メインコンテンツにスキップ

このバージョンは誤った内容を含んでいる可能性があります。最新の承認済みスナップショットに切り替えてください。

必要な工具と部品

  1. この手順は未翻訳です。 翻訳を手伝う。

    : 手順 1、 2の画像 1 : 手順 1、 2の画像 2
    • Loosen the exhaust strap:

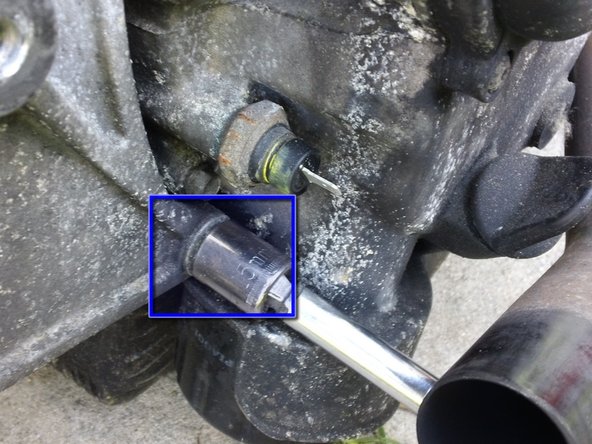
    • Use an 12mm wrench to loosen the exhaust band lock nut.

    • A 6mm Allen key is required to unscrew the bolt at the bottom of the band.

    • The Allen bolt is screwed into a loose nut in a cavity cast into the swing arm. It may fall out or become twisted. A magnet is helpful in retrieving it to re-align it for reassembly.

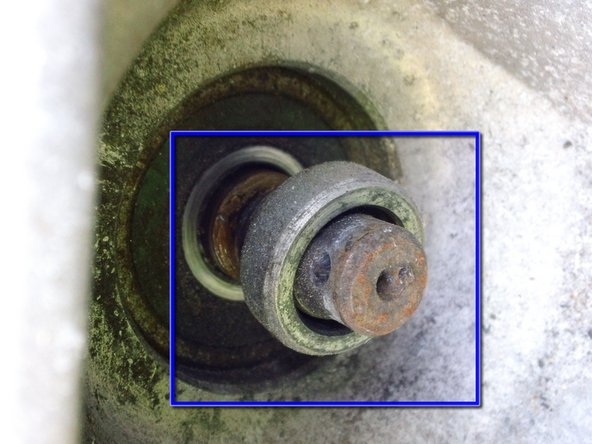
    • Once the bottom of the strap is loose, you can push it upward and slide the retaining pin that secures the top of the strap out to release it.

  2. この手順は未翻訳です。 翻訳を手伝う。

    : 手順 2、 1の画像 1
    • Use a 13mm socket to loosen the clamp between the muffler and header pipe.

    • You do not need to remove the bolt, but you want to loosen the clamp enough to allow the exhaust to be removed without damaging the gasket between the muffler and header pipe.

  3. この手順は未翻訳です。 翻訳を手伝う。

    : 手順 3、 1の画像 1
    • A Torx T40 driver is required to remove the final bolt securing the exhaust.

    • The Exhaust assembly is now free. Pull and wiggle the muffler back (taking care not to damage your exhaust joint gasket) until the muffler comes free from the header pipe.

  4. この手順は未翻訳です。 翻訳を手伝う。

    : 手順 4、 2の画像 1 : 手順 4、 2の画像 2
    • Remove the 15mm nut securing the upper front corner of the swingarm.

    • Remove the 15mm nut securing the lower front corner of the swing arm.

    • Access to this nut is limited by the header pipe. A swivel extension maybe required to reach it.

  5. この手順は未翻訳です。 翻訳を手伝う。

    : 手順 5、 1の画像 1
    • Straighten and remove the cotter pin securing the rear hub nut cover.

    • Don't worry about damaging the cotter pin. It is intended to be replaced each time it is removed.

    • Remove the cover from the rear hub nut.

  6. この手順は未翻訳です。 翻訳を手伝う。

    : 手順 6、 2の画像 1 : 手順 6、 2の画像 2
    • Remove the 24mm rear hub nut. Having a friend hold the rear brake handle will help break it loose. You can also use an impact wrench to remove it if you cannot get enough torque with a hand ratchet.

    • There is a spacer behind the rear hub nut. It will slide off with little or no force.

    • There is a spacer behind the rear hub nut. It will slide off with little or no force.

  7. この手順は未翻訳です。 翻訳を手伝う。

    : 手順 7、 1の画像 1
    • Grip the swingarm and pull it free of the 2 15mm studs and rear axle. You will now have access to the rear wheel.

    • and dont forget to remove 2 allen screws from shocks absorber and tilt it to remove swingers and tyre

ゴール

2 の人々がこのガイドを完成させました。

作成者

3人の作成者と共同で作成されました。

Eric Essen

メンバー登録日: 06/04/10

17,804 ポイント

8のガイドは作成済み

チーム

iFixit iFixit人のメンバー

Staff

135 メンバー

16,817のガイドは作成済み

0 件のコメント

コメントを追加

統計データ:

過去 24時間: 1

過去 7 日: 2

過去 30 日: 10

今までの合計 4,237