メインコンテンツにスキップ

このバージョンは誤った内容を含んでいる可能性があります。最新の承認済みスナップショットに切り替えてください。

必要な工具と部品

  1. この手順は未翻訳です。 翻訳を手伝う。

    : 手順 1、 1の画像 1
    • Place your device upside down and locate the battery compartment.

    • Find the Phillips head screw securing the battery cover in the bottom right hand corner of the device.

    • Loosen the screw enough to remove the battery cover but leave the screw in the cover for reassembly.

    • Use only a Phillips screwdriver to remove screw.

  2. この手順は未翻訳です。 翻訳を手伝う。

    : 手順 2、 1の画像 1
    • Slowly remove the battery cover with the iFixit opening tool.

    • Make sure to remove the cover carefully to keep from losing Phillips screw in the cover. It will be needed for reassembly.

  3. この手順は未翻訳です。 翻訳を手伝う。

    : 手順 3、 2の画像 1 : 手順 3、 2の画像 2
    • Use the iFixit opening tool to carefully pry the battery out of the case.

    • After the old battery is removed replace it with a new battery facing the same direction as when the cover was opened.

    • For some devices, you may be able to remove the battery by flipping the DS over and letting the battery fall into your hand.

  4. この手順は未翻訳です。 翻訳を手伝う。

    : 手順 4、 1の画像 1
    • Remove the following seven screws that secure the lower case to the DS Lite:

    • Three silver tri-wing screws (5mm long)

    • One black tri-wing screw (4mm)

    • Two gold Phillips screws (4mm)

    • One silver Phillips screw (3mm)

    • Do not remove the silver PH screw (3mm) in the battery compartment yet. It holds the main PCB in place.

  5. この手順は未翻訳です。 翻訳を手伝う。

    : 手順 5、 1の画像 1
    • On the front edge of the Nintendo DS between the headphone jack plug and volume controls remove the plastic insert (or cartridge) from the lower slot (Slot 2).

  6. この手順は未翻訳です。 翻訳を手伝う。

    : 手順 6、 2の画像 1 : 手順 6、 2の画像 2
    • Flip the unit over so that it is facing right-side up.

    • Use a spudger to pry open the gap between the bottom case and the front panel. Work all the way around the case until the panel is free.

    • Avoid touching the L and R shoulder buttons, because they easily detach and are difficult to reassemble. Keep the bottom case flat against your workbench to help hold the shoulder buttons in place.

  7. この手順は未翻訳です。 翻訳を手伝う。

    : 手順 7、 3の画像 1 : 手順 7、 3の画像 2 : 手順 7、 3の画像 3
    • Carefully separate the two pieces by hand.

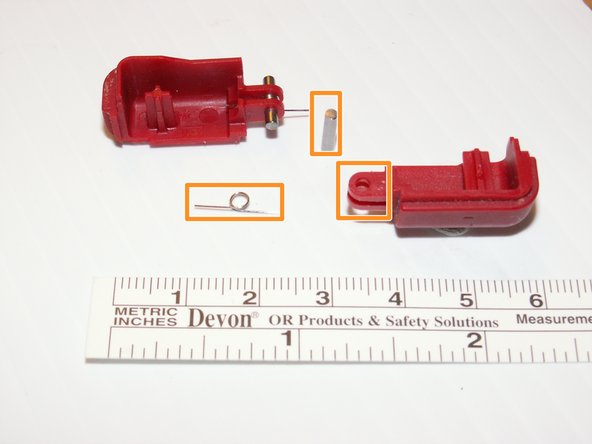
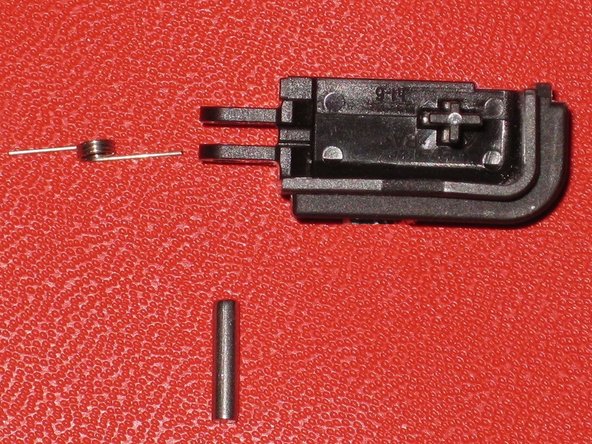
    • The two shoulder buttons are made up of three pieces -- the plastic button, a pin, and a spring. If they accidentally pop out while you are working, study the picture and make sure you put the spring in the correct position.

    • When reassembling the cover, make sure that the power switch caver on the bottom case is in the off (down) position to avoid breakage.

ゴール

10 の人々がこのガイドを完成させました。

作成者

24人の作成者と共同で作成されました。

Brittany K

メンバー登録日: 01/21/10

1,484 ポイント

4のガイドは作成済み

チーム

Cal Poly, Team 16-30, Maness Winter 2010 Cal Poly, Team 16-30, Maness Winter 2010人のメンバー

CPSU-MANESS-W10S16G30

4 メンバー

24のガイドは作成済み

5 件のコメント

Not bad tutorial but I want to complain a little bit. Could you add more flashlights when you take photos of dark objects? It would make this tutorial more pleasant for viewing.

Clayton Simpson - 返信

Thank you my ds gave up last night and I want to open it and have a look 👀

Rom - 返信

This tutorial worked great for me! My sons DS got wet and I was able to successfully open and dry it out. Cleaned up with alcohol and it’s running better than ever. Grateful for you!

Angela Schlagenhaft - 返信

The tri-point Y1 screwdriver is not working for me. I have tried both Y000 and Y1.

Michael Sam - 返信

Same, I just bought the Y1 triwing screwdriver here with a digitizer for the ds lite and the screwdriver is too big.

Ian Swift -

コメントを追加

統計データ:

過去 24時間: 5

過去 7 日: 41

過去 30 日: 247

今までの合計 13,704