メインコンテンツにスキップ

Disassembling KDDI Kyocera A5521K Keyboard

必要な工具と部品

  1. Disassembling KDDI Kyocera A5521K Keyboard, Disassembling KDDI Kyocera A5521K Battery: 手順 1、 3の画像 1 Disassembling KDDI Kyocera A5521K Keyboard, Disassembling KDDI Kyocera A5521K Battery: 手順 1、 3の画像 2 Disassembling KDDI Kyocera A5521K Keyboard, Disassembling KDDI Kyocera A5521K Battery: 手順 1、 3の画像 3
    • Turn the phone over to expose the battery cover.

    • Apply pressure to the back of the battery cover to slide it down.

    • The battery cover is now separate from the phone.

  2. Disassembling KDDI Kyocera A5521K Keyboard: 手順 2、 3の画像 1 Disassembling KDDI Kyocera A5521K Keyboard: 手順 2、 3の画像 2 Disassembling KDDI Kyocera A5521K Keyboard: 手順 2、 3の画像 3
    • Remove the battery by pushing it up and out from the bottom.

    • The battery, cover, and phone should now be separated.

  3. Disassembling KDDI Kyocera A5521K Keyboard, Back Plate: 手順 3、 2の画像 1 Disassembling KDDI Kyocera A5521K Keyboard, Back Plate: 手順 3、 2の画像 2
    • Remove the four screws with the Y0 screwdriver.

  4. Disassembling KDDI Kyocera A5521K Keyboard: 手順 4、 2の画像 1 Disassembling KDDI Kyocera A5521K Keyboard: 手順 4、 2の画像 2
    • Remove the black, rubber screw caps towards the top of the back of the phone to reveal two additional screws.

    • Remove the two screws with a Y0 screwdriver.

  5. Disassembling KDDI Kyocera A5521K Keyboard: 手順 5、 3の画像 1 Disassembling KDDI Kyocera A5521K Keyboard: 手順 5、 3の画像 2 Disassembling KDDI Kyocera A5521K Keyboard: 手順 5、 3の画像 3
    • Rotate the phone 180 degrees.

    • Carefully separate the back plate from the remainder of the phone.

    • The back plate should now be detached from the rest of the phone.

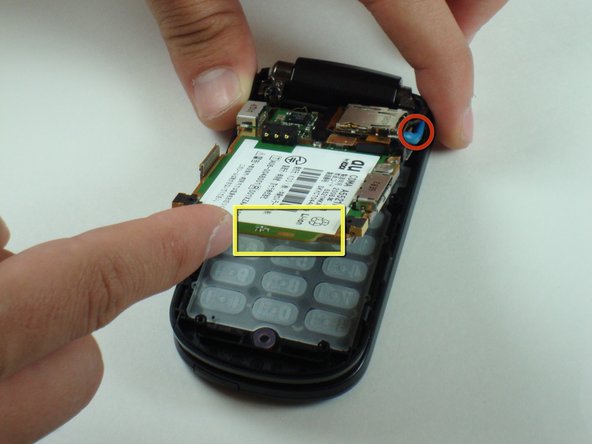
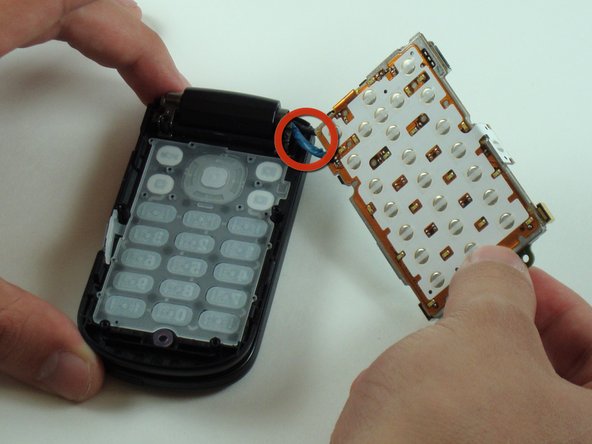
  6. Disassembling KDDI Kyocera A5521K Keyboard, Keyboard: 手順 6、 3の画像 1 Disassembling KDDI Kyocera A5521K Keyboard, Keyboard: 手順 6、 3の画像 2 Disassembling KDDI Kyocera A5521K Keyboard, Keyboard: 手順 6、 3の画像 3
    • Lift up the bottom of the logic board.

    • Carefully remove the logic board from the lower half of the phone.

    • The logic board is connected to the remainder of the phone by two cables at the upper right corner indicated by the red circle. Do not damage the cables.

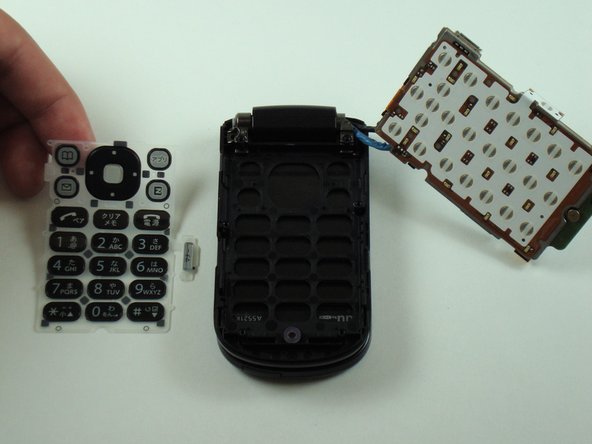
  7. Disassembling KDDI Kyocera A5521K Keyboard: 手順 7、 2の画像 1 Disassembling KDDI Kyocera A5521K Keyboard: 手順 7、 2の画像 2
    • Gently lift the keyboard up with a spudger.

    • The keyboard is now separate from the remainder of the phone and can be easily removed.

終わりに

To reassemble your device, follow these instructions in reverse order.

作成者

4人の作成者と共同で作成されました。

Dominic Grisafe

メンバー登録日: 04/15/10

157 ポイント

10のガイドは作成済み

チーム

Cal Poly, Team 28-25, Regan Spring 2010 Cal Poly, Team 28-25, Regan Spring 2010人のメンバー

CPSU-REGAN-S10S28G25

4 メンバー

20のガイドは作成済み

0 件のコメント

コメントを追加

統計データ:

過去 24時間: 0

過去 7 日: 2

過去 30 日: 4

今までの合計 1,322