メインコンテンツにスキップ

Disassembling HP Compaq NC6120 Laptop

必要な工具と部品

  1. Disassembling HP Compaq NC6120 Laptop, Disassembling HP Compaq NC6120 Laptop: 手順 1、 3の画像 1 Disassembling HP Compaq NC6120 Laptop, Disassembling HP Compaq NC6120 Laptop: 手順 1、 3の画像 2 Disassembling HP Compaq NC6120 Laptop, Disassembling HP Compaq NC6120 Laptop: 手順 1、 3の画像 3
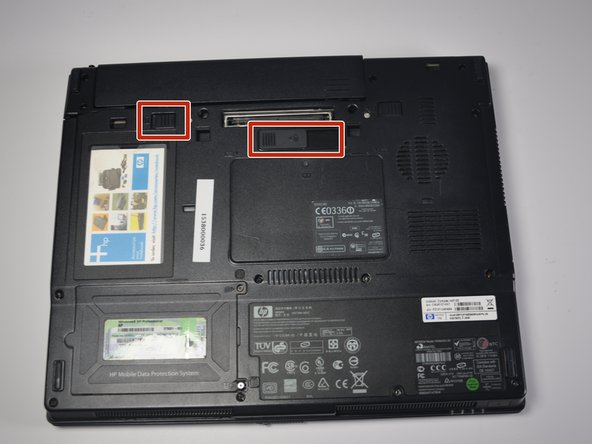
    • Flip laptop so the backside is facing upwards.

    • Pull the two plastic switches at the top of the backside of the computer outwards, and remove the battery.

  2. Disassembling HP Compaq NC6120 Laptop: 手順 2、 2の画像 1 Disassembling HP Compaq NC6120 Laptop: 手順 2、 2の画像 2
    • Remove all 13 screws from the back panel of the computer (includes the two torx screws under the battery and the two under the ram memory panel).

    • Remove the four screws at the hinge of the computer (also attaching the back panel to the rest of the computer).

    • All screws are 9.8mm 3.0 flatheads except for the two under the battery which are T9 torx.

  3. Disassembling HP Compaq NC6120 Laptop: 手順 3、 2の画像 1 Disassembling HP Compaq NC6120 Laptop: 手順 3、 2の画像 2
    • Open up the laptop so that the screen is facing towards you. Push the monitor back until it is flat, parallel to the keyboard.

  4. Disassembling HP Compaq NC6120 Laptop: 手順 4、 2の画像 1 Disassembling HP Compaq NC6120 Laptop: 手順 4、 2の画像 2
    • Using the iFixit opening tool, remove the plastic panel located between the keyboard and monitor. It should pop off easily with the spudger and can then be pulled away.

  5. Disassembling HP Compaq NC6120 Laptop: 手順 5、 2の画像 1 Disassembling HP Compaq NC6120 Laptop: 手順 5、 2の画像 2
    • Remove the white cable attached to the just-removed plastic panel from the motherboard.

  6. Disassembling HP Compaq NC6120 Laptop: 手順 6、 2の画像 1 Disassembling HP Compaq NC6120 Laptop: 手順 6、 2の画像 2
    • Flip the keyboard away from the monitor, rotating it so that the keys are face down on the mousepad. Remove the black cord at the bottom of the keyboard that connects it to the motherboard. The keyboard is now free and can be removed.

  7. Disassembling HP Compaq NC6120 Laptop: 手順 7、 3の画像 1 Disassembling HP Compaq NC6120 Laptop: 手順 7、 3の画像 2 Disassembling HP Compaq NC6120 Laptop: 手順 7、 3の画像 3
    • Remove the two 9.8mm 3.0 flathead screws. There is one at each of the hinges.

  8. Disassembling HP Compaq NC6120 Laptop: 手順 8、 3の画像 1 Disassembling HP Compaq NC6120 Laptop: 手順 8、 3の画像 2 Disassembling HP Compaq NC6120 Laptop: 手順 8、 3の画像 3
    • Unplug the black cable with rectangular white plastic head from the motherboard. It is located at the top left of the motherboard, directly below the left hinge.

  9. Disassembling HP Compaq NC6120 Laptop: 手順 9、 2の画像 1 Disassembling HP Compaq NC6120 Laptop: 手順 9、 2の画像 2
    • Pull the monitor directly upwards from where it lay. The two metal hinges should easily slide out of their holes and the monitor will be disconnected from the motherboard.

  10. Disassembling HP Compaq NC6120 Laptop: 手順 10、 3の画像 1 Disassembling HP Compaq NC6120 Laptop: 手順 10、 3の画像 2 Disassembling HP Compaq NC6120 Laptop: 手順 10、 3の画像 3
    • Using the iFixit opening tool, pry the black plastic panel (with mousepad) off of the motherboard.

  11. Disassembling HP Compaq NC6120 Laptop: 手順 11、 3の画像 1 Disassembling HP Compaq NC6120 Laptop: 手順 11、 3の画像 2 Disassembling HP Compaq NC6120 Laptop: 手順 11、 3の画像 3
    • Unplug the white cord connecting the mousepad to the motherboard from the motherboard, and pull off the entire plastic panel.

終わりに

To reassemble your device, follow these instructions in reverse order.

8 の人々がこのガイドを完成させました。

作成者

6人の作成者と共同で作成されました。

Mateo Cuellar

メンバー登録日: 04/08/15

601 ポイント

4のガイドは作成済み

チーム

Cal Poly, Team 17-4, Forte Spring 2015 Cal Poly, Team 17-4, Forte Spring 2015人のメンバー

CPSU-FORTE-S15S17G4

3 メンバー

6のガイドは作成済み

コメント 1 件

bravo j'ai bien reussi

merci

Zitouni Lebrieki - 返信

コメントを追加

統計データ:

過去 24時間: 3

過去 7 日: 19

過去 30 日: 51

今までの合計 9,177