はじめに
These instructions show you how to disassemble the BRAUN cruZer6 hair and beard trimmer type 5417 and replace the battery. Make sure you have all the necessary tools and spare parts ready before you start. It is also a good opportunity to clean the inside of the appliance.
必要な工具と部品
-
-
Remove the trimmer head.
-
Remove the two Torx T5 screws attaching the cover to the hand-piece.
-
Remove the cover.
-
-
-
-
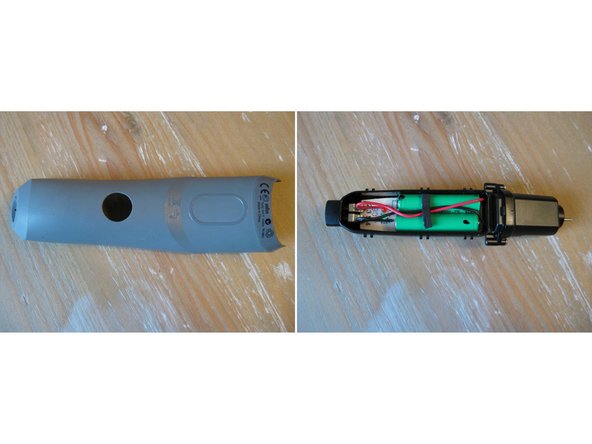
Remove the back cover.
-
Using a flat head screw driver, remove the single screw holding the power board in place.
-
Use compressed air to clean the motor. Lubricate the trimmer with a suitable lubricant.
-
Remove the two AAA batteries by de-soldering them with a soldering iron and de-soldering pump.
-
Bend the terminals of the new batteries and solder them back in the right direction
-
Insert the board again, with the side towards the motor first
-
-
-
Remove the front cover of the device.
-
Clean and lubricate this area thoroughly as well, then your device will run better.
-


To reassemble your device, follow the above steps in reverse order.
To reassemble your device, follow the above steps in reverse order.
23 の人々がこのガイドを完成させました。
以下の翻訳者の皆さんにお礼を申し上げます:
100%


これらの翻訳者の方々は世界を修理する私たちのサポートをしてくれています。 あなたも貢献してみませんか?
翻訳を始める ›
7 件のコメント
Your guide saved me from purchasing a new device.
After replacing the batteries it works again like a charm!
Thanks this was helpful. The Braun Series 3 Hair Clipper HC3050 has a VERY similar design. Some additional notes: After removing the screws, it takes a bit of force to get the back separated from the front. I had to gently pry it apart with a screw driver. The very inside is slightly different, but same concept.
Die Anleitung war sehr hilfreich.
Der Austausch der Batterien ging ziemlich gut.
I think one pcc— 1.2 V 1800 mah AA battary
Thank you! Another appliance reborn :)
It really helps to work around consumerism with such shared knowledge!
Keep it up 👍