メインコンテンツにスキップ

Digital2 D2-861G Speaker Replacement

必要な工具と部品

  1. Digital2 D2-861G Speaker Replacement, Battery: 手順 1、 1の画像 1
    • Working on your device while powered on may result in electric shock. Make sure to unplug and power down your device before you begin.

    • Place your device on a soft cloth to avoid scratching the screen.

    • Flip your device over so back panel is facing upwards

  2. Digital2 D2-861G Speaker Replacement: 手順 2、 2の画像 1 Digital2 D2-861G Speaker Replacement: 手順 2、 2の画像 2
    • Do not use a lot of force as it can break the clips or the back panel.

    • Insert spudger in the slot below the micro SD card

    • You should hear clips releasing as you pry along the edges.

    • With the spudger tool, run along the edges of the backing undoing 20 plastic clips.

  3. Digital2 D2-861G Speaker Replacement: 手順 3、 3の画像 1 Digital2 D2-861G Speaker Replacement: 手順 3、 3の画像 2 Digital2 D2-861G Speaker Replacement: 手順 3、 3の画像 3
    • Look at the images to locate the black tabs.

    • Carefully remove the tape to avoid damaging the device.

    • Remove ALL the yellow tape securing the gold colored ZIF (Zero insertion force) connector and the battery. Discard or save the tape if you would like.

    • To unclip the connector. Go under the black tab with a spudger or finger nail and simply lift up.

  4. Digital2 D2-861G Speaker Replacement: 手順 4、 2の画像 1 Digital2 D2-861G Speaker Replacement: 手順 4、 2の画像 2
    • Make sure to not bend or puncture the battery when removing it.

    • Locate the bundled cable connector and disconnect it by simply pulling it gently with your hands or using a spudger.

    • Use prying tools to carefully break the adhesive under the battery

  5. Digital2 D2-861G Speaker Replacement, Speaker: 手順 5、 2の画像 1 Digital2 D2-861G Speaker Replacement, Speaker: 手順 5、 2の画像 2
    • Be sure to have a magnetic mat or anything magnetic to hold your screws!

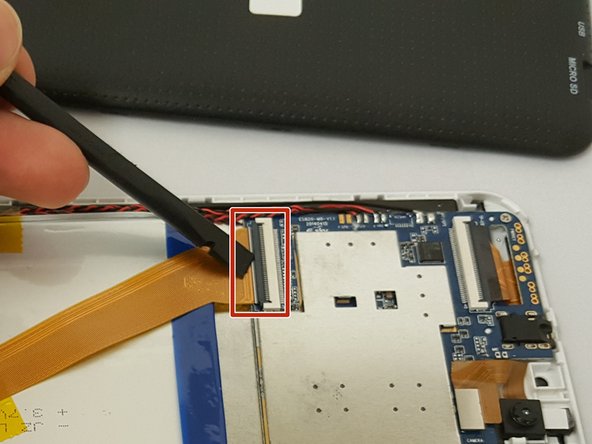
    • Now that you have removed the battery, proceed to removing the two 3.51mm screws with your Phillips #00 Screwdriver.

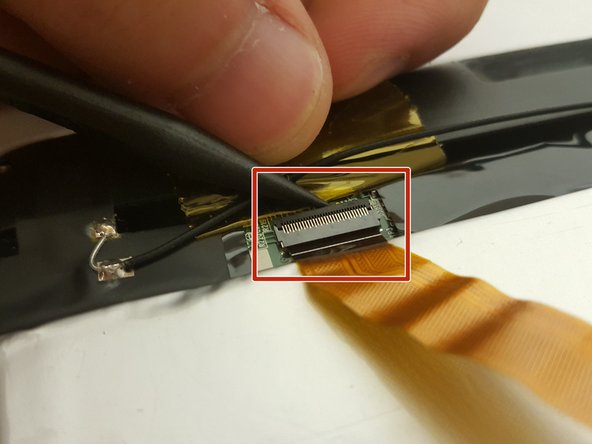
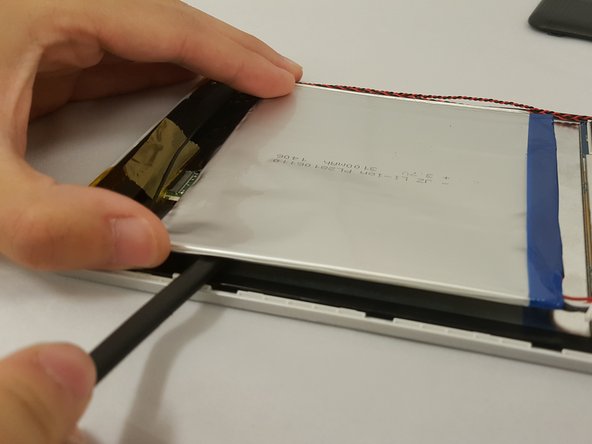
    • Carefully lift the casing and pull back the tape along with the soldered wire.

    • You can remove the soldered wire if you want or leave it connected. Refer to iFixit's はんだ付けとはんだ除去の作業ガイド guide.

  6. Digital2 D2-861G Speaker Replacement: 手順 6、 1の画像 1
終わりに

To reassemble your device, follow these instructions in reverse order.

作成者

4人の作成者と共同で作成されました。

Eduardo Duran

メンバー登録日: 09/29/16

600 ポイント

5のガイドは作成済み

チーム

Eastern Washington University, Team 1-3, Crane Fall 2016 Eastern Washington University, Team 1-3, Crane Fall 2016人のメンバー

EWU-CRANE-F16S1G3

3 メンバー

6のガイドは作成済み

0 件のコメント

コメントを追加

統計データ:

過去 24時間: 0

過去 7 日: 0

過去 30 日: 0

今までの合計 121