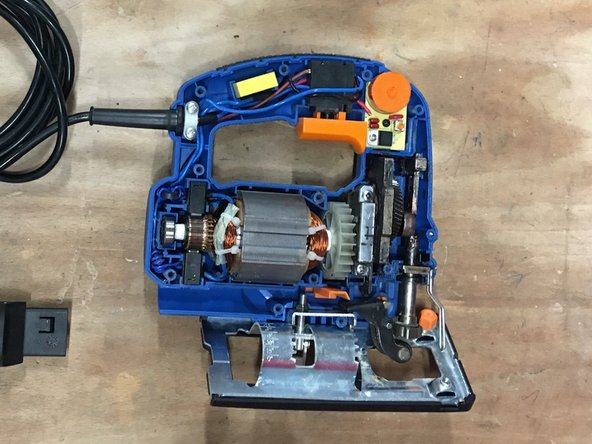
メインコンテンツにスキップ

Dexter 750W Corded Jigsaw Motor Replacement

必要な工具と部品

  1. Dexter 750W Corded Jigsaw Motor Replacement, Unplug: 手順 1、 1の画像 1
    • Before you begin, remember to disconnect the mains plug.

  2. Dexter 750W Corded Jigsaw Motor Replacement: 手順 2、 1の画像 1
    • Remove the vacuum adapter from the back of the device.

  3. Dexter 750W Corded Jigsaw Motor Replacement: 手順 3、 2の画像 1 Dexter 750W Corded Jigsaw Motor Replacement: 手順 3、 2の画像 2
    • Using a screwdriver or screwdriver, unscrew and open the device.

    • Unlock the tray by lifting the lever.

    • Use needle nose pliers and remove the clip located next to the blade holder.

    • Remove the blade holder, keeping the slider at the end of the holder.

  4. Dexter 750W Corded Jigsaw Motor Replacement: 手順 6、 1の画像 1
    • Unscrew the two screws and set them aside.

    • Remove the two carbons located next to the stator.

    • Lift the stator, then lever out the motor.

  5. Dexter 750W Corded Jigsaw Motor Replacement: 手順 9、 1の画像 1
    • Put the new motor back in its place.

  6. Dexter 750W Corded Jigsaw Motor Replacement: 手順 10、 2の画像 1 Dexter 750W Corded Jigsaw Motor Replacement: 手順 10、 2の画像 2
    • Collect the end cap on the old engine.

    • Put it back on the new motor.

    • Put some grease on the tip.

  7. Dexter 750W Corded Jigsaw Motor Replacement: 手順 11、 1の画像 1
    • Replace the two screws to stabilize the motor.

    • Return the blade holder to its location

    • Make sure you put each piece in its place.

    • Replace the staple in the same location. The curved side of the staple should go to the rounded side of the bracket.

    • Lubricate the whole

    • Make sure you put each piece in its place.

  8. Dexter 750W Corded Jigsaw Motor Replacement: 手順 14、 2の画像 1 Dexter 750W Corded Jigsaw Motor Replacement: 手順 14、 2の画像 2
    • Put the coals back in their places.

  9. Dexter 750W Corded Jigsaw Motor Replacement: 手順 15、 1の画像 1
    • Before closing, lubricate each gear.

  10. Dexter 750W Corded Jigsaw Motor Replacement: 手順 16、 1の画像 1
    • Close and screw the device.

終わりに

follow guide through or in reverse to reassemble

以下の翻訳者の皆さんにお礼を申し上げます:

fr en

100%

HelloMacOSさんは世界中で修理する私たちを助けてくれています! あなたも貢献してみませんか?
翻訳を始める ›

作成者

1人の作成者と共同作成されました。

Céline Chemineau

メンバー登録日: 01/29/20

16,608 ポイント

95のガイドは作成済み

チーム

Leroy Merlin Leroy Merlin人のメンバー

Community

37 メンバー

239のガイドは作成済み

0 件のコメント

コメントを追加

統計データ:

過去 24時間: 0

過去 7 日: 3

過去 30 日: 14

今までの合計 508