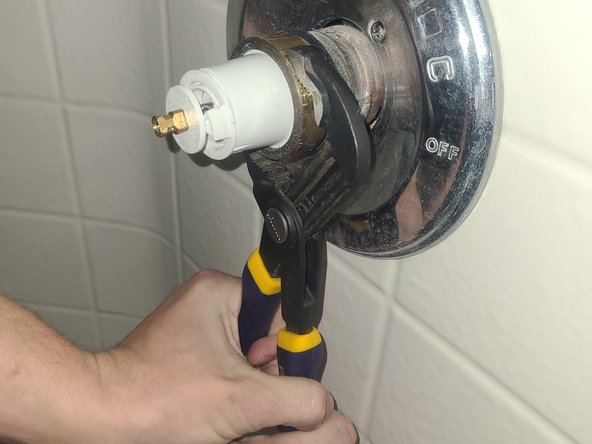
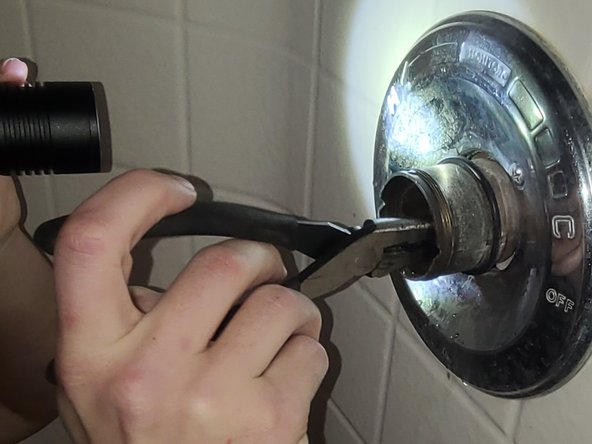
メインコンテンツにスキップ

Delta Shower Handle Cartridge Replacement

必要な工具と部品

  1. Delta Shower Handle Cartridge Replacement, Shower Handle Cartridge: 手順 1、 3の画像 1 Delta Shower Handle Cartridge Replacement, Shower Handle Cartridge: 手順 1、 3の画像 2 Delta Shower Handle Cartridge Replacement, Shower Handle Cartridge: 手順 1、 3の画像 3
    • Turn off the water supply to the house by turning the knob seen here to the off position.

    • This can be done with a water shut off key or a pair of pliers.

    • This style of knob has 2 holes that line up when it is in the off position.

  2. Delta Shower Handle Cartridge Replacement: 手順 2、 3の画像 1 Delta Shower Handle Cartridge Replacement: 手順 2、 3の画像 2 Delta Shower Handle Cartridge Replacement: 手順 2、 3の画像 3
    • Loosen the small bolt seen here in order to remove the shower handle.

    • A hex key will likely be needed, sizes may vary.

  3. Delta Shower Handle Cartridge Replacement: 手順 3、 2の画像 1 Delta Shower Handle Cartridge Replacement: 手順 3、 2の画像 2
    • Remove the metal sleeve by grasping with one hand and pulling towards your body.

  4. Delta Shower Handle Cartridge Replacement: 手順 4、 2の画像 1 Delta Shower Handle Cartridge Replacement: 手順 4、 2の画像 2
    • Remove the metal ring using a pair of channel lock pliers and twisting counter clockwise.

  5. Delta Shower Handle Cartridge Replacement: 手順 5、 2の画像 1 Delta Shower Handle Cartridge Replacement: 手順 5、 2の画像 2
    • Insert your flathead screwdriver into a slot on either the top or bottom of the cartridge, this will give you something to help wedge the cartridge out.

    • While using the screwdriver, use your hand to wiggle the cartridge up and down to help in the removal process.

  6. Delta Shower Handle Cartridge Replacement: 手順 6、 3の画像 1 Delta Shower Handle Cartridge Replacement: 手順 6、 3の画像 2 Delta Shower Handle Cartridge Replacement: 手順 6、 3の画像 3
    • Check the inside of the pipe to ensure the old cartridge did not break or leave any small pieces behind.

    • Remove any pieces left behind with a pair of needle nose pliers.

  7. Delta Shower Handle Cartridge Replacement: 手順 7、 1の画像 1
    • Do one last double check for any objects that will interfere with the installation of the new cartridge.

  8. Delta Shower Handle Cartridge Replacement: 手順 8、 2の画像 1 Delta Shower Handle Cartridge Replacement: 手順 8、 2の画像 2
    • Use plumbers silicone grease to add a lubricant to the O-rings of the new cartridge.

    • Use your finger to evenly distribute the grease over the entire O-ring.

  9. Delta Shower Handle Cartridge Replacement: 手順 9、 2の画像 1 Delta Shower Handle Cartridge Replacement: 手順 9、 2の画像 2
    • There will be an identifier to show which side of the cartridge is the "hot side". This side should be installed facing the pipe that your hot water comes from.

  10. Delta Shower Handle Cartridge Replacement: 手順 10、 3の画像 1 Delta Shower Handle Cartridge Replacement: 手順 10、 3の画像 2 Delta Shower Handle Cartridge Replacement: 手順 10、 3の画像 3
    • Line up the notches on the cartridge and the pipe when inserting the new cartridge.

    • Firmly press the cartridge into the pipe until the notches have fully met.

    • Thread the metal ring over the cartridge and onto the pipe.

    • This can be done by rotating the metal ring clockwise once it has been met with the threads of the pipe.

    • You may not be able to push the cartridge all the way so the notches touch. If this happens then use the metal ring to push the cartridge the rest of the way.

終わりに

To reassemble your device, follow steps 1 - 4 in reverse order.

ある他の人がこのガイドを完成しました。

作成者

2人の作成者と共同で作成されました。

Jared Singleton

メンバー登録日: 02/21/22

202 ポイント

1ガイドが承認済み

チーム

University of North Texas, Team 1-8, Smith Spring 2022 University of North Texas, Team 1-8, Smith Spring 2022人のメンバー

UNT-SMITH-S22S1G8

2 メンバー

2のガイドは作成済み

0 件のコメント

コメントを追加

統計データ:

過去 24時間: 7

過去 7 日: 52

過去 30 日: 355

今までの合計 10,678