メインコンテンツにスキップ

Dell XPS 15 9560 Motherboard Replacement

必要な工具と部品

  1. Dell XPS 15 9560 Motherboard Replacement, Back Panel: 手順 1、 1の画像 1
    • Using a T5 Torx screwdriver, remove ten 4.0 mm screws from the back panel of the laptop.

  2. Dell XPS 15 9560 Motherboard Replacement: 手順 2、 1の画像 1
    • Using a Phillips #2 screwdriver, remove two 5.0 mm screws underneath the XPS badge door.

  3. Dell XPS 15 9560 Motherboard Replacement: 手順 3、 1の画像 1
    • Wedge the scribe between the backplate and remove the bottom base cover.

  4. Dell XPS 15 9560 Motherboard Replacement, Battery: 手順 4、 1の画像 1
    • Using a T5 Torx screwdriver, remove the six 4.0 mm screws.

  5. Dell XPS 15 9560 Motherboard Replacement: 手順 5、 1の画像 1
    • Unplug the battery cable.

  6. Dell XPS 15 9560 Motherboard Replacement: 手順 6、 1の画像 1
    • Remove the battery.

  7. Dell XPS 15 9560 Motherboard Replacement, Hard Drive: 手順 7、 1の画像 1
    • Using a Phillips #0 screwdriver, remove four 4.0 mm screws of the hard drive bracket.

    • Unplug the hard drive cable.

  8. Dell XPS 15 9560 Motherboard Replacement: 手順 8、 1の画像 1
    • Remove the hard drive bracket. Then, unplug and remove the hard drive.

  9. Dell XPS 15 9560 Motherboard Replacement, Solid State Drive (SSD): 手順 9、 1の画像 1
    • Using a Phillips #2 screwdriver, remove a single 3.0 mm screw from the SSD bracket.

  10. Dell XPS 15 9560 Motherboard Replacement: 手順 10、 1の画像 1
    • Using the same Phillips #2 screwdriver, unscrew and remove one 2.0 mm wafer screw from the SSD bracket.

  11. Dell XPS 15 9560 Motherboard Replacement: 手順 11、 1の画像 1
    • Pull out and separate the SSD bracket and SSD, replacing the old SSD with a new one.

  12. Dell XPS 15 9560 Motherboard Replacement, Wireless Card: 手順 12、 1の画像 1
    • Using the Phillips #2 screwdriver, remove the single 4.0 mm screw securing the wireless card base to the motherboard.

  13. Dell XPS 15 9560 Motherboard Replacement: 手順 13、 1の画像 1
    • Disconnect the wireless card cables from the wireless card.

  14. Dell XPS 15 9560 Motherboard Replacement: 手順 14、 1の画像 1
    • Slide the wireless card out of its slot.

  15. Dell XPS 15 9560 Motherboard Replacement, Fans: 手順 15、 1の画像 1
    • Using a T5 Torx screwdriver, remove two 4.0 mm screws.

  16. Dell XPS 15 9560 Motherboard Replacement: 手順 16、 1の画像 1
    • Unplug the fan cable.

  17. Dell XPS 15 9560 Motherboard Replacement: 手順 17、 1の画像 1
    • Carefully remove the left-side fan.

  18. Dell XPS 15 9560 Motherboard Replacement: 手順 18、 1の画像 1
    • Using a T5 Torx screwdriver, remove two 4.0 mm screws.

    • Unplug the fan cable.

  19. Dell XPS 15 9560 Motherboard Replacement: 手順 19、 1の画像 1
    • Remove the right-side fan.

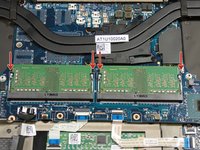
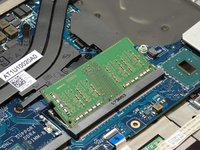
  20. Dell XPS 15 9560 Motherboard Replacement, RAM: 手順 20、 2の画像 1 Dell XPS 15 9560 Motherboard Replacement, RAM: 手順 20、 2の画像 2
    • Pull the metal clips surrounding the RAM stick outward.

    • The RAM will pop out.

    • Remove the RAM stick from the device.

  21. Dell XPS 15 9560 Motherboard Replacement, Motherboard: 手順 21、 1の画像 1
    • Using a screwdriver, unscrew one 5.0 mm Torx T5 bracket screw.

    • Remove the bracket and unplug and loosen the LCD cable.

  22. Dell XPS 15 9560 Motherboard Replacement: 手順 22、 1の画像 1
    • Using a T5 Torx screwdriver, remove ten 4.0 mm screws securing the motherboard to the device.

  23. Dell XPS 15 9560 Motherboard Replacement: 手順 23、 1の画像 1
    • From right to left, unplug the bottom motherboard cables, DC jack cable, speaker cable.

  24. Dell XPS 15 9560 Motherboard Replacement: 手順 24、 1の画像 1
    • Remove the motherboard.

終わりに

To reassemble your device, follow these instructions in reverse order.

作成者

4人の作成者と共同で作成されました。

Jada Houser

メンバー登録日: 09/28/21

790 ポイント

7のガイドは作成済み

チーム

Clemson, Team 4-5, Hunter Fall 2021 Clemson, Team 4-5, Hunter Fall 2021人のメンバー

CLEM-HUNTER-F21S4G5

4 メンバー

15のガイドは作成済み

0 件のコメント

コメントを追加

統計データ:

過去 24時間: 5

過去 7 日: 30

過去 30 日: 84

今までの合計 3,661