はじめに
このガイドでは、Dell XPS 13でSSDを交換する方法を示します。古いSSDが機能する場合は、交換する前に必ず完全なバックアップを作成するか、ドライブのクローンを作成してください。このガイドによって大容量ドライブにアップグレードしたり、障害のあるドライブを交換できます。 空のSSDをインストールする場合、修復が完了したらWindows(またはお好みのOS)を再インストールする必要があります。
必要な工具と部品
-
-
-
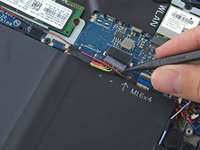
バッテリーのケーブルコネクタをバッテリー側に向けて引き抜いて、ソケットから接続を外します。
-
コネクタが固くて外れない場合は、片側を少し押し出してから、反対側も同じように押し出します。
-
コネクターがうまく抜けない場合は、スパッジャーの先端でコネクターのくぼみを軽く押して、コネクターをスライドさせて抜きます。
-
ディスプレイを開き、電源ボタンを5秒間長押しして、放電します。
-


デバイスを再組み立てする際は、このインストラクションを逆の順番に従って作業を進めてください。
デバイスを再組み立てする際は、このインストラクションを逆の順番に従って作業を進めてください。
28 の人々がこのガイドを完成させました。
以下の翻訳者の皆さんにお礼を申し上げます:
100%


これらの翻訳者の方々は世界を修理する私たちのサポートをしてくれています。 あなたも貢献してみませんか?
翻訳を始める ›
14 件のコメント
I’m kinda new on pc upgrading. So once I install a new m.2 I’ll need to install a new window 10 right
Yes, you have to install windows again. or you can clone your existing ssd onto the new one using some adapters easily found online
You will have to reinstall unless you are buying a samsung m.2 which comes with a disk duplicator utility. The xps 13 cames with a samsung early life evo disk (128GB) and transferring from 1 evo to another is very easy with the app. I believe its the same with every disk though I havent tried the latter.
Dell has some nice recovery tools:
https://www.dell.com/support/kbdoc/en-us...
I downloaded a recovery image to use from a USB drive. I am using it to reinstall the Windows that came with the PC. You don't have to be the original owner but you do need to have the Dell asset number usually stored in the bios
https://www.laptopmag.com/articles/upgra...
helpful resource