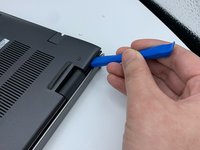
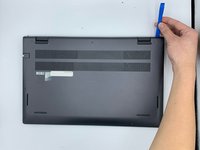
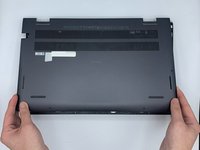
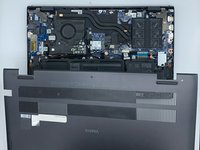
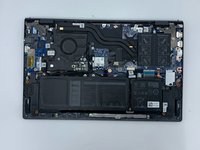
メインコンテンツにスキップ

Dell Vostro 5510 Back Cover Replacement

必要な工具と部品

  1. Dell Vostro 5510 Back Cover Replacement, Back Cover: 手順 1、 1の画像 1
    • Power off your laptop before beginning disassembly.

    • Place the laptop so the bottom cover is facing upwards.

  2. Dell Vostro 5510 Back Cover Replacement: 手順 2、 1の画像 1
    • Remove the remaining (M2x4mm) screws with the screwdriver.

    • Loosen the two captive (M2x7.5mm) corner screws with the screwdriver.

  3. Dell Vostro 5510 Back Cover Replacement: 手順 3、 3の画像 1 Dell Vostro 5510 Back Cover Replacement: 手順 3、 3の画像 2 Dell Vostro 5510 Back Cover Replacement: 手順 3、 3の画像 3
    • Pry open the top left corner of the cover with the opening tool.

    • Pry open the top right corner of the cover with the opening tool.

    • Pry the rest of the cover with the opening tool, working in a clockwise motion until it is completely loosened.

  4. Dell Vostro 5510 Back Cover Replacement: 手順 4、 3の画像 1 Dell Vostro 5510 Back Cover Replacement: 手順 4、 3の画像 2 Dell Vostro 5510 Back Cover Replacement: 手順 4、 3の画像 3
    • Lift the cover to remove it from the rest of the laptop.

終わりに

To reassemble your device, follow these instructions in reverse order.

ある他の人がこのガイドを完成しました。

作成者

1人の作成者と共同作成されました。

Ky Vang

メンバー登録日: 09/28/21

378 ポイント

3のガイドは作成済み

チーム

University of North Texas, Team 3-5, Saru Jimmy Spring 2023 University of North Texas, Team 3-5, Saru Jimmy Spring 2023人のメンバー

UNT-SARU JIMMY-S23S3G5

4 メンバー

6のガイドは作成済み

0件のガイドコメント

コメントを追加

統計データ:

過去 24時間: 0

過去 7 日: 5

過去 30 日: 13

今までの合計 390