はじめに
Use this guide to replace a broken battery on your Dell Latitude E7270 or to safely remove and replace other components without causing further damage.
The battery is the power bank that gives power to each component in the computer. After time they become inefficient or incapable of holding a charge at all. A bad battery can also get extremely hot under normal use. This can cause your computer to shut off without warning.
Before using this guide, check out the troubleshooting page to see if your symptoms match any that represent a bad battery.
You can also use this guide to upgrade the battery instead of using the original battery.
This replacement requires a #00 Phillips head screwdriver.
NOTE: This guide requires removal of the back panel and includes the extra prerequisite guide steps.
必要な工具と部品
-
-
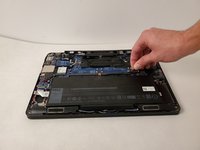
Place the device top down in front of you so that the vents are visible and are furthest from the user.
-
-
-
-
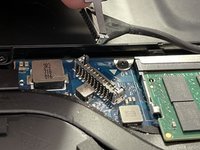
Remove the three M2.5 X 5MM screws, located above the battery, with a Phillips #00 screwdriver.
-


To reassemble your device, follow these instructions in reverse order.
To reassemble your device, follow these instructions in reverse order.
3 の人々がこのガイドを完成させました。

チーム

Embry-Riddle Aeronautical University, Team S16-G5, Branham Spring 2020 Embry-Riddle Aeronautical University, Team S16-G5, Branham Spring 2020人のメンバー
ERAU-BRANHAM-S20S16G5
3 メンバー
6のガイドは作成済み
1件のガイドコメント
On Step 4 there is no screw on middle since that hole is for backpanel center screw.