メインコンテンツにスキップ

Dell Latitude 7390 Fan Replacement

必要な工具と部品

  1. Dell Latitude 7390 Fan Replacement, Bottom Panel: 手順 1、 1の画像 1
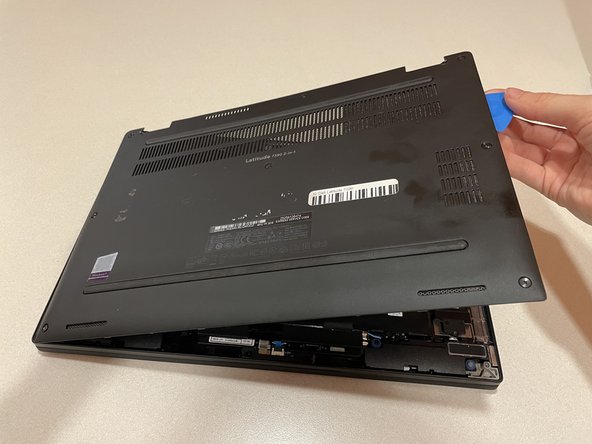
    • Orient your Dell Latitude 7390 laptop so that it is facing towards you as if you're going to open it.

  2. Dell Latitude 7390 Fan Replacement: 手順 2、 3の画像 1 Dell Latitude 7390 Fan Replacement: 手順 2、 3の画像 2 Dell Latitude 7390 Fan Replacement: 手順 2、 3の画像 3
    • Flip your laptop over so that the bottom is facing up.

  3. Dell Latitude 7390 Fan Replacement: 手順 3、 1の画像 1
    • Using your Phillips #1 screwdriver, remove the eight 6 mm screws around the border of the bottom panel.

  4. Dell Latitude 7390 Fan Replacement: 手順 4、 2の画像 1 Dell Latitude 7390 Fan Replacement: 手順 4、 2の画像 2
    • Using an opening tool or picks, work your way around the periphery and pry the back case off.

  5. Dell Latitude 7390 Fan Replacement: 手順 5、 1の画像 1
    • Finally, lift the back panel off to uncover the inside of your Dell Latitude 7390.

  6. Dell Latitude 7390 Fan Replacement, Battery: 手順 6、 1の画像 1
    • Make sure the laptop is turned OFF and unplugged from the power adapter before taking the battery out.

    • Use the Phillips #1 screwdriver to remove the five 6 mm screws holding the battery in place along the edges of the battery.

  7. Dell Latitude 7390 Fan Replacement: 手順 7、 3の画像 1 Dell Latitude 7390 Fan Replacement: 手順 7、 3の画像 2 Dell Latitude 7390 Fan Replacement: 手順 7、 3の画像 3
    • Be careful not to break the connector by pulling too hard on the black tab.

    • Pull the black tab on the top of the connector to unplug the battery from the motherboard.

  8. Dell Latitude 7390 Fan Replacement: 手順 8、 1の画像 1
    • Carefully lift the battery out of the laptop.

  9. Dell Latitude 7390 Fan Replacement, Fan: 手順 9、 1の画像 1
    • Remove the five black screws holding the fan and heatsink in place using the Phillips #0 screwdriver.

  10. Dell Latitude 7390 Fan Replacement: 手順 10、 1の画像 1
    • Use tweezers or your fingers to disconnect the fan connector.

  11. Dell Latitude 7390 Fan Replacement: 手順 11、 1の画像 1
    • Remove the fan from the case.

終わりに

To reassemble your device, follow these instructions in reverse order.

3 の人々がこのガイドを完成させました。

作成者

3人の作成者と共同で作成されました。

Glennjay Elayda

メンバー登録日: 02/22/22

246 ポイント

2のガイドは作成済み

チーム

Clemson, Team 1-4, Hunter Spring 2022 Clemson, Team 1-4, Hunter Spring 2022人のメンバー

CLEM-HUNTER-S22S1G4

5 メンバー

5のガイドは作成済み

0 件のコメント

コメントを追加

統計データ:

過去 24時間: 6

過去 7 日: 18

過去 30 日: 61

今までの合計 2,453