この翻訳は機械によって生成されたものであり、まだ人間による校正は行われていません。 日本語を話せますか? レビューはこちらから。

Dell Latitude 5521 メモリの交換

Michael Engle とその他
最終更新日: 2026年8月3日
閲覧: 1138
統計データ:
- 過去24時間:
- 1
- 過去7日:
- 14
- 過去30日:
- 48
- 今までの合計
- 1,138
コメント: 1
1件のガイドコメント
修理ガイドのコメントへ完了済み: 0 1
誰もこのガイドで修理を「完了」させていません。あなたが一番目になりませんか?
1人のユーザーがこのガイドを使って修理を「完了」させました。あなたもその一人です!素晴らしいです!
お気に入り: 0 1
誰もこのガイドをお気に入りに登録していません。一番最初の登録者になりませんか?
1人がこのガイドをお気に入りに登録しています。あなたもそのうちの一人です!
箇条書き!
マークアップやブレットの色や形を変えてコーディネートしてみるとこのガイドをより見やすくできます。
コミュニティメンバーによる寄稿ガイド
iFixitコミュニティーの素晴らしいメンバーがこのガイドを作成しました。iFixitスタッフによって作成されたものではありません。
文法の修正
あなたの中にある日本語能力を呼び起こし、このガイドの文法に磨きをかけましょう。
必要な工具と部品
ツール
-
Spudger4.9


-
-
-
ケースの底面にある9本の拘束プラスネジ(#0)を緩めます。
-
スパッジャーを使って、慎重にベースカバーをこじ開けて外します。内部の部品を傷つけないよう注意しながら、ゆっくりとケースの周りに沿って進めます。
-
取り外すと、ケース内部の部品にアクセスできるようになります。
 FixBotに聞いてみる
-
-
-
-
-
-
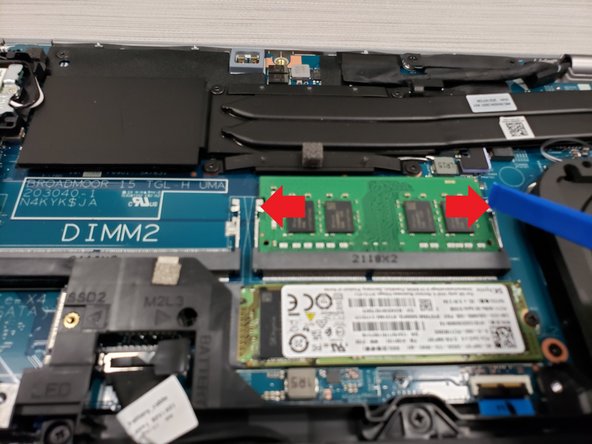
メインボード上のメモリを見つけます。
-
メモリの両端にある固定クリップを、メモリから離れる方向に軽く押します。両方のクリップを押すと、メモリが自動的に跳ね上がります。
-
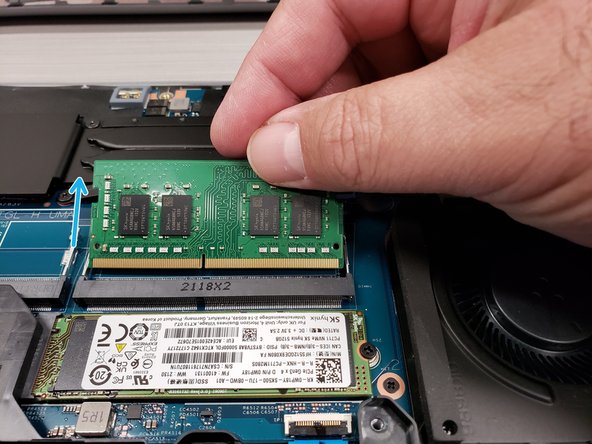
メインボードからメモリを引き抜きます。
-
-




デバイスを再組み立てするには、これらのインストラクションを逆の順番に従って作業を進めてください。

1件のガイドコメント
Thanks, this helped me! I noted a few things:
1.some of the screws are a little hard to get out, I think because they have lock-tite, it acts as a retainer. They had to be pulled while also unscrewing.
2.I used the iFixit bladed halberd, to pry of the case without breaking the clips. I know it's not as common of a tool, but the ultra thing blade worked well to disengage the clips gently.
3. My single 16GB DIMM wasn't cutting it. All physical memory was exhausted by the time I booted and loaded one Office file. I added a 4GB PC4-2666MHZ I had lying around, and it worked. Mixing and matching isn't recommended, but it worked in my case. Hopefully now I have some breathing room for running apps. PC/Mac vendors should stop selling units with 16GB or less. It simply isn't enough for a modern Mac or Windows (but does work fine for Linux).
