メインコンテンツにスキップ

Dell Inspiron N4010 Top Cover Replacement

必要な工具と部品

  1. Dell Inspiron N4010 Top Cover Replacement, Battery: 手順 1、 1の画像 1
    • Make sure the laptop is not plugged into any wall outlets or the charger

    • Unlock the battery by sliding the right-hand switch to the right.

  2. Dell Inspiron N4010 Top Cover Replacement: 手順 2、 2の画像 1 Dell Inspiron N4010 Top Cover Replacement: 手順 2、 2の画像 2
    • While holding the left-hand switch to the left position, pull the battery away from the laptop.

  3. Dell Inspiron N4010 Top Cover Replacement: 手順 3、 1の画像 1
    • The battery is now fully removed and the laptop will not power on without it.

  4. Dell Inspiron N4010 Top Cover Replacement, Keyboard: 手順 4、 3の画像 1 Dell Inspiron N4010 Top Cover Replacement, Keyboard: 手順 4、 3の画像 2 Dell Inspiron N4010 Top Cover Replacement, Keyboard: 手順 4、 3の画像 3
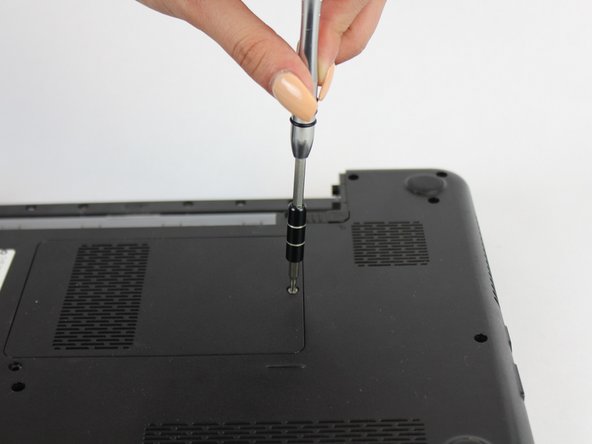
    • Using the #0 Philips head, unscrew the indicated screw.

    • Carefully pull the RAM cover up and away.

  5. Dell Inspiron N4010 Top Cover Replacement: 手順 5、 1の画像 1
    • Unscrew the indicated 5.7mm screw beneath the RAM Cover.

    • Remove another screw above the battery release tab

  6. Dell Inspiron N4010 Top Cover Replacement: 手順 7、 2の画像 1 Dell Inspiron N4010 Top Cover Replacement: 手順 7、 2の画像 2
    • Using a thin plastic tool (such as a guitar pick or spudger) at the top of the keyboard just above the F7 key, gently pry the keyboard away.

    • Move the spudger to either end at the top of the keyboard to fully undo all plastic clips.

  7. Dell Inspiron N4010 Top Cover Replacement: 手順 8、 2の画像 1 Dell Inspiron N4010 Top Cover Replacement: 手順 8、 2の画像 2
    • Carefully tip the keyboard upwards and pull it slightly away from the body of the laptop.

    • Be careful not to put stress on the ribbon cable below.

  8. Dell Inspiron N4010 Top Cover Replacement: 手順 9、 2の画像 1 Dell Inspiron N4010 Top Cover Replacement: 手順 9、 2の画像 2
    • Carefully unclip the ribbon cable by tipping the keyboard towards the screen.

    • The keyboard is now completely disconnected.

  9. Dell Inspiron N4010 Top Cover Replacement, Top Cover: 手順 10、 2の画像 1 Dell Inspiron N4010 Top Cover Replacement, Top Cover: 手順 10、 2の画像 2
    • Remove the indicated 5.7mm screws.

    • Remove the smaller 3mm screws from underneath the battery compartment.

  10. Dell Inspiron N4010 Top Cover Replacement: 手順 11、 2の画像 1 Dell Inspiron N4010 Top Cover Replacement: 手順 11、 2の画像 2
    • With a plastic spudger, pry away the silver top cover from the black casing.

    • Move the tool to the right and left along the seams to fully disconnect the cover.

  11. Dell Inspiron N4010 Top Cover Replacement: 手順 12、 1の画像 1
    • Disconnect the indicated ribbon cables underneath where the keyboard sits.

  12. Dell Inspiron N4010 Top Cover Replacement: 手順 13、 1の画像 1
    • Lift the cover upwards and away from the body of the laptop, after removing the optical drive and unscrewing the three screws on the right

終わりに

To reassemble your device, follow these instructions in reverse order.

作成者

2人の作成者と共同で作成されました。

Jonathan Sellier

メンバー登録日: 09/26/17

952 ポイント

7のガイドは作成済み

チーム

USF Tampa, Team S13-G5, Boczar Fall 2017 USF Tampa, Team S13-G5, Boczar Fall 2017人のメンバー

USFT-BOCZAR-F17S13G5

5 メンバー

9のガイドは作成済み

0 件のコメント

コメントを追加

統計データ:

過去 24時間: 1

過去 7 日: 1

過去 30 日: 2

今までの合計 703