メインコンテンツにスキップ

Dell Inspiron Mini 1012: Keyboard Replacement

必要な工具と部品

  1. Dell Inspiron Mini 1012: Keyboard Replacement, Keyboard: 手順 1、 1の画像 1
    • Remove the battery

  2. Dell Inspiron Mini 1012: Keyboard Replacement: 手順 2、 1の画像 1
    • Using a Philip's head screwdriver, remove three screws: one directly below the battery and the other two to the right and the left of the two battery lock switches

  3. Dell Inspiron Mini 1012: Keyboard Replacement: 手順 3、 2の画像 1 Dell Inspiron Mini 1012: Keyboard Replacement: 手順 3、 2の画像 2
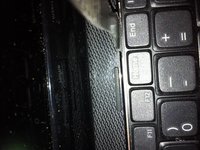
    • At the top of the keyboard, insert the metal spudger between the keyboard's metal frame and the body of the laptop as shown

    • When inserting the metal spudger, be sure to place the spudger under the frame and not under a key to avoid damaging the component

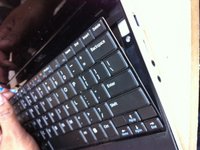
    • Gently lift up the keyboard starting at the top of the frame

    • Make sure that you do not damage the ribbon attached to the bottom of the keyboard

  4. Dell Inspiron Mini 1012: Keyboard Replacement: 手順 4、 1の画像 1
    • Pull the clear tab at the end of the ribbon towards the hard drive to detach the ribbon

    • Perform steps one through four in reverse order with your new keyboard to finish the replacement process

ゴール

4 の人々がこのガイドを完成させました。

作成者

2人の作成者と共同で作成されました。

Marie K Bordley

メンバー登録日: 09/30/14

241 ポイント

2のガイドは作成済み

チーム

Ohio State, Team 1-1, Buehl Fall 2014 Ohio State, Team 1-1, Buehl Fall 2014人のメンバー

OSU-BUEHL-F14S1G1

4 メンバー

4のガイドは作成済み

コメント 1 件

After keyboard open, You can change HDD or Memory as you like.

최희욱 - 返信

コメントを追加

統計データ:

過去 24時間: 0

過去 7 日: 1

過去 30 日: 4

今までの合計 3,259