メインコンテンツにスキップ

Dell Inspiron M5110 Hard Drive Replacement

必要な工具と部品

  1. Dell Inspiron M5110 Hard Drive Replacement, Hard Drive: 手順 1、 1の画像 1
    • Shut down the computer and turn it upside down.

  2. Dell Inspiron M5110 Hard Drive Replacement: 手順 2、 1の画像 1
    • Slide both of the battery release latches on the bottom of the device in towards the center of the computer.

  3. Dell Inspiron M5110 Hard Drive Replacement: 手順 3、 1の画像 1
    • Slide and lift the battery up and out from the device.

  4. Dell Inspiron M5110 Hard Drive Replacement: 手順 4、 2の画像 1 Dell Inspiron M5110 Hard Drive Replacement: 手順 4、 2の画像 2
    • Remove the 5 mm Phillips # 0 screw in the middle of the device.

  5. Dell Inspiron M5110 Hard Drive Replacement: 手順 5、 1の画像 1
    • Remove the module cover pressing in the release tabs and pulling the cover up and away from the base of the device.

  6. Dell Inspiron M5110 Hard Drive Replacement: 手順 6、 2の画像 1 Dell Inspiron M5110 Hard Drive Replacement: 手順 6、 2の画像 2
    • Insert a small screwdriver into the hole and slide the optical drive away from the center of the device. This will slide the optical assembly out from the side of the device.

  7. Dell Inspiron M5110 Hard Drive Replacement: 手順 7、 1の画像 1
    • Slide the optical drive assembly the rest of the way out of the device.

  8. Dell Inspiron M5110 Hard Drive Replacement: 手順 8、 1の画像 1
    • Flip the laptop over and open it to reveal the keyboard.

    • Open the computer and push the screen back as far as possible.

  9. Dell Inspiron M5110 Hard Drive Replacement: 手順 9、 1の画像 1
    • Slide a plastic opening tool into the slots on the top of the keyboard.

  10. Dell Inspiron M5110 Hard Drive Replacement: 手順 10、 1の画像 1
    • Pry the keyboard away from the device using the plastic opening tool.

  11. Dell Inspiron M5110 Hard Drive Replacement: 手順 11、 1の画像 1
    • Lift and slide the keyboard towards the screen to remove the tabs on the keyboard from the slots on the palmrest.

  12. Dell Inspiron M5110 Hard Drive Replacement: 手順 12、 1の画像 1
    • Flip the keyboard over and place it on the front of the device making sure not to pull out the keyboard cable.

  13. Dell Inspiron M5110 Hard Drive Replacement: 手順 13、 1の画像 1
    • Lift up the connector latch and remove the keyboard cable. The keyboard is now free from the device.

  14. Dell Inspiron M5110 Hard Drive Replacement: 手順 14、 1の画像 1
    • Turn the computer over and remove the twelve 5 mm Phillips # 0 screws on the back of the device.

  15. Dell Inspiron M5110 Hard Drive Replacement: 手順 15、 1の画像 1
    • Turn the computer over and open the display as far as possible and remove the four 5 mm Phillips # 0 screw holding the palmrest in place.

  16. Dell Inspiron M5110 Hard Drive Replacement: 手順 16、 2の画像 1 Dell Inspiron M5110 Hard Drive Replacement: 手順 16、 2の画像 2
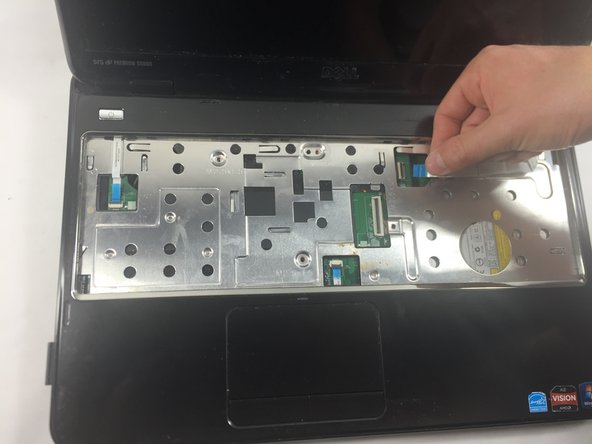
    • Disconnect the power button board cable, touch pad cable and the hot key board cable from the connectors.

  17. Dell Inspiron M5110 Hard Drive Replacement: 手順 17、 2の画像 1 Dell Inspiron M5110 Hard Drive Replacement: 手順 17、 2の画像 2
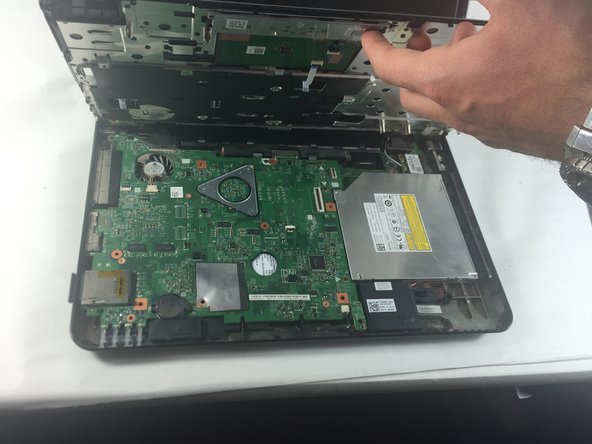
    • Use a plastic opening tool to carefully pry out the palmrest assembly and lift it off the computer base.

  18. Dell Inspiron M5110 Hard Drive Replacement: 手順 18、 1の画像 1
    • Unscrew the five 5 mm Phillips # 0 screws located in the red circles, found on the system board.

  19. Dell Inspiron M5110 Hard Drive Replacement: 手順 19、 2の画像 1 Dell Inspiron M5110 Hard Drive Replacement: 手順 19、 2の画像 2
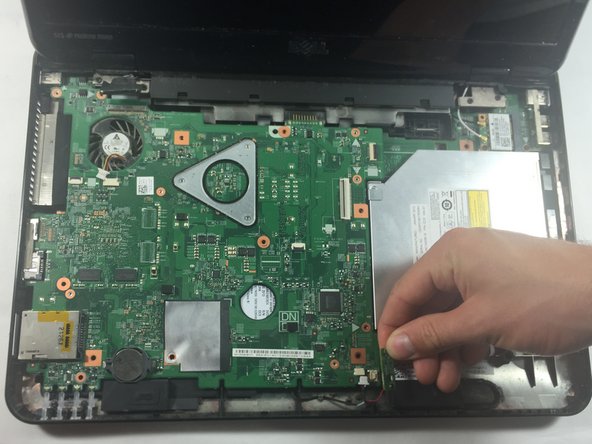
    • Unplug the small, green, rectangular Bluetooth receptor chip attached towards the bottom right hand corner of the system board.

    • Grasp the chip by placing your forefinger under the chip and thumb on the top, lightly pulling the chip upwards away from the device.

  20. Dell Inspiron M5110 Hard Drive Replacement: 手順 20、 2の画像 1 Dell Inspiron M5110 Hard Drive Replacement: 手順 20、 2の画像 2
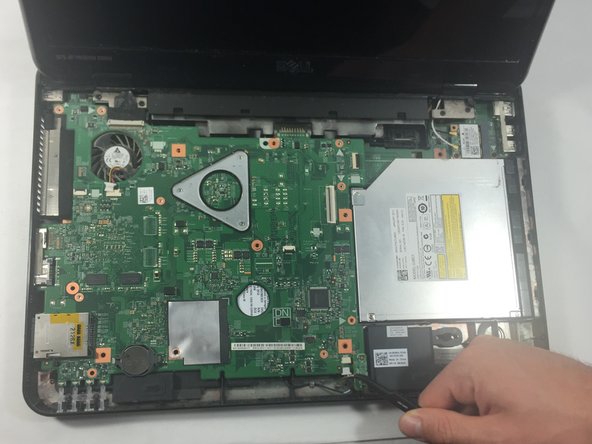
    • Unplug the small white cable connected to the speaker in the lower right hand corner of the device.

    • Use tweezers to unplug the cable if it is hard to remove by hand or if you cannot grasp it.

  21. Dell Inspiron M5110 Hard Drive Replacement: 手順 21、 2の画像 1 Dell Inspiron M5110 Hard Drive Replacement: 手順 21、 2の画像 2
    • Disconnect the black and white antenna cables from the Mini Card.

  22. Dell Inspiron M5110 Hard Drive Replacement: 手順 22、 1の画像 1
    • Unplug the rectangular black LCD cable attached to the system board towards the upper left hand corner.

  23. Dell Inspiron M5110 Hard Drive Replacement: 手順 23、 2の画像 1 Dell Inspiron M5110 Hard Drive Replacement: 手順 23、 2の画像 2
    • Remove the SD card by pressing the SD card slot, on the side of the device, inside the device until you hear a click. Then release your pressure on the slot then gently slide the SD card out.

  24. Dell Inspiron M5110 Hard Drive Replacement: 手順 24、 2の画像 1 Dell Inspiron M5110 Hard Drive Replacement: 手順 24、 2の画像 2
    • There are two 5 mm Phillips # 0 screws on each hinge.

    • Unscrew the four 5 mm Phillips # 0 screws holding the hinge that keeps the monitor in place.

  25. Dell Inspiron M5110 Hard Drive Replacement: 手順 25、 3の画像 1 Dell Inspiron M5110 Hard Drive Replacement: 手順 25、 3の画像 2 Dell Inspiron M5110 Hard Drive Replacement: 手順 25、 3の画像 3
    • Remove the monitor carefully.

    • Pull up and away on the black hinge cover with moderate force to release from the device.

  26. Dell Inspiron M5110 Hard Drive Replacement: 手順 26、 3の画像 1 Dell Inspiron M5110 Hard Drive Replacement: 手順 26、 3の画像 2 Dell Inspiron M5110 Hard Drive Replacement: 手順 26、 3の画像 3
    • Remove the system board from the laptop.

    • Disconnect the two minor boards, the VGA/Power Board on the left, and the I/O Board on the right, attatched to the system board.

    • Flip the system board over revealing the fan compartment and the hard drive.

  27. Dell Inspiron M5110 Hard Drive Replacement: 手順 27、 1の画像 1
    • Remove the two 5 mm Phillips # 0 screws holding in place the hard drive.

  28. Dell Inspiron M5110 Hard Drive Replacement: 手順 28、 1の画像 1
    • Pull gently on the end of the hard drive that is farthest away from the fan, it will come out easily.

終わりに

To reassemble your device, follow these instructions in reverse order.

5 の人々がこのガイドを完成させました。

作成者

1人の作成者と共同作成されました。

Larain

メンバー登録日: 10/26/16

387 ポイント

3のガイドは作成済み

チーム

UMass Dartmouth, Team 4-3, Catania Fall 2016 UMass Dartmouth, Team 4-3, Catania Fall 2016人のメンバー

UMASSD-CATANIA-F16S4G3

3 メンバー

8のガイドは作成済み

コメント 1 件

Thanks, a perfect manual,

Jo Henkens - 返信

コメントを追加

統計データ:

過去 24時間: 1

過去 7 日: 2

過去 30 日: 4

今までの合計 2,776