メインコンテンツにスキップ

Dell Inspiron 3521 CMOS Battery Replacement

必要な工具と部品

  1. Dell Inspiron 3521 CMOS Battery Replacement, Remove the Battery: 手順 1、 3の画像 1 Dell Inspiron 3521 CMOS Battery Replacement, Remove the Battery: 手順 1、 3の画像 2 Dell Inspiron 3521 CMOS Battery Replacement, Remove the Battery: 手順 1、 3の画像 3
    • Make sure laptop is turned off and unplugged.

    • Turn over the laptop, and push in the clips to take out the battery.

  2. Dell Inspiron 3521 CMOS Battery Replacement, Remove Surface Cover: 手順 2、 3の画像 1 Dell Inspiron 3521 CMOS Battery Replacement, Remove Surface Cover: 手順 2、 3の画像 2 Dell Inspiron 3521 CMOS Battery Replacement, Remove Surface Cover: 手順 2、 3の画像 3
    • Remove the screws to take off the surface cover.

    • Make sure to keep small screws organized in Step 2 and all subsequent steps to make reassembly easier.

  3. Dell Inspiron 3521 CMOS Battery Replacement, Remove Hard Drive: 手順 3、 3の画像 1 Dell Inspiron 3521 CMOS Battery Replacement, Remove Hard Drive: 手順 3、 3の画像 2 Dell Inspiron 3521 CMOS Battery Replacement, Remove Hard Drive: 手順 3、 3の画像 3
    • Remove screws securing the hard drive

    • Remove hard drive by pulling on the tab to slide it out.

  4. Dell Inspiron 3521 CMOS Battery Replacement, Remove Memory Card: 手順 4、 3の画像 1 Dell Inspiron 3521 CMOS Battery Replacement, Remove Memory Card: 手順 4、 3の画像 2 Dell Inspiron 3521 CMOS Battery Replacement, Remove Memory Card: 手順 4、 3の画像 3
    • Remove the memory card by pressing on the latches on either side.

  5. Dell Inspiron 3521 CMOS Battery Replacement, Remove Optical Drive: 手順 5、 2の画像 1 Dell Inspiron 3521 CMOS Battery Replacement, Remove Optical Drive: 手順 5、 2の画像 2
    • Remove the screws securing the optical drive, then slide out the optical drive.

  6. Dell Inspiron 3521 CMOS Battery Replacement, Remove All Screws on the Back: 手順 6、 1の画像 1
    • Remove all remaining screws on the back.

  7. Dell Inspiron 3521 CMOS Battery Replacement, Remove Keyboard: 手順 7、 3の画像 1 Dell Inspiron 3521 CMOS Battery Replacement, Remove Keyboard: 手順 7、 3の画像 2 Dell Inspiron 3521 CMOS Battery Replacement, Remove Keyboard: 手順 7、 3の画像 3
    • Turn computer over and open it.

    • Carefully pry off keyboard using spudger.

    • Be careful not to damage ribbon cable while removing the keyboard.

  8. Dell Inspiron 3521 CMOS Battery Replacement, Disconnect Ribbon Cable: 手順 8、 3の画像 1 Dell Inspiron 3521 CMOS Battery Replacement, Disconnect Ribbon Cable: 手順 8、 3の画像 2 Dell Inspiron 3521 CMOS Battery Replacement, Disconnect Ribbon Cable: 手順 8、 3の画像 3
    • Remove the ribbon cable by pulling up on the tab where it is attached, then slide it out.

  9. Dell Inspiron 3521 CMOS Battery Replacement, Unplug Smaller Ribbon Cable: 手順 9、 3の画像 1 Dell Inspiron 3521 CMOS Battery Replacement, Unplug Smaller Ribbon Cable: 手順 9、 3の画像 2 Dell Inspiron 3521 CMOS Battery Replacement, Unplug Smaller Ribbon Cable: 手順 9、 3の画像 3
    • Unplug the smaller ribbon cable by pulling up on the tab where it is attached, then slide it out.

  10. Dell Inspiron 3521 CMOS Battery Replacement, Unplug Motherboard Cable: 手順 10、 3の画像 1 Dell Inspiron 3521 CMOS Battery Replacement, Unplug Motherboard Cable: 手順 10、 3の画像 2 Dell Inspiron 3521 CMOS Battery Replacement, Unplug Motherboard Cable: 手順 10、 3の画像 3
    • Unplug the motherboard cable by pulling up on the tab where it is attached, then slide it out.

  11. Dell Inspiron 3521 CMOS Battery Replacement, Remove All Screws from Palm Rest: 手順 11、 1の画像 1
    • Remove all screws from palm rest

  12. Dell Inspiron 3521 CMOS Battery Replacement, Remove Palm Rest: 手順 12、 3の画像 1 Dell Inspiron 3521 CMOS Battery Replacement, Remove Palm Rest: 手順 12、 3の画像 2 Dell Inspiron 3521 CMOS Battery Replacement, Remove Palm Rest: 手順 12、 3の画像 3
    • Remove palm rest by carefully prying it off with a spudger.

  13. Dell Inspiron 3521 CMOS Battery Replacement, Unplug White Ribbon Cable: 手順 13、 2の画像 1 Dell Inspiron 3521 CMOS Battery Replacement, Unplug White Ribbon Cable: 手順 13、 2の画像 2
    • Unplug the white ribbon cable by pulling up on the tab where it is attached, then slide it out.

  14. Dell Inspiron 3521 CMOS Battery Replacement, Remove Connecting Cable: 手順 14、 3の画像 1 Dell Inspiron 3521 CMOS Battery Replacement, Remove Connecting Cable: 手順 14、 3の画像 2 Dell Inspiron 3521 CMOS Battery Replacement, Remove Connecting Cable: 手順 14、 3の画像 3
    • Gently pull out the connecting cable.

  15. Dell Inspiron 3521 CMOS Battery Replacement, Unplug the Black and White Cables from Wi-Fi Chip: 手順 15、 2の画像 1 Dell Inspiron 3521 CMOS Battery Replacement, Unplug the Black and White Cables from Wi-Fi Chip: 手順 15、 2の画像 2
    • Unplug the black and white cables connected to the Wi-Fi chip.

  16. Dell Inspiron 3521 CMOS Battery Replacement, Remove Screen: 手順 16、 2の画像 1 Dell Inspiron 3521 CMOS Battery Replacement, Remove Screen: 手順 16、 2の画像 2
    • Disconnect screen by removing all remaining screws.

  17. Dell Inspiron 3521 CMOS Battery Replacement, Remove Wi-Fi Chip: 手順 17、 2の画像 1 Dell Inspiron 3521 CMOS Battery Replacement, Remove Wi-Fi Chip: 手順 17、 2の画像 2
    • Remove screws securing the Wi-Fi chip, then remove Wi-Fi chip.

  18. Dell Inspiron 3521 CMOS Battery Replacement, Unplug Connecting Cables on Motherboard: 手順 18、 2の画像 1 Dell Inspiron 3521 CMOS Battery Replacement, Unplug Connecting Cables on Motherboard: 手順 18、 2の画像 2
    • Locate and disconnect connecting cables on motherboard.

  19. Dell Inspiron 3521 CMOS Battery Replacement, Remove Motherboard: 手順 19、 2の画像 1 Dell Inspiron 3521 CMOS Battery Replacement, Remove Motherboard: 手順 19、 2の画像 2
    • Remove the remaining screws securing the motherboard to remove it.

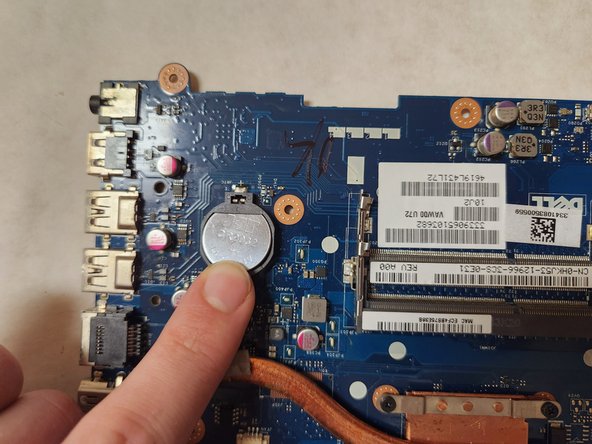
  20. Dell Inspiron 3521 CMOS Battery Replacement, Remove CMOS Battery: 手順 20、 3の画像 1 Dell Inspiron 3521 CMOS Battery Replacement, Remove CMOS Battery: 手順 20、 3の画像 2 Dell Inspiron 3521 CMOS Battery Replacement, Remove CMOS Battery: 手順 20、 3の画像 3
    • Flip over motherboard and locate CMOS battery

    • Pry off battery with spudger.

  21. Dell Inspiron 3521 CMOS Battery Replacement, Replace CMOS Battery: 手順 21、 2の画像 1 Dell Inspiron 3521 CMOS Battery Replacement, Replace CMOS Battery: 手順 21、 2の画像 2
    • Place new CMOS battery in motherboard.

    • Repeat all steps backwards to reassemble computer.

終わりに

To reassemble your device, follow these instructions in reverse order.

ある他の人がこのガイドを完成しました。

作成者

4人の作成者と共同で作成されました。

Victoria Rivera

メンバー登録日: 04/14/23

349 ポイント

1ガイドが承認済み

コメント 1 件

Dont wast you time for these steps because this model 3521 ,only 2nd step enough for remove cmos battery . Once remove the Surface Cover ,you can see the cmos battery .. no need to remove all the components .thanks me later .

Stuff Srilanka - 返信

コメントを追加

統計データ:

過去 24時間: 1

過去 7 日: 6

過去 30 日: 24

今までの合計 568