メインコンテンツにスキップ

Dell Inspiron 3520 Screen Replacement

必要な工具と部品

  1. Dell Inspiron 3520 Screen Replacement, Battery: 手順 1、 2の画像 1 Dell Inspiron 3520 Screen Replacement, Battery: 手順 1、 2の画像 2
    • Turn off notebook

    • Set the notebook upside down with the battery facing away from you.

    • Locate the unlock and release sliding tabs on the bottom right and left hand corners of the battery respectively.

  2. Dell Inspiron 3520 Screen Replacement: 手順 2、 3の画像 1 Dell Inspiron 3520 Screen Replacement: 手順 2、 3の画像 2 Dell Inspiron 3520 Screen Replacement: 手順 2、 3の画像 3
    • Slide the right tab to the right to unlock the battery.

    • Slide and hold the the left tab to the left to release the battery from the unit.

    • Finally, remove the battery by sliding it away from the unit and yourself.

  3. Dell Inspiron 3520 Screen Replacement, Keyboard: 手順 3、 2の画像 1 Dell Inspiron 3520 Screen Replacement, Keyboard: 手順 3、 2の画像 2
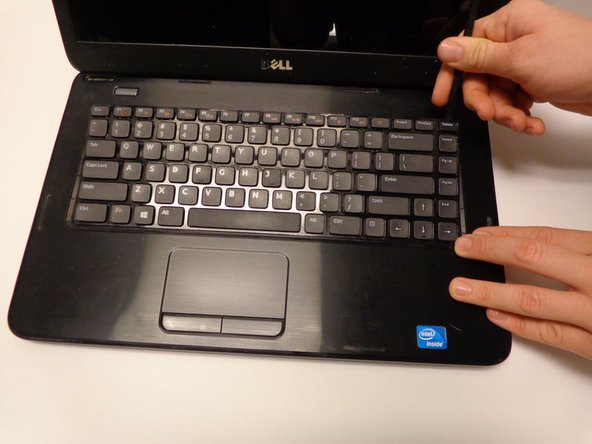
    • Locate the four tabs along the top edge of the keyboard.

    • Using the spudger, push the tabs away from the keyboard and pull the keyboard up away from the laptop.

  4. Dell Inspiron 3520 Screen Replacement: 手順 4、 1の画像 1
    • Slide the keyboard forward towards the screen to release the bottom tabs.

  5. Dell Inspiron 3520 Screen Replacement: 手順 5、 2の画像 1 Dell Inspiron 3520 Screen Replacement: 手順 5、 2の画像 2
    • Carefully lift the board up and locate the connecting cable.

    • Gently pull the end of the cable free from the port on the laptop.

  6. Dell Inspiron 3520 Screen Replacement, Screen: 手順 6、 3の画像 1 Dell Inspiron 3520 Screen Replacement, Screen: 手順 6、 3の画像 2 Dell Inspiron 3520 Screen Replacement, Screen: 手順 6、 3の画像 3
    • Locate and remove the 14 (5mm) Phillips #00 screws from the bottom of the laptop.

    • Locate and remove the two 5mm Phillips #00 screws found under the keyboard.

    • Disconnect the two controlling wires with the blue pull tabs.

  7. Dell Inspiron 3520 Screen Replacement: 手順 7、 3の画像 1 Dell Inspiron 3520 Screen Replacement: 手順 7、 3の画像 2 Dell Inspiron 3520 Screen Replacement: 手順 7、 3の画像 3
    • Using the spudger, carefully work your way around the edge of the upper shell.

    • Lift the upper shell away from the laptop.

    • Close the laptop and remove the casing over the hinge using the spudger.

  8. Dell Inspiron 3520 Screen Replacement: 手順 8、 3の画像 1 Dell Inspiron 3520 Screen Replacement: 手順 8、 3の画像 2 Dell Inspiron 3520 Screen Replacement: 手順 8、 3の画像 3
    • Gently pull the cable located near the fan free from its dock.

    • Just behind the optical drive locate the 4mm Phillps #00 mounting screw for the small circuit board and remove it.

    • The board should then pull free.

    • Take note of how the cables fit along the ridge for when it comes to reassembly.

  9. Dell Inspiron 3520 Screen Replacement: 手順 9、 2の画像 1 Dell Inspiron 3520 Screen Replacement: 手順 9、 2の画像 2
    • Open the laptop and locate the two hinges.

    • Each hinge has two 5mm Phillips #00 screws that need to be removed.

    • With the screws removed the screen should pull free.

終わりに

To reassemble your device, follow these instructions in reverse order.

5 の人々がこのガイドを完成させました。

作成者

2人の作成者と共同で作成されました。

Ian

メンバー登録日: 01/30/15

1,557 ポイント

5のガイドは作成済み

チーム

USF Tampa, Team 16-2, Watkins Winter 2015 USF Tampa, Team 16-2, Watkins Winter 2015人のメンバー

USFT-WATKINS-W15S16G2

3 メンバー

5のガイドは作成済み

コメント 1 件

These instructions are not for screen replacement

Ryan Zulu - 返信

コメントを追加

統計データ:

過去 24時間: 1

過去 7 日: 10

過去 30 日: 43

今までの合計 5,294