メインコンテンツにスキップ

Dell Inspiron 17R-5737 Keyboard Replacement

必要な工具と部品

  1. Dell Inspiron 17R-5737 Keyboard Replacement, Battery: 手順 1、 1の画像 1
    • Make sure the laptop is off before attempting to remove the battery.

    • Flip over your laptop so that the battery faces you.

  2. Dell Inspiron 17R-5737 Keyboard Replacement: 手順 2、 2の画像 1 Dell Inspiron 17R-5737 Keyboard Replacement: 手順 2、 2の画像 2
    • Slide each latch away from the battery to unlock it.

  3. Dell Inspiron 17R-5737 Keyboard Replacement: 手順 3、 2の画像 1 Dell Inspiron 17R-5737 Keyboard Replacement: 手順 3、 2の画像 2
    • Lift the battery upwards to remove it.

    • Continue holding the latches when removing the battery.

  4. Dell Inspiron 17R-5737 Keyboard Replacement, Optical Drive: 手順 4、 2の画像 1 Dell Inspiron 17R-5737 Keyboard Replacement, Optical Drive: 手順 4、 2の画像 2
    • Remove one 4.8mm screw with a JIS #00 screwdriver.

    • Remove the optical drive.

  5. Dell Inspiron 17R-5737 Keyboard Replacement, Access Panel: 手順 5、 1の画像 1
    • Remove two 4.8mm screws with a JIS #00 screwdriver.

    • Remove the access panel.

  6. Dell Inspiron 17R-5737 Keyboard Replacement, Hard Drive: 手順 6、 3の画像 1 Dell Inspiron 17R-5737 Keyboard Replacement, Hard Drive: 手順 6、 3の画像 2 Dell Inspiron 17R-5737 Keyboard Replacement, Hard Drive: 手順 6、 3の画像 3
    • Remove three 4.8mm screws from the hard drive with a JIS #00 screwdriver.

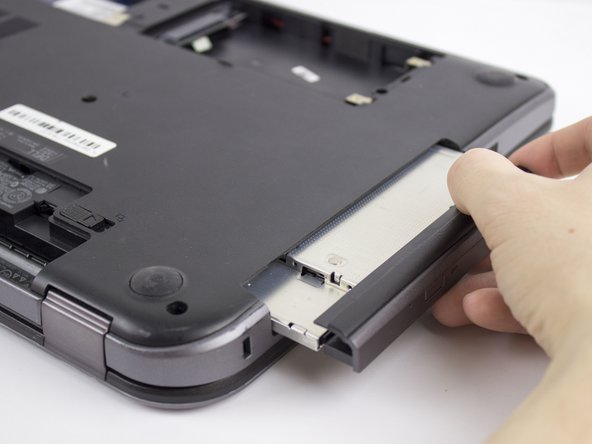
    • Slide the hard drive to the left.

    • Slide the hard drive to the right and up.

  7. Dell Inspiron 17R-5737 Keyboard Replacement, RAM: 手順 7、 2の画像 1 Dell Inspiron 17R-5737 Keyboard Replacement, RAM: 手順 7、 2の画像 2
    • Slide the two clips away from the RAM.

    • Lift the RAM out.

  8. Dell Inspiron 17R-5737 Keyboard Replacement, Keyboard: 手順 8、 1の画像 1
    • A metal spudger can scratch delicate internal parts. Be extra careful when removing the keyboard.

    • Use a metal spudger to loosen the main frame of the keyboard.

    • A metal spudger should be used instead of a plastic one because a plastic one will probably break.

    • Make sure to get the spudger under the entire keyboard and not just under the keys.

  9. Dell Inspiron 17R-5737 Keyboard Replacement: 手順 9、 3の画像 1 Dell Inspiron 17R-5737 Keyboard Replacement: 手順 9、 3の画像 2 Dell Inspiron 17R-5737 Keyboard Replacement: 手順 9、 3の画像 3
    • Slowly lift the keyboard.

    • Lift the locking flap that holds the ribbon cable in place.

    • The white line on this ribbon cable marks the edge of the connection area. To reinstall, insert the cable into the connector up to this line, and then close the locking flap.

    • Remove the keyboard.

終わりに

To reassemble your device, follow these instructions in reverse order.

作成者

3人の作成者と共同で作成されました。

David Callahan

メンバー登録日: 10/19/17

559 ポイント

5のガイドは作成済み

チーム

UMass Dartmouth, Team S3-G7, Bailey Fall 2017 UMass Dartmouth, Team S3-G7, Bailey Fall 2017人のメンバー

UMASSD-BAILEY-F17S3G7

3 メンバー

11のガイドは作成済み

0 件のコメント

コメントを追加

統計データ:

過去 24時間: 2

過去 7 日: 3

過去 30 日: 6

今までの合計 486