メインコンテンツにスキップ

Dell Inspiron 17" 7786 2-in-1 TouchPad Replacement

必要な工具と部品

  1. Dell Inspiron 17" 7786 2-in-1 TouchPad Replacement, Base Cover: 手順 1、 2の画像 1 Dell Inspiron 17" 7786 2-in-1 TouchPad Replacement, Base Cover: 手順 1、 2の画像 2
    • Remove the eight M2 5mm screws that secure the base cover using a Phillips #0 screwdriver.

  2. Dell Inspiron 17" 7786 2-in-1 TouchPad Replacement: 手順 2、 2の画像 1 Dell Inspiron 17" 7786 2-in-1 TouchPad Replacement: 手順 2、 2の画像 2
    • Loosen the three captive screws that secure the base closer to the hinges.

    • Do not attempt to remove the three captive screws! You need only to loosen them. They're supposed to stay on the base cover.

  3. Dell Inspiron 17" 7786 2-in-1 TouchPad Replacement: 手順 3、 3の画像 1 Dell Inspiron 17" 7786 2-in-1 TouchPad Replacement: 手順 3、 3の画像 2 Dell Inspiron 17" 7786 2-in-1 TouchPad Replacement: 手順 3、 3の画像 3
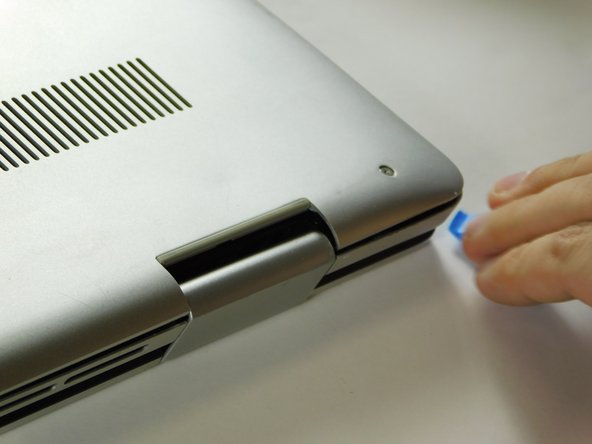
    • Carefully pry the base cover using an iFixit opening tool in the crevice near the hinges. Guide the pick along the edges and slightly lift upwards as you go along.

    • Do not start from the speaker end of the edges when opening, or you may cause further damage to your device!

  4. Dell Inspiron 17" 7786 2-in-1 TouchPad Replacement: 手順 4、 3の画像 1 Dell Inspiron 17" 7786 2-in-1 TouchPad Replacement: 手順 4、 3の画像 2 Dell Inspiron 17" 7786 2-in-1 TouchPad Replacement: 手順 4、 3の画像 3
    • Carefully remove the base cover from the laptop.

  5. Dell Inspiron 17" 7786 2-in-1 TouchPad Replacement, Internal Battery: 手順 5、 3の画像 1 Dell Inspiron 17" 7786 2-in-1 TouchPad Replacement, Internal Battery: 手順 5、 3の画像 2 Dell Inspiron 17" 7786 2-in-1 TouchPad Replacement, Internal Battery: 手順 5、 3の画像 3
    この手順で使用する道具:
    Tweezers
    $4.99
    購入する
    • Detach the tab connecting the battery to the system board using your fingers or a pair of tweezers.

    • Peel off the adhesive tab holding the cable to the device.

  6. Dell Inspiron 17" 7786 2-in-1 TouchPad Replacement: 手順 6、 1の画像 1
    • Flip the device over. Press and hold the power button for a few seconds to discharge any leftover electrical current.

    • You may leave the screen open if further repair is needed, or close it if you are only replacing the battery.

  7. Dell Inspiron 17" 7786 2-in-1 TouchPad Replacement: 手順 7、 3の画像 1 Dell Inspiron 17" 7786 2-in-1 TouchPad Replacement: 手順 7、 3の画像 2 Dell Inspiron 17" 7786 2-in-1 TouchPad Replacement: 手順 7、 3の画像 3
    • Dell's official service manual does not mention of the 5th screw located near the middle edge of the battery closer to the touchpad.

    • Flip the device back over.

    • Remove five 3 mm screws that are securing the battery using a Phillips #0 screwdriver.

    • Lift the battery upwards to remove it completely.

  8. Dell Inspiron 17" 7786 2-in-1 TouchPad Replacement, TouchPad: 手順 8、 2の画像 1 Dell Inspiron 17" 7786 2-in-1 TouchPad Replacement, TouchPad: 手順 8、 2の画像 2
    • Lift the latch holding down the ribbon cable connected to the touch pad.

    • When inserting the cable back, ensure that it goes under the white indents.

    • Remove the three screws holding down the bracket on the bottom portion of the touch pad using a Phillips #0 screwdriver.

    • Remove the four screws holding down the bracket on the upper portion of the touch pad using a Phillips #0 screwdriver.

    • Remove the bracket on the bottom portion of the touchpad by carefully peeling it away, as it is held by adhesives, then set it aside.

  9. Dell Inspiron 17" 7786 2-in-1 TouchPad Replacement: 手順 9、 1の画像 1
    • Pull the small adhesive tabs to lift the touch pad away from the assembly.

終わりに

To reassemble your device, follow these instructions in reverse order.

作成者

2人の作成者と共同で作成されました。

Antonio Franco

メンバー登録日: 08/25/22

1,025 ポイント

10のガイドは作成済み

チーム

Gateway, Team 1-3, Class Fall 2022 Gateway, Team 1-3, Class Fall 2022人のメンバー

GCC-CLASS-F22S1G3

4 メンバー

15のガイドは作成済み

0 件のコメント

コメントを追加

統計データ:

過去 24時間: 2

過去 7 日: 2

過去 30 日: 11

今までの合計 170