メインコンテンツにスキップ

Dell Inspiron 17-5755 Display Panel Replacement

必要な工具と部品

  1. Dell Inspiron 17-5755 Display Panel Replacement, Battery: 手順 1、 1の画像 1
    • Make sure the computer has been shut down, and isn't plugged into an outlet before attempting to remove the battery.

  2. Dell Inspiron 17-5755 Display Panel Replacement: 手順 2、 2の画像 1 Dell Inspiron 17-5755 Display Panel Replacement: 手順 2、 2の画像 2
    • Find the battery release latch on the bottom side of the computer.

    • Slide the latch to the left until you hear a "click". This indicates that the battery has been released.

  3. Dell Inspiron 17-5755 Display Panel Replacement: 手順 3、 1の画像 1
    • Safely remove the battery from the laptop.

  4. Dell Inspiron 17-5755 Display Panel Replacement, Keyboard: 手順 4、 2の画像 1 Dell Inspiron 17-5755 Display Panel Replacement, Keyboard: 手順 4、 2の画像 2
    • Open the display of the laptop as far as possible, and locate the tabs which secure the keyboard to the laptop.

  5. Dell Inspiron 17-5755 Display Panel Replacement: 手順 5、 1の画像 1
    • Use a plastic opening tool to gently release the tabs that secure the keyboard to the laptop.

  6. Dell Inspiron 17-5755 Display Panel Replacement: 手順 6、 2の画像 1 Dell Inspiron 17-5755 Display Panel Replacement: 手順 6、 2の画像 2
    • Carefully lift the keyboard from the laptop, being mindful of any attachments that it may have.

  7. Dell Inspiron 17-5755 Display Panel Replacement: 手順 7、 3の画像 1 Dell Inspiron 17-5755 Display Panel Replacement: 手順 7、 3の画像 2 Dell Inspiron 17-5755 Display Panel Replacement: 手順 7、 3の画像 3
    • Lift the zero insertion force (ZIF) tab that secures the keyboard back light ribbon cable

    • Afterwards, carefully detach the backlight cable from the laptop.

  8. Dell Inspiron 17-5755 Display Panel Replacement: 手順 8、 3の画像 1 Dell Inspiron 17-5755 Display Panel Replacement: 手順 8、 3の画像 2 Dell Inspiron 17-5755 Display Panel Replacement: 手順 8、 3の画像 3
    • Gently release the ZIF tab that secures the keyboard ribbon cable to the laptop.

    • Afterwards, carefully slide the cable out of its slot.

  9. Dell Inspiron 17-5755 Display Panel Replacement: 手順 9、 2の画像 1 Dell Inspiron 17-5755 Display Panel Replacement: 手順 9、 2の画像 2
    • Now that the keyboard is detached from the laptop, you may safely remove it.

  10. Dell Inspiron 17-5755 Display Panel Replacement, Motherboard: 手順 10、 1の画像 1
    • Use a Phillips #0 screwdriver to unscrew the two 8mm screws which secure the base cover.

  11. Dell Inspiron 17-5755 Display Panel Replacement: 手順 11、 2の画像 1 Dell Inspiron 17-5755 Display Panel Replacement: 手順 11、 2の画像 2
    • Locate the tabs that hold the base cover to the laptop and use a plastic opening tool to gently release the base cover.

  12. Dell Inspiron 17-5755 Display Panel Replacement: 手順 12、 2の画像 1 Dell Inspiron 17-5755 Display Panel Replacement: 手順 12、 2の画像 2
    • Now with the base cover removed, you may lift it off of the laptop and continue.

  13. Dell Inspiron 17-5755 Display Panel Replacement: 手順 13、 3の画像 1 Dell Inspiron 17-5755 Display Panel Replacement: 手順 13、 3の画像 2 Dell Inspiron 17-5755 Display Panel Replacement: 手順 13、 3の画像 3
    • Disconnect the hard drive ribbon cable from the laptop by lifting the latch which secures it.

  14. Dell Inspiron 17-5755 Display Panel Replacement: 手順 14、 1の画像 1
    • Use a Phillips #0 screwdriver to remove the four 8mm screws which secure the hard drive assembly to the laptop.

  15. Dell Inspiron 17-5755 Display Panel Replacement: 手順 15、 2の画像 1 Dell Inspiron 17-5755 Display Panel Replacement: 手順 15、 2の画像 2
    • Carefully remove the hard drive and its assembly from the laptop.

  16. Dell Inspiron 17-5755 Display Panel Replacement: 手順 16、 3の画像 1 Dell Inspiron 17-5755 Display Panel Replacement: 手順 16、 3の画像 2 Dell Inspiron 17-5755 Display Panel Replacement: 手順 16、 3の画像 3
    • Remove the 3mm screw which secures the wireless card bracket.

    • After removing the screw, remove the wireless card bracket, along with the antenna cables secured to the wireless card.

    • Afterwards, you may slide and remove the wireless card from the motherboard.

  17. Dell Inspiron 17-5755 Display Panel Replacement: 手順 17、 3の画像 1 Dell Inspiron 17-5755 Display Panel Replacement: 手順 17、 3の画像 2 Dell Inspiron 17-5755 Display Panel Replacement: 手順 17、 3の画像 3
    • Gently spread apart the securing clips on each end of the memory-module slot until the memory module pops out.

    • Slide and remove the memory module afterwards.

  18. Dell Inspiron 17-5755 Display Panel Replacement: 手順 18、 2の画像 1 Dell Inspiron 17-5755 Display Panel Replacement: 手順 18、 2の画像 2
    • Use a plastic opening tool to gently pry the CMOS battery found at the bottom right of the laptop out of the socket.

  19. Dell Inspiron 17-5755 Display Panel Replacement: 手順 19、 3の画像 1 Dell Inspiron 17-5755 Display Panel Replacement: 手順 19、 3の画像 2 Dell Inspiron 17-5755 Display Panel Replacement: 手順 19、 3の画像 3
    • Use a Phillips #0 screwdriver to remove the 3mm screw which secures the optical-drive assembly to the computer base

    • Turn the computer over and using a plastic opening tool, push the optical-drive assembly out of the optical drive bay.

    • Afterwards, safely pull the optical-drive assembly out of the optical-drive bay.

  20. Dell Inspiron 17-5755 Display Panel Replacement: 手順 20、 3の画像 1 Dell Inspiron 17-5755 Display Panel Replacement: 手順 20、 3の画像 2 Dell Inspiron 17-5755 Display Panel Replacement: 手順 20、 3の画像 3
    • Turn the computer over

    • Lift the latch securing the optical drive ribbon cable, and disconnect it from the motherboard.

    • Afterwards, use a Phillips #0 screwdriver to remove the four 5mm screws.

  21. Dell Inspiron 17-5755 Display Panel Replacement: 手順 21、 2の画像 1 Dell Inspiron 17-5755 Display Panel Replacement: 手順 21、 2の画像 2
    • Turn over the laptop, and safely disconnect the speaker cable.

  22. Dell Inspiron 17-5755 Display Panel Replacement: 手順 22、 1の画像 1
    • Remove the antenna cables from the routing guides on the computer base.

  23. Dell Inspiron 17-5755 Display Panel Replacement: 手順 23、 2の画像 1 Dell Inspiron 17-5755 Display Panel Replacement: 手順 23、 2の画像 2
    • Use a Phillips #0 screwdriver to remove the 15 screws that secure the computer base to the palm rest assembly.

    • Afterwards, safely pry the computer base from the palm rest assembly using a plastic opening tool.

    • There are 3 different screws used: Three 2mm screws on the edge of the optical drive, two 3mm screws located where the battery was, and ten 8mm screws.

  24. Dell Inspiron 17-5755 Display Panel Replacement: 手順 24、 2の画像 1 Dell Inspiron 17-5755 Display Panel Replacement: 手順 24、 2の画像 2
    • Use a Phillips #0 screwdriver to remove the 5mm screw that secures the I/O board to the palm-rest assembly.

  25. Dell Inspiron 17-5755 Display Panel Replacement: 手順 25、 3の画像 1 Dell Inspiron 17-5755 Display Panel Replacement: 手順 25、 3の画像 2 Dell Inspiron 17-5755 Display Panel Replacement: 手順 25、 3の画像 3
    • Lift the I/O board and turn it over.

    • Afterwards, lift the ZIF latch and disconnect the I/O-board cable from the I/O board.

  26. Dell Inspiron 17-5755 Display Panel Replacement: 手順 26、 3の画像 1 Dell Inspiron 17-5755 Display Panel Replacement: 手順 26、 3の画像 2 Dell Inspiron 17-5755 Display Panel Replacement: 手順 26、 3の画像 3
    • Disconnect the fan cable from the motherboard.

    • Use a Phillips #0 screwdriver to remove the heat-sink screws in sequential order, as indicated by the numbers on the heat-sink assembly.

    • Afterwards lift the heat-sink assembly off the motherboard.

  27. Dell Inspiron 17-5755 Display Panel Replacement: 手順 27、 3の画像 1 Dell Inspiron 17-5755 Display Panel Replacement: 手順 27、 3の画像 2 Dell Inspiron 17-5755 Display Panel Replacement: 手順 27、 3の画像 3
    • Turn the computer over and open the display as far as possible.

    • Lift the latches for the power button board cable and disconnect it along with the touchpad cable from the motherboard.

  28. Dell Inspiron 17-5755 Display Panel Replacement: 手順 28、 1の画像 1
    • Close the display and turn the computer over.

    • Proceed to lift the latch which secures the ZIF display cable to the motherboard.

    • Disconnect the display cable from the motherboard.

  29. Dell Inspiron 17-5755 Display Panel Replacement: 手順 29、 2の画像 1 Dell Inspiron 17-5755 Display Panel Replacement: 手順 29、 2の画像 2
    • Use a Phillips# 0 screwdriver to remove the 3mm screw that secures the motherboard to the palm-rest assembly.

    • Afterwards, carefully peel the I/O board cable off the palm-rest assembly.

  30. Dell Inspiron 17-5755 Display Panel Replacement: 手順 30、 3の画像 1 Dell Inspiron 17-5755 Display Panel Replacement: 手順 30、 3の画像 2 Dell Inspiron 17-5755 Display Panel Replacement: 手順 30、 3の画像 3
    • Turn the motherboard over.

    • Lift the latch to disconnect the I/O-board cable from the motherboard.

  31. Dell Inspiron 17-5755 Display Panel Replacement: 手順 31、 3の画像 1 Dell Inspiron 17-5755 Display Panel Replacement: 手順 31、 3の画像 2 Dell Inspiron 17-5755 Display Panel Replacement: 手順 31、 3の画像 3
    • Disconnect the power-adapter port cable from the motherboard.

    • Afterwards you may safely remove the motherboard from the laptop.

  32. Dell Inspiron 17-5755 Display Panel Replacement, Display Panel: 手順 32、 2の画像 1 Dell Inspiron 17-5755 Display Panel Replacement, Display Panel: 手順 32、 2の画像 2
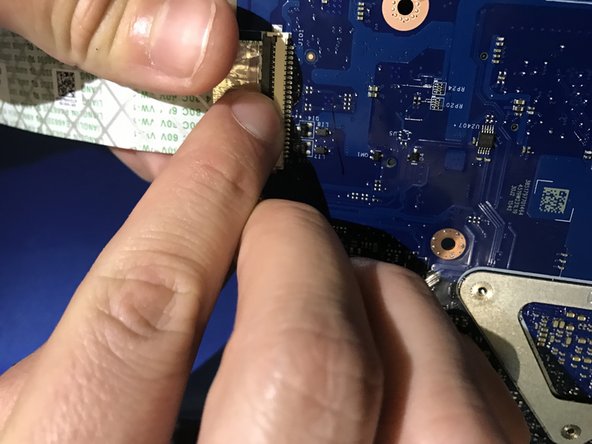
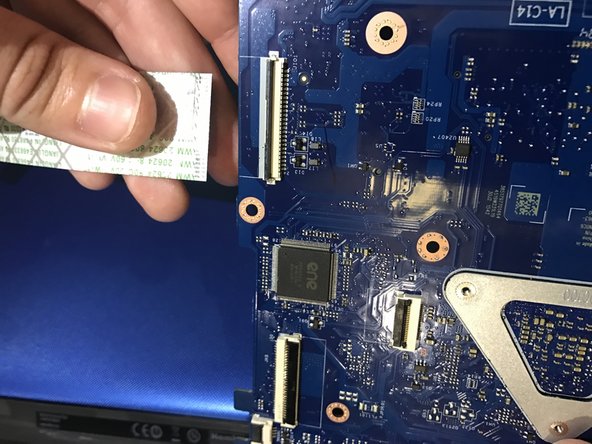
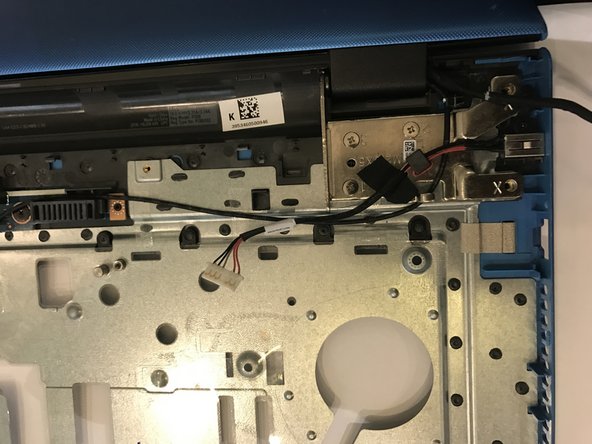
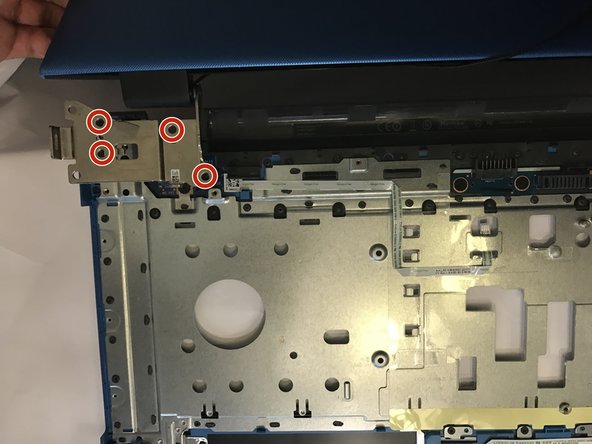
    • Using a Phillips 0 screwdriver, remove the screw (M2 x 3) the power-adapter port to the palm-rest assembly.

    • Peel off the tape that secures the power-adapter port to the palm-rest assembly.

  33. Dell Inspiron 17-5755 Display Panel Replacement: 手順 33、 3の画像 1 Dell Inspiron 17-5755 Display Panel Replacement: 手順 33、 3の画像 2 Dell Inspiron 17-5755 Display Panel Replacement: 手順 33、 3の画像 3
    • Carefully detach the antenna cables from their respective routing guides

  34. Dell Inspiron 17-5755 Display Panel Replacement: 手順 34、 2の画像 1 Dell Inspiron 17-5755 Display Panel Replacement: 手順 34、 2の画像 2
    • Using a Phillips 0 screwdriver, remove the 7 screws (M2.5 x 5) that secure the display hinges to the palm-rest assembly.

    • Detach the display assembly from the palm rest assembly

  35. Dell Inspiron 17-5755 Display Panel Replacement: 手順 35、 3の画像 1 Dell Inspiron 17-5755 Display Panel Replacement: 手順 35、 3の画像 2 Dell Inspiron 17-5755 Display Panel Replacement: 手順 35、 3の画像 3
    • Using the tip of your fingers, gently pry off the display bezel from the back-cover

  36. Dell Inspiron 17-5755 Display Panel Replacement: 手順 36、 3の画像 1 Dell Inspiron 17-5755 Display Panel Replacement: 手順 36、 3の画像 2 Dell Inspiron 17-5755 Display Panel Replacement: 手順 36、 3の画像 3
    • Using a Phillips 0 screwdriver, remove the 10 screws (M2.5 x 4.5) that secure the display panel to the display back-cover.

  37. Dell Inspiron 17-5755 Display Panel Replacement: 手順 37、 2の画像 1 Dell Inspiron 17-5755 Display Panel Replacement: 手順 37、 2の画像 2
    • Using a Phillips 0 screwdriver, remove the 6 screws (M2 x 3) that secure the display hinges to the display panel.

  38. Dell Inspiron 17-5755 Display Panel Replacement: 手順 38、 2の画像 1 Dell Inspiron 17-5755 Display Panel Replacement: 手順 38、 2の画像 2
    • Carefully turn the display assembly around.

    • Gently peel the display cable and disconnect the latch that is found under it.

  39. Dell Inspiron 17-5755 Display Panel Replacement: 手順 39、 1の画像 1
    • Once the display hinges are removed, your display panel is now ready to be replaced.

終わりに

To reassemble your device, follow these instructions in reverse order.

ある他の人がこのガイドを完成しました。

作成者

3人の作成者と共同で作成されました。

Jeff

メンバー登録日: 02/15/17

385 ポイント

3のガイドは作成済み

チーム

USF Tampa, Team S6-G1, Lacy Spring 2017 USF Tampa, Team S6-G1, Lacy Spring 2017人のメンバー

USFT-LACY-S17S6G1

3 メンバー

5のガイドは作成済み

0 件のコメント

コメントを追加

統計データ:

過去 24時間: 1

過去 7 日: 6

過去 30 日: 13

今までの合計 1,128