メインコンテンツにスキップ

Dell Inspiron 1564 CPU Fan Replacement

必要な工具と部品

  1. Dell Inspiron 1564 CPU Fan Replacement, Fan: 手順 1、 3の画像 1 Dell Inspiron 1564 CPU Fan Replacement, Fan: 手順 1、 3の画像 2 Dell Inspiron 1564 CPU Fan Replacement, Fan: 手順 1、 3の画像 3
    • Removing Battery

    • Locate battery latch on the bottom of the computer and slide to the right.

    • While holding battery latch, pull battery away from device.

  2. Dell Inspiron 1564 CPU Fan Replacement: 手順 2、 2の画像 1 Dell Inspiron 1564 CPU Fan Replacement: 手順 2、 2の画像 2
    • Removing Hardware Panel

    • With the J0 screwdriver bit, loosen all the screws from the backing opposite of battery.

    • Remove the covering.

  3. Dell Inspiron 1564 CPU Fan Replacement: 手順 3、 2の画像 1 Dell Inspiron 1564 CPU Fan Replacement: 手順 3、 2の画像 2
    • Removing RAM

    • Gently pull back the small clips along the side of each stick of RAM.

    • Gently lift the RAM upwards so the RAM is now angled.

    • Pull the RAM away from the device.

    • Repeat steps for second stick of RAM

  4. Dell Inspiron 1564 CPU Fan Replacement: 手順 4、 3の画像 1 Dell Inspiron 1564 CPU Fan Replacement: 手順 4、 3の画像 2 Dell Inspiron 1564 CPU Fan Replacement: 手順 4、 3の画像 3
    • Removing the Hard Drive

    • Unscrew the four screws holding in the hard drive.

    • Slide the hard drive towards and to the left to unplug it.

    • Pry the hard drive upwards and pull away from device.

  5. Dell Inspiron 1564 CPU Fan Replacement: 手順 5、 3の画像 1 Dell Inspiron 1564 CPU Fan Replacement: 手順 5、 3の画像 2 Dell Inspiron 1564 CPU Fan Replacement: 手順 5、 3の画像 3
    • Removing CD Drive

    • With the J0 screwdriver remove the 11 screws on the bottom of the computer.

    • Locate the CD drive at the left side when computer is flipped over.

    • Pry CD drive away from device gently.

  6. Dell Inspiron 1564 CPU Fan Replacement: 手順 6、 2の画像 1 Dell Inspiron 1564 CPU Fan Replacement: 手順 6、 2の画像 2
    • Removing Keyboard Cover

    • Be careful to not pull on the ribbon cable that connects the keyboard to the computer.

    • Using the blue plastic opening tool, start prying in the space between the screen and the keyboard.

    • Remove black cover from the keyboard.

  7. Dell Inspiron 1564 CPU Fan Replacement: 手順 7、 3の画像 1 Dell Inspiron 1564 CPU Fan Replacement: 手順 7、 3の画像 2 Dell Inspiron 1564 CPU Fan Replacement: 手順 7、 3の画像 3
    • Removing Keyboard

    • Remove the four screws on the top of the keyboard.

    • Press down on the tabs on each side of the keyboard to free it.

    • In the next part, there is a wire connected to the bottom of the keyboard, and if you pull the keyboard up too fast it will break.

    • Remove the keyboard by pulling the board towards the screen and up.

    • Flip the latch on the computer connecting the ribbon cable to the keyboard.

  8. Dell Inspiron 1564 CPU Fan Replacement: 手順 8、 2の画像 1 Dell Inspiron 1564 CPU Fan Replacement: 手順 8、 2の画像 2
    • Removing Keyboard Continued

    • Slide the keyboard ribbon cable out.

    • Remove the five screws that were underneath the keyboard.

  9. Dell Inspiron 1564 CPU Fan Replacement: 手順 9、 2の画像 1 Dell Inspiron 1564 CPU Fan Replacement: 手順 9、 2の画像 2
    • Removing Wireless Card Cables

    • In the next part, be careful to not rip black and white wire.

    • Turn device upside-down.

    • Remove black and white wires from wireless card.

  10. Dell Inspiron 1564 CPU Fan Replacement: 手順 10、 2の画像 1 Dell Inspiron 1564 CPU Fan Replacement: 手順 10、 2の画像 2
    • Removing Wireless Card Cables Continued

    • Lift black and white wire connections away from the device.

    • Slide wires through the hole to the top of the keyboard.

  11. Dell Inspiron 1564 CPU Fan Replacement: 手順 11、 1の画像 1
    • Removing Casing

    • In this step, be careful not to pull the casing too quickly or the black and white wire may rip.

    • Loosen and pry sides away from each other.

    • Remove casing.

  12. Dell Inspiron 1564 CPU Fan Replacement: 手順 12、 3の画像 1 Dell Inspiron 1564 CPU Fan Replacement: 手順 12、 3の画像 2 Dell Inspiron 1564 CPU Fan Replacement: 手順 12、 3の画像 3
    • Removing Fan

    • Using the J0 screwdriver bit, remove two 7mm screws holding fan in place.

    • With tweezers, gently pull cable connecting fan to board.

    • Gently tilt fan upwards and remove.

終わりに

To reassemble your device, follow these instructions in reverse order.

5 の人々がこのガイドを完成させました。

作成者

8人の作成者と共同で作成されました。

Tyson Duerr

メンバー登録日: 10/06/15

273 ポイント

2のガイドは作成済み

チーム

Eastern Washington University, Team 2-1, Plummer Fall 2015 Eastern Washington University, Team 2-1, Plummer Fall 2015人のメンバー

EWU-PLUMMER-F15S2G1

4 メンバー

5のガイドは作成済み

3 件のコメント

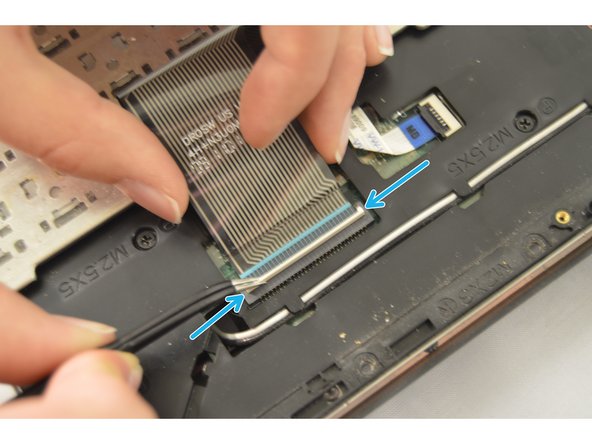
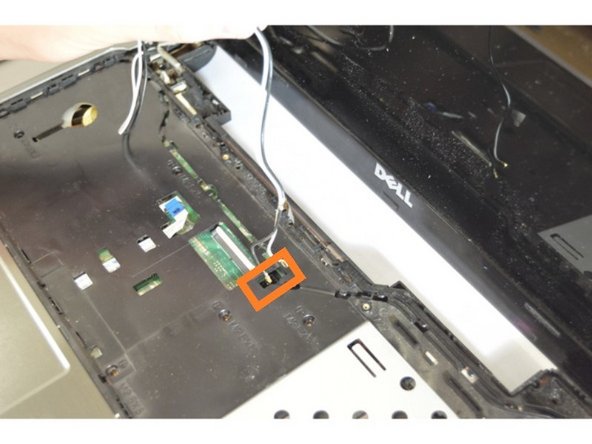
It's a nice guide to disassemble the notebook correctly, but I would like to add more precise pictures at some steps. At step 9 for example you wrote to lift up the cables for sliding wires through a hole in the couvering plate. Here it was useful to show with a coloured circle where to locate this. In the last step you added a wrong picture. The second image shows the wireless card and how to disconnect it's cables instead the fan's connector. But apart from that this guide was useful (sorry for possible language mistakes) :-)

TechJo - 返信

My dell m330 is not starting when i turned its power buton on just led starts blinking no symbol of Pc working no noise just led is blnking i tried another battery and also remove battery and power on button for 15_20 sec but in vain

aan - 返信

Now i’m assuming that this is because my computer has been used quite a bit, but in step 8, my ribbon cable fell apart. it is currently held together with electrical tape and prayers. so if anyone would want to not have that happen, I suggest removing the power button and tucking it away instead.

Joe Donahue - 返信

コメントを追加

統計データ:

過去 24時間: 0

過去 7 日: 0

過去 30 日: 9

今までの合計 3,827