メインコンテンツにスキップ

Dell Inspiron 1545 Palm Rest Replacement

必要な工具と部品

  1. Dell Inspiron 1545 Palm Rest Replacement, Battery: 手順 1、 1の画像 1
    • Before attempting to remove the battery ensure that the laptop is disconnected from all power sources and turned off.

    • Turn the laptop over to its back.

  2. Dell Inspiron 1545 Palm Rest Replacement: 手順 2、 1の画像 1
    • Slide the release latch while simultaneously pulling backwards on the battery.

  3. Dell Inspiron 1545 Palm Rest Replacement: 手順 3、 1の画像 1
    • Slide the battery out of the battery bay.

  4. Dell Inspiron 1545 Palm Rest Replacement, Base Cover: 手順 4、 1の画像 1
    • Unscrew the four screws (3mm Phillips #1) that hold the base cover in place.

    • The top 3 screws are "captive" (held in by a retaining ring) and will not come out.

  5. Dell Inspiron 1545 Palm Rest Replacement: 手順 5、 2の画像 1 Dell Inspiron 1545 Palm Rest Replacement: 手順 5、 2の画像 2
    • Carefully lift the base cover vertically away from the laptop.

  6. Dell Inspiron 1545 Palm Rest Replacement, Center Control Cover: 手順 6、 1の画像 1
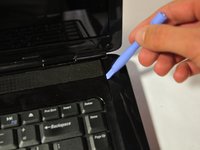
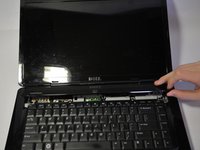
    • After removing the battery, remove the two screws (3mm Phillips #1) beneath it. These screws hold the Center Control Cover in place.

  7. Dell Inspiron 1545 Palm Rest Replacement: 手順 7、 1の画像 1
    • Flip the laptop over to the front and open the display as far as possible.

  8. Dell Inspiron 1545 Palm Rest Replacement: 手順 8、 3の画像 1 Dell Inspiron 1545 Palm Rest Replacement: 手順 8、 3の画像 2 Dell Inspiron 1545 Palm Rest Replacement: 手順 8、 3の画像 3
    • The Center Control Cover is VERY fragile, be careful when using prying tools.

    • Pry the Center Control Cover from the laptop. On the right there is a small divot, it is advised that you start removing the panel from here.

    • Carefully lift the Center Control Cover away from the laptop.

  9. Dell Inspiron 1545 Palm Rest Replacement, Keyboard: 手順 9、 1の画像 1
    • Remove the two screws (5mm Phillips #1) at the top of the keyboard.

  10. Dell Inspiron 1545 Palm Rest Replacement: 手順 10、 1の画像 1
    • Slide the keyboard out and away from the laptop and lift it up to access the keyboard connector.

    • Do not pull hard on the keyboard while removing it, you may damage the keyboard or the keyboard connector.

  11. Dell Inspiron 1545 Palm Rest Replacement: 手順 11、 1の画像 1
    • Lift the connector latch that secures the keyboard cable to the connector on the motherboard and remove the cable.

  12. Dell Inspiron 1545 Palm Rest Replacement: 手順 12、 1の画像 1
    • Lift the keyboard up and away from the laptop.

  13. Dell Inspiron 1545 Palm Rest Replacement, Palm Rest: 手順 13、 1の画像 1
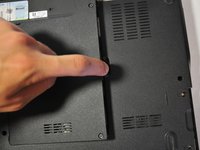
    • Remove the 11 screws (5mm Phillips #1) from the back of the laptop as marked. One screw is in the middle, by the RAM.

  14. Dell Inspiron 1545 Palm Rest Replacement: 手順 14、 1の画像 1
    • Remove black and white wires from the WLAN that lead to the display by pulling straight up.

    • Unwind the wires from the routing guides.

  15. Dell Inspiron 1545 Palm Rest Replacement: 手順 15、 1の画像 1
    • Turn the laptop back over to its normal resting position and pull the black and white wires previously connected to the WLAN through the hole.

    • Remove the 4 smaller screws (5mm Phillips #1) and one screw on the top left (3mm Phillips #1) from the palm rest.

  16. Dell Inspiron 1545 Palm Rest Replacement: 手順 16、 1の画像 1
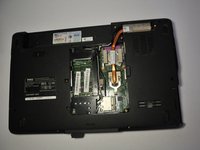
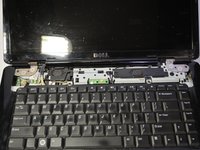
    • Disconnect the Bluetooth card cable, Wed cable, Camera1 cable, power cable, and touchpad cable from the respective Motherboard connectors as marked. For the Bluetooth cable and Camera1 cable, pull the plugs towards the screen. For the touchpad and power cable, lift the black tab and then pull them out. For the Wed cable, pull the blue tab up.

    • Unsecure the wires from the routing guides so they are loose.

    • Pull on the plastic tabs for each connector to help prevent causing damage to the connectors.

  17. Dell Inspiron 1545 Palm Rest Replacement: 手順 17、 1の画像 1
    • To separate the palm rest from the rest of the computer, use a plastic opening tool to lift up the plastic. It is best to start at one point and work your way around.

終わりに

To reassemble your device, follow these instructions in reverse order.

5 の人々がこのガイドを完成させました。

作成者

7人の作成者と共同で作成されました。

Nathan Lemay

メンバー登録日: 04/16/14

3,052 ポイント

15のガイドは作成済み

チーム

Cal Poly, Team 9-14, Regan Spring 2014 Cal Poly, Team 9-14, Regan Spring 2014人のメンバー

CPSU-REGAN-S14S9G14

4 メンバー

15のガイドは作成済み

0 件のコメント

コメントを追加

統計データ:

過去 24時間: 0

過去 7 日: 3

過去 30 日: 15

今までの合計 6,001