はじめに
Use this guide to help you replace the keyboard in a Dell Inspiron 1525.
必要な工具と部品
-
-
-
Slide the battery release switch away from the lock symbol until you hear the battery click.
-
Slide the battery towards the back of the laptop until it comes free.
-
-
-
-
Remove the two 4.00 mm Phillips #1 screws from the battery tray.
-
-
-
-
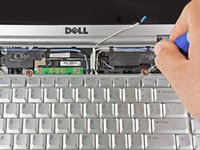
Insert the flat end of a spudger into the slot on the right side of the central control cover and pry it up.
-
Carefully pull the central control cover up along its edges.
-
-
-
Peel back the silver tape securing the ribbon cable to the cover.
-
Pull the small brown latch on the ribbon cable connector out.
-
Disconnect the ribbon cable to completely free the central control cover.
-
-
-
-
-
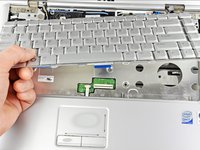
Remove the two 5.75 mm Phillips #1 screws securing the keyboard to the laptop.
-
Gently slide the keyboard towards the display until the tabs on its front side are free.
-
-
-
Use a spudger to gently lift the ribbon cable retaining flap.
-
Disconnect the ribbon cable.
-
Shift the keyboard sideways enough to free one side from it's retaining tab. Then lift the keyboard away from the laptop.
-
-


To reassemble your device, follow these instructions in reverse order.
11 の人々がこのガイドを完成させました。

3件のガイドコメント
why did you say to remove the central control cover? It is so hard top get it back! Especially when the guide on laptopkeyboard.com seems to suggest that this is unnecessary.
sally wise - 返信 共有
Thank you so much…!
thanks, marvelous site . I am in