メインコンテンツにスキップ

Dell Inspiron 1525 Central Control Cover Replacement

必要な工具と部品

  1. Dell Inspiron 1525 Central Control Cover Replacement, Battery: 手順 1、 1の画像 1
    • Locate the battery release switch on the bottom of the laptop.

  2. Dell Inspiron 1525 Central Control Cover Replacement: 手順 2、 2の画像 1 Dell Inspiron 1525 Central Control Cover Replacement: 手順 2、 2の画像 2
    • Slide the battery release switch away from the lock symbol until you hear the battery click.

    • Slide the battery towards the back of the laptop until it comes free.

  3. Dell Inspiron 1525 Central Control Cover Replacement, Central Control Cover: 手順 3、 1の画像 1
    • Remove the two 4.00 mm Phillips #1 screws from the battery tray.

  4. Dell Inspiron 1525 Central Control Cover Replacement: 手順 4、 3の画像 1 Dell Inspiron 1525 Central Control Cover Replacement: 手順 4、 3の画像 2 Dell Inspiron 1525 Central Control Cover Replacement: 手順 4、 3の画像 3
    • Insert the flat end of a spudger into the slot on the right side of the central control cover and pry it up.

    • Carefully pull the central control cover up along its edges.

    • Do not attempt to completely remove the cover, as it is still attached via a ribbon cable.

  5. Dell Inspiron 1525 Central Control Cover Replacement: 手順 5、 3の画像 1 Dell Inspiron 1525 Central Control Cover Replacement: 手順 5、 3の画像 2 Dell Inspiron 1525 Central Control Cover Replacement: 手順 5、 3の画像 3
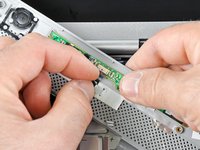
    • Peel back the silver tape securing the ribbon cable to the cover.

    • Pull the small brown latch on the ribbon cable connector out.

    • Disconnect the ribbon cable to completely free the central control cover.

終わりに

To reassemble your device, follow these instructions in reverse order.

3 の人々がこのガイドを完成させました。

作成者

2人の作成者と共同で作成されました。

Miroslav Djuric

158,300 ポイント

144のガイドは作成済み

0 件のコメント

コメントを追加

統計データ:

過去 24時間: 0

過去 7 日: 0

過去 30 日: 2

今までの合計 3,578