メインコンテンツにスキップ

このバージョンは誤った内容を含んでいる可能性があります。最新の承認済みスナップショットに切り替えてください。

必要な工具と部品

  1. この手順は未翻訳です。 翻訳を手伝う。

    : 手順 1、 1の画像 1
    • Rotate the laptop so its bottom is facing up.

  2. この手順は未翻訳です。 翻訳を手伝う。

    : 手順 2、 3の画像 1 : 手順 2、 3の画像 2 : 手順 2、 3の画像 3
    • Identify the lock mechanisms holding the battery in place.

    • Slide each button outward with your fingers to disengage the battery.

    • Pull the battery off with your hand to separate it from the laptop.

  3. この手順は未翻訳です。 翻訳を手伝う。

    : 手順 3、 3の画像 1 : 手順 3、 3の画像 2 : 手順 3、 3の画像 3
    • Find the two small indentations of the sides of the panel covering the power button.

    • Pry up both sides of the panel by sticking the plastic opener tool in each indentation and prying up.

  4. この手順は未翻訳です。 翻訳を手伝う。

    : 手順 4、 1の画像 1
    • Now that the panel is loose simply pull the panel off with your hand.

  5. この手順は未翻訳です。 翻訳を手伝う。

    : 手順 5、 3の画像 1 : 手順 5、 3の画像 2 : 手順 5、 3の画像 3
    • Locate the two 5 mm Phillips #1 screws holding down the keyboard that were underneath the panel.

    • Remove these screws with a Phillips #1 screwdriver.

    • With the screws removed pull the keyboard up with your hand.

  6. この手順は未翻訳です。 翻訳を手伝う。

    : 手順 6、 3の画像 1 : 手順 6、 3の画像 2 : 手順 6、 3の画像 3
    • Locate the connector that links the keyboard to the laptop.

    • Gently pull the connector toward the screen of the laptop with your figers to disconnect it.

  7. この手順は未翻訳です。 翻訳を手伝う。

    : 手順 7、 3の画像 1 : 手順 7、 3の画像 2 : 手順 7、 3の画像 3
    • Locate the two Phillips #1 screws holding the Wireless Local Area Network (WLAN) panel in place.

    • Remove these two screws with a Phillips #1 screwdriver.

    • Remove the WLAN panel by pulling it up with your hand.

  8. この手順は未翻訳です。 翻訳を手伝う。

    : 手順 8、 3の画像 1 : 手順 8、 3の画像 2 : 手順 8、 3の画像 3
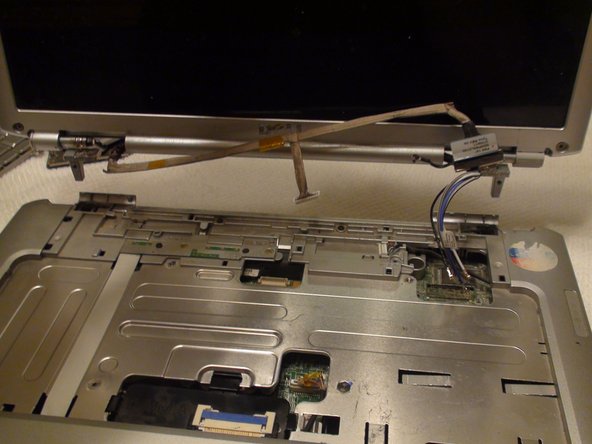
    • Disconnect the black and white wires attached to the WLAN card by pulling up on the connectors with your fingers.

    • During reassembly, the black and white wires reconnect to the WLAN card near the black and white triangles, respectively.

    • Remove the remaining wires from their protective sleeve by hand.

    • The wires in the sleeve are only used in other Dell laptop models. During reassembly they do not connect to anything so just place them back into the sleeve.

  9. この手順は未翻訳です。 翻訳を手伝う。

    : 手順 9、 2の画像 1 : 手順 9、 2の画像 2
    • Pull the wires that you disconnected in the previous step through the hole in the top of the laptop.

  10. この手順は未翻訳です。 翻訳を手伝う。

    : 手順 10、 3の画像 1 : 手順 10、 3の画像 2 : 手順 10、 3の画像 3
    • Detach the Phillips #1 grounding screw with a Phillips #1 screwdriver.

    • Disconnect the display cable by pulling up on the rectangular tab with your fingers.

  11. この手順は未翻訳です。 翻訳を手伝う。

    : 手順 11、 3の画像 1 : 手順 11、 3の画像 2 : 手順 11、 3の画像 3
    • When disconnecting the camera/microphone cable, pull up by the white plug. Pulling on the cable itself can damage it.

    • Disconnect the camera/microphone cable by prying it upward with the plastic opener tool.

    • Separate the camera/microphone cable from the case by pulling it up with your fingers.

  12. この手順は未翻訳です。 翻訳を手伝う。

    : 手順 12、 3の画像 1 : 手順 12、 3の画像 2 : 手順 12、 3の画像 3
    • Remove the two 10 mm Phillips #1 screws from the bottom of the laptop that attach the lid assembly to the laptop with a Phillips #1 screwdriver.

    • Remove the two 10 mm Phillips #1 screws from the back of the laptop that also attach the lid assembly to the laptop with a Phillips #1 screwdriver.

  13. この手順は未翻訳です。 翻訳を手伝う。

    : 手順 13、 2の画像 1 : 手順 13、 2の画像 2
    • There is a risk of dropping the lid or base of the laptop, or damaging cables. Make sure no cables are still attached.

    • Remove the lid by pulling it up from the base of the laptop with both hands.

ゴール

作成者

4人の作成者と共同で作成されました。

Christopher McCormack

メンバー登録日: 09/27/12

42 ポイント

2のガイドは作成済み

チーム

Cal Poly, Team 15-47, Forte Fall 2012 Cal Poly, Team 15-47, Forte Fall 2012人のメンバー

CPSU-FORTE-F12S15G47

5 メンバー

9のガイドは作成済み

0 件のコメント

コメントを追加

統計データ:

過去 24時間: 1

過去 7 日: 8

過去 30 日: 8

今までの合計 2,117