はじめに
This guide will show you how to remove the keyboard from your laptop.
必要な工具と部品
-
-
Place the laptop facedown with the battery facing you.
-
Push the switch above the battery to the right and hold it in that position.
-
Lift the battery using the grip on the top and remove it from its socket.
-
-
-
Open the laptop all the way, rotating the display so that it is level with the surface that you are working on.
-
Insert the spudger underneath the groove on the right side of the hinge cover.
-
Push up to pry the edge of the hinge cover out.
-
Lift up to release the hinge cover from the laptop, working from right to left.
-
-
-
-
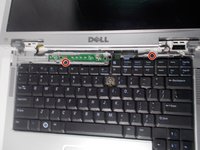
Remove the two 5mm JIS #1 screws from the top of the keyboard.
-
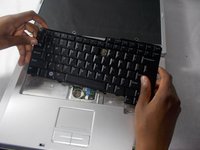
Lift the top of the keyboard up and pull the keyboard away from the laptop.
-


To reassemble your device, follow these instructions in reverse order.
To reassemble your device, follow these instructions in reverse order.
2 の人々がこのガイドを完成させました。
チーム

UMass Dartmouth, Team S2-G4, Simcock Spring 2018 UMass Dartmouth, Team S2-G4, Simcock Spring 2018人のメンバー
UMASSD-SIMCOCK-S18S2G4
4 メンバー
7のガイドは作成済み