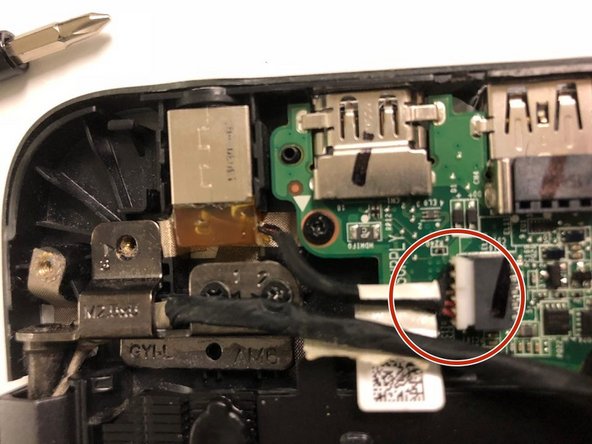
メインコンテンツにスキップ

Dell Inspiron 15-7548 Power Port Replacement

必要な工具と部品

  1. Dell Inspiron 15-7548  Power Port Replacement, Back Panel: 手順 1、 2の画像 1 Dell Inspiron 15-7548  Power Port Replacement, Back Panel: 手順 1、 2の画像 2
    • Remove the six 6 mm screws from the back panel with a Phillips #1 screwdriver.

    • Loosen the four captive screws at the bottom using a Phillips #1 screwdriver.

    • The four screws on the bottom are captive screws and cannot be removed.

  2. Dell Inspiron 15-7548  Power Port Replacement: 手順 2、 2の画像 1 Dell Inspiron 15-7548  Power Port Replacement: 手順 2、 2の画像 2
    • Pry out the back panel using the flat head side of the spudger.

    • Do not insert the spudger more than half an inch when separating the bottom and right side of the back panel.

  3. Dell Inspiron 15-7548  Power Port Replacement, Power Port: 手順 3、 2の画像 1 Dell Inspiron 15-7548  Power Port Replacement, Power Port: 手順 3、 2の画像 2
    • Grab the wires and lightly pull to remove the power port from the motherboard.

終わりに

To reassemble your device, follow these instructions in reverse order.

ある他の人がこのガイドを完成しました。

作成者

2人の作成者と共同で作成されました。

Christopher Fisher

メンバー登録日: 09/26/18

394 ポイント

4のガイドは作成済み

チーム

University of North Texas, Team S7-G3, Thompson Fall 2018 University of North Texas, Team S7-G3, Thompson Fall 2018人のメンバー

UNT-THOMPSON-F18S7G3

3 メンバー

5のガイドは作成済み

0 件のコメント

コメントを追加

統計データ:

過去 24時間: 0

過去 7 日: 1

過去 30 日: 1

今までの合計 378