メインコンテンツにスキップ

Dell Inspiron 15-7547 Hard Drive Replacement

必要な工具と部品

  1. Dell Inspiron 15-7547 Hard Drive Replacement, Bottom Cover: 手順 1、 1の画像 1
    • Before you begin, be sure to turn off your laptop and unplug it from the outlet.

    • Close the display and flip the laptop on its back.

    • Loosen the ten 5.0 mm-long Phillips #0 screws.

    • The four screws marked with orange will remain captive to the cover.

  2. Dell Inspiron 15-7547 Hard Drive Replacement: 手順 2、 1の画像 1
    • Use a spudger to pry up and loosen the back cover.

    • Remove the back cover.

  3. Dell Inspiron 15-7547 Hard Drive Replacement, Hard Drive: 手順 3、 2の画像 1 Dell Inspiron 15-7547 Hard Drive Replacement, Hard Drive: 手順 3、 2の画像 2
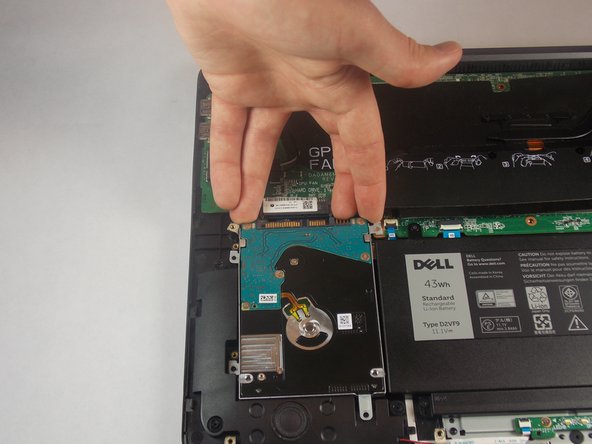
    • Remove the four 5.0 mm-long Philips #0 screws connecting the hard drive to the chassis.

  4. Dell Inspiron 15-7547 Hard Drive Replacement: 手順 4、 2の画像 1 Dell Inspiron 15-7547 Hard Drive Replacement: 手順 4、 2の画像 2
    • Disconnect the hard drive from the motherboard by placing your fingers at the back, and pulling forward towards the front of the chassis.

  5. Dell Inspiron 15-7547 Hard Drive Replacement: 手順 5、 1の画像 1
    • Lift the hard drive out of the chassis.

終わりに

To reassemble your device, follow these instructions in reverse order.

ある他の人がこのガイドを完成しました。

作成者

1人の作成者と共同作成されました。

Isaac Brooks

メンバー登録日: 09/10/18

355 ポイント

3のガイドは作成済み

チーム

Appalachian State University, Team S2-G4, Menagarishvili Fall 2018 Appalachian State University, Team S2-G4, Menagarishvili Fall 2018人のメンバー

APSU-MENAGARISHVILI-F18S2G4

3 メンバー

10のガイドは作成済み

0 件のコメント

コメントを追加

統計データ:

過去 24時間: 0

過去 7 日: 2

過去 30 日: 5

今までの合計 674