メインコンテンツにスキップ

Dell Inspiron 14-5447 Keyboard Replacement

必要な工具と部品

  1. Dell Inspiron 14-5447 Keyboard Replacement, Battery: 手順 1、 1の画像 1
    • Flip the laptop upside down to access the battery.

  2. Dell Inspiron 14-5447 Keyboard Replacement: 手順 2、 2の画像 1 Dell Inspiron 14-5447 Keyboard Replacement: 手順 2、 2の画像 2
    • Remove the two black 5.70mm Phillips#0 screws on the case's back.

    • Insert a plastic opening tool into the small slit, centered between the removed screws, and pry open the back cover

  3. Dell Inspiron 14-5447 Keyboard Replacement: 手順 3、 2の画像 1 Dell Inspiron 14-5447 Keyboard Replacement: 手順 3、 2の画像 2
    • Remove the two 5.70mm Phillips #0 screws that secure the battery in place on its left side .

    • Treat the battery with care - puncturing or bending may cause damage to the battery and may result in fire or injury.

  4. Dell Inspiron 14-5447 Keyboard Replacement: 手順 4、 2の画像 1 Dell Inspiron 14-5447 Keyboard Replacement: 手順 4、 2の画像 2
    • Use the black, plastic flap on the left side to pull the battery out.

    • Slowly lift the flap up and the battery should slide out.

  5. Dell Inspiron 14-5447 Keyboard Replacement, Keyboard: 手順 5、 3の画像 1 Dell Inspiron 14-5447 Keyboard Replacement, Keyboard: 手順 5、 3の画像 2 Dell Inspiron 14-5447 Keyboard Replacement, Keyboard: 手順 5、 3の画像 3
    • Locate the five small slits at the top of the keyboard.

    • Using a plastic opening tool, carefully pry each slit to loosen the keyboard.

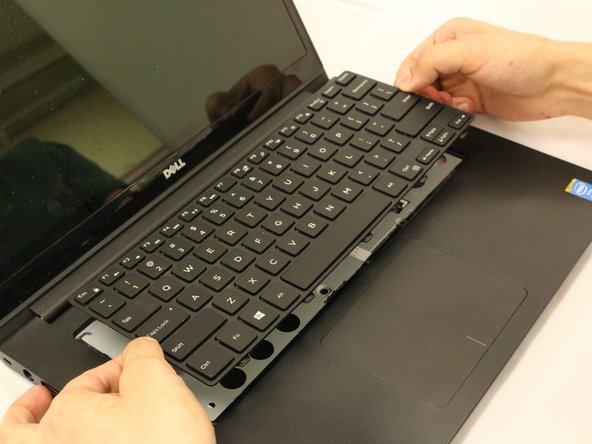
    • Slide the keyboard towards the screen at an angle for removal.

    • Be cautious when lifting the keyboard because there are secured, fragile wires connected underneath it.

  6. Dell Inspiron 14-5447 Keyboard Replacement: 手順 6、 2の画像 1 Dell Inspiron 14-5447 Keyboard Replacement: 手順 6、 2の画像 2
    • If the keyboard is not lifted with caution, damage to the cables may occur.

    • Lift the keyboard and flip it onto the mouse-pad.

  7. Dell Inspiron 14-5447 Keyboard Replacement: 手順 7、 3の画像 1 Dell Inspiron 14-5447 Keyboard Replacement: 手順 7、 3の画像 2 Dell Inspiron 14-5447 Keyboard Replacement: 手順 7、 3の画像 3
    • Locate the two cable connectors. These connectors secure the cables to the laptop with small, securing flaps.

    • To release the cables, take each flap and flip them upwards to the unlocking position.

    • Pull both the cables out after unlocking and set aside the keyboard.

終わりに

To reassemble your device, follow these instructions in reverse order.

ある他の人がこのガイドを完成しました。

作成者

7人の作成者と共同で作成されました。

Miguel Vargas

メンバー登録日: 04/10/17

119 ポイント

1ガイドが承認済み

チーム

0 件のコメント

コメントを追加

統計データ:

過去 24時間: 0

過去 7 日: 1

過去 30 日: 11

今までの合計 1,229