メインコンテンツにスキップ

Dell Inspiron 13z 5323 Keyboard Replacement

必要な工具と部品

  1. Dell Inspiron 13z 5323 Keyboard Replacement, Keyboard: 手順 1、 3の画像 1 Dell Inspiron 13z 5323 Keyboard Replacement, Keyboard: 手順 1、 3の画像 2 Dell Inspiron 13z 5323 Keyboard Replacement, Keyboard: 手順 1、 3の画像 3
    • First flip the device over, so the bottom is facing you. Then you will remove the highlighted screw.

  2. Dell Inspiron 13z 5323 Keyboard Replacement: 手順 2、 3の画像 1 Dell Inspiron 13z 5323 Keyboard Replacement: 手順 2、 3の画像 2 Dell Inspiron 13z 5323 Keyboard Replacement: 手順 2、 3の画像 3
    • Flip over the laptop and open it so that the screen is facing you.

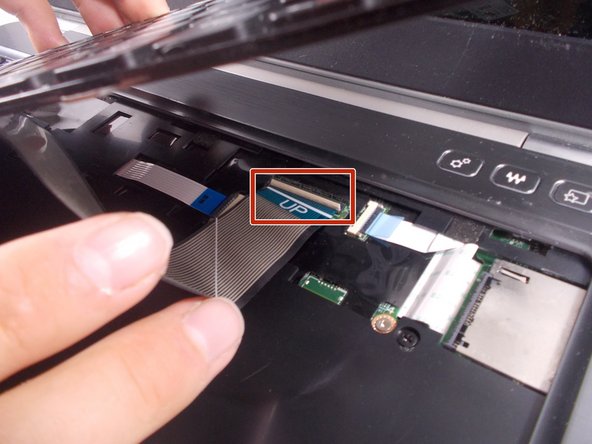
    • At the top side of the Keyboard closest to the screen you will find 2 inset plastic clips. The clips are shown here in red. Using the flat and of the metal prying tool bend the clips in and at the same time lift the keyboard up.

    • Their is a ribbon connector still attached to the bottom of the keyboard. You should be careful not to damage this cable.

  3. Dell Inspiron 13z 5323 Keyboard Replacement: 手順 3、 2の画像 1 Dell Inspiron 13z 5323 Keyboard Replacement: 手順 3、 2の画像 2
    • The ribbon connector seen in yellow can be removed by flipping up the plastic hinge clamp with a thin plastic pry lever

終わりに

To reassemble your device, follow these instructions in reverse order.

作成者

2人の作成者と共同で作成されました。

Chase Hussey

メンバー登録日: 03/08/17

201 ポイント

2のガイドは作成済み

チーム

UMass Dartmouth, Team S5-G6, Botvin Spring 2017 UMass Dartmouth, Team S5-G6, Botvin Spring 2017人のメンバー

UMASSD-BOTVIN-S17S5G6

3 メンバー

4のガイドは作成済み

0 件のコメント

コメントを追加

統計データ:

過去 24時間: 0

過去 7 日: 2

過去 30 日: 3

今までの合計 344