メインコンテンツにスキップ

Dell Inspiron 13z 5323 Hard Drive Replacement

必要な工具と部品

  1. Dell Inspiron 13z 5323 Hard Drive Replacement, Remove the Screws: 手順 1、 1の画像 1
    • WARNING: Before working inside your computer, read the safety information that shipped with your computer and follow the steps in "Before You Begin".

    • CAUTION: Hard drives are extremely fragile. Exercise care when handling the hard drive.

    • Remove the screws that secure the hard-drive assembly to the computer base.

  2. Dell Inspiron 13z 5323 Hard Drive Replacement, Disconnecting the Hard-Drive Cable: 手順 2、 2の画像 1 Dell Inspiron 13z 5323 Hard Drive Replacement, Disconnecting the Hard-Drive Cable: 手順 2、 2の画像 2
    • Disconnect the hard-drive cable connector from the hard-drive assembly.

  3. Dell Inspiron 13z 5323 Hard Drive Replacement, Lifting the Hard-Drive Assembly: 手順 3、 1の画像 1
    • Lift the hard-drive assembly away from the computer base.

  4. Dell Inspiron 13z 5323 Hard Drive Replacement, Remove the Screws: 手順 4、 1の画像 1
    • Remove the screws that secure the hard-drive bracket to the hard drive.

  5. Dell Inspiron 13z 5323 Hard Drive Replacement, Lifting the Hard-Drive Bracket: 手順 5、 2の画像 1 Dell Inspiron 13z 5323 Hard Drive Replacement, Lifting the Hard-Drive Bracket: 手順 5、 2の画像 2
    • Lift the hard-drive bracket off the hard drive.

  6. Dell Inspiron 13z 5323 Hard Drive Replacement, Align the Screw Holes: 手順 6、 1の画像 1
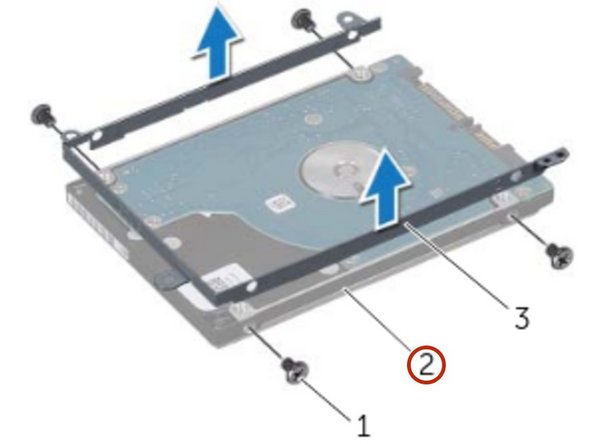
    • Align the screw holes on the hard drive-bracket with the screw holes on the NEW hard drive.

  7. Dell Inspiron 13z 5323 Hard Drive Replacement, Replace the Screws: 手順 7、 1の画像 1
    • Replace the screws that secure the hard-drive bracket to the hard drive.

  8. Dell Inspiron 13z 5323 Hard Drive Replacement, Connecting the Hard-Drive Cable: 手順 8、 2の画像 1 Dell Inspiron 13z 5323 Hard Drive Replacement, Connecting the Hard-Drive Cable: 手順 8、 2の画像 2
    • Connect the hard-drive cable connector to the hard-drive assembly.

  9. Dell Inspiron 13z 5323 Hard Drive Replacement, Align the Screw Holes: 手順 9、 1の画像 1
    • Align the screw holes on the hard-drive assembly with the screw holes on the computer base.

  10. Dell Inspiron 13z 5323 Hard Drive Replacement, Replace the Screws: 手順 10、 1の画像 1
    • Replace the screws that secure the hard-drive assembly to the computer base.

終わりに

To reassemble your device, follow these instructions in reverse order.

作成者

2人の作成者と共同で作成されました。

Terrence15

メンバー登録日: 12/18/17

79,121 ポイント

441のガイドは作成済み

チーム

RampUP America, Inc. RampUP America, Inc.人のメンバー

Community

42 メンバー

1,985のガイドは作成済み

0 件のコメント

コメントを追加

統計データ:

過去 24時間: 1

過去 7 日: 3

過去 30 日: 5

今までの合計 595