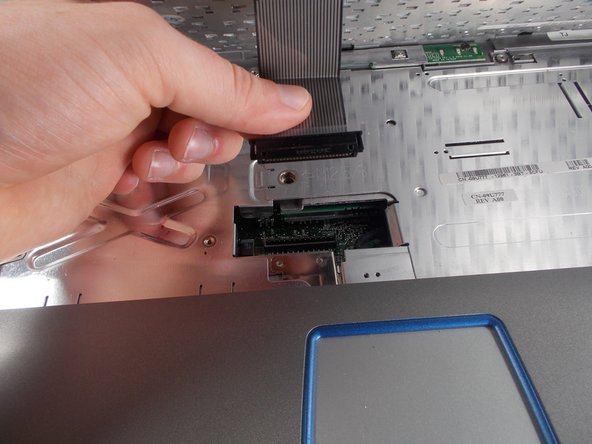
メインコンテンツにスキップ

Dell Inspiron 1100 Keyboard Replacement

必要な工具と部品

  1. Dell Inspiron 1100 Keyboard Replacement, Keyboard: 手順 1、 3の画像 1 Dell Inspiron 1100 Keyboard Replacement, Keyboard: 手順 1、 3の画像 2 Dell Inspiron 1100 Keyboard Replacement, Keyboard: 手順 1、 3の画像 3
    • Remove the plastic face plate from the laptop using the iFixit Plastic Opening Tool.

    • Start by inserting the iFixit Plastic Opening Tool into the groove on the right side of the face plate.

    • This step does require some force. Be careful to not bend or break the plastic face plate.

  2. Dell Inspiron 1100 Keyboard Replacement: 手順 2、 2の画像 1 Dell Inspiron 1100 Keyboard Replacement: 手順 2、 2の画像 2
    • Remove the four 3mm Phillips #0 screws securing the keyboard.

  3. Dell Inspiron 1100 Keyboard Replacement: 手順 3、 1の画像 1
    • Lift up the keyboard to expose the ribbon header on the motherboard.

    • Be careful as the keyboard can only move a little ways from the surface of the laptop and is easily damaged.

  4. Dell Inspiron 1100 Keyboard Replacement: 手順 4、 2の画像 1 Dell Inspiron 1100 Keyboard Replacement: 手順 4、 2の画像 2
    • Grip the ribbon on its hard plastic connector, and pull the ribbon and its connector out of the motherboard header.

    • Do not pull on the ribbon itself, as this may cause internal damage to the connector.

終わりに

To reassemble your device, follow these instructions in reverse order.

2 の人々がこのガイドを完成させました。

作成者

3人の作成者と共同で作成されました。

Alexander Pacheco

メンバー登録日: 10/19/16

610 ポイント

5のガイドは作成済み

チーム

UMass Dartmouth, Team 3-3, Isaacson Fall 2016 UMass Dartmouth, Team 3-3, Isaacson Fall 2016人のメンバー

UMASSD-ISAACSON-F16S3G3

3 メンバー

9のガイドは作成済み

0 件のコメント

コメントを追加

統計データ:

過去 24時間: 0

過去 7 日: 0

過去 30 日: 0

今までの合計 443