はじめに
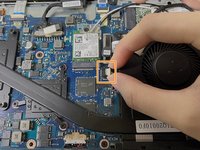
This guide teaches you how to repair and replace the cooling fan on the Dell Inspiron 15-7560 laptop.
必要な工具と部品
-
-
Power off the laptop and place the laptop with the bottom facing upwards.
-
Remove eight 5 mm screws from the bottom of the laptop.
-
Loosen the three captive screws.
-
Use an iFixit opening tool to pry the bottom cover away from the laptop.
-
-


To reassemble your device, follow these instructions in reverse order.
To reassemble your device, follow these instructions in reverse order.
6 の人々がこのガイドを完成させました。
以下の翻訳者の皆さんにお礼を申し上げます:
100%


これらの翻訳者の方々は世界を修理する私たちのサポートをしてくれています。 あなたも貢献してみませんか?
翻訳を始める ›

チーム

York University, Team 1-4, O'Regan Winter 2022 York University, Team 1-4, O'Regan Winter 2022人のメンバー
YORK-O'REGAN-W22S1G4
1 メンバー
2のガイドは作成済み