メインコンテンツにスキップ

Dell Alienware M18x Display Assembly Replacement

必要な工具と部品

  1. Dell Alienware M18x Display Assembly Replacement, Pull the Display Cable: 手順 1、 1の画像 1
    • WARNING: Before working inside your computer, read the safety information that shipped with your computer.

    • CAUTION: To avoid electrostatic discharge, ground yourself by using a wrist grounding strap or by periodically touching an unpainted metal surface (such as a connector on your computer).

    • CAUTION: Only a certified service technician should perform repairs on your computer. Damage due to servicing that is not authorized by Dell is not covered by your warranty.

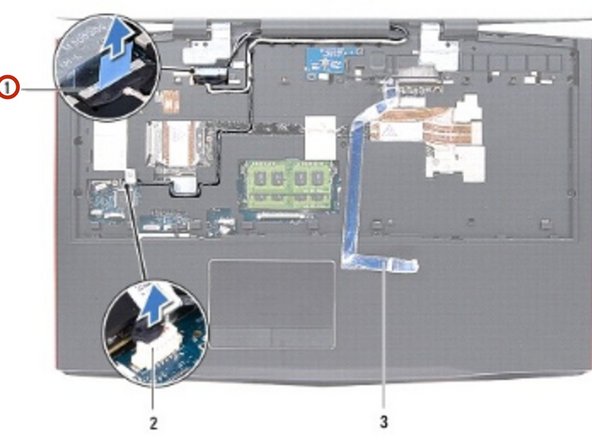
    • Using the pull-tab, pull the display cable to disconnect the display cable from the connector on the system board.

  2. Dell Alienware M18x Display Assembly Replacement, Disconnecting the Video-Card Connector Cable: 手順 2、 1の画像 1
    • Disconnect and peel off the video-card connector cable from the connector on the system board.

  3. Dell Alienware M18x Display Assembly Replacement, Disconnecting the LED-Logo Board Cable: 手順 3、 2の画像 1 Dell Alienware M18x Display Assembly Replacement, Disconnecting the LED-Logo Board Cable: 手順 3、 2の画像 2
    • Disconnect the LED-logo board cable from the connector on the system board.

  4. Dell Alienware M18x Display Assembly Replacement, Close the Display: 手順 4、 1の画像 1
    • Close the display and turn the computer over.

  5. Dell Alienware M18x Display Assembly Replacement, Removing the Cables: 手順 5、 1の画像 1
    • Disconnect the antenna cables from the Mini-Card.

    • Note the routing of the antenna cables, and then remove the cables from the routing guides on the computer base.

  6. Dell Alienware M18x Display Assembly Replacement, Remove the  Screws: 手順 6、 1の画像 1
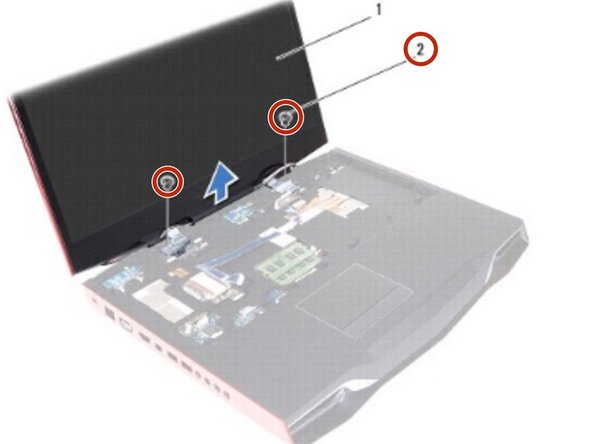
    • Remove the four screws that secure the display assembly on the computer base.

  7. Dell Alienware M18x Display Assembly Replacement, Note the Routing: 手順 7、 1の画像 1
    • Turn the computer over and open the display.

    • Note the routing of the display cable and LED -logo board cable, and then remove the cables from the routing guides on the palm-rest assembly.

  8. Dell Alienware M18x Display Assembly Replacement, Remove the Screws: 手順 8、 1の画像 1
    • Remove the two screws, on the display hinges, that secure the display assembly to the computer base.

    • Gently slide out the antenna cables through the slot on the computer base.

  9. Dell Alienware M18x Display Assembly Replacement, Moving the Display: 手順 10、 1の画像 1
    • Move the display to a perpendicular position to the computer base, and then lift the display assembly off the computer.

  10. Dell Alienware M18x Display Assembly Replacement, Placing the Display Assembly: 手順 11、 1の画像 1
    • Place the NEW display assembly in position and replace the two screws, on the display hinges, that secure the display assembly to the computer base

  11. Dell Alienware M18x Display Assembly Replacement, Routing the Display Cable: 手順 12、 1の画像 1
    • Route the display cable and LED -logo board cable through the routing guides on the palm-rest assembly.

  12. Dell Alienware M18x Display Assembly Replacement, Connecting the Display Cable: 手順 13、 1の画像 1
    • Connect the display cable, video-card connector cable, and LED-logo board cable to the respective connectors on the system board.

  13. Dell Alienware M18x Display Assembly Replacement, Sliding the Cables: 手順 14、 1の画像 1
    • Slide the Mini-Card antenna cables through the slot on the computer base.

  14. Dell Alienware M18x Display Assembly Replacement, Close the Display: 手順 15、 1の画像 1
    • Close the display and turn the computer over.

終わりに

To reassemble your device, follow these instructions in reverse order.

ある他の人がこのガイドを完成しました。

作成者

1人の作成者と共同作成されました。

Terrence15

メンバー登録日: 12/18/17

79,121 ポイント

441のガイドは作成済み

チーム

RampUP America, Inc. RampUP America, Inc.人のメンバー

Community

42 メンバー

1,985のガイドは作成済み

0 件のコメント

コメントを追加

統計データ:

過去 24時間: 2

過去 7 日: 7

過去 30 日: 12

今までの合計 659