メインコンテンツにスキップ

Dell Alienware 14 Wireless Mini-Card Replacement

必要な工具と部品

  1. Dell Alienware 14 Wireless Mini-Card Replacement, Close the Display: 手順 1、 1の画像 1
    • WARNING: Before working inside your computer, read the safety information that shipped with your computer and follow the steps in Before You Begin. . After working inside your computer, follow the instructions in "After Working Inside Your Computer".

    • Close the display, and turn the computer over.

  2. Dell Alienware 14 Wireless Mini-Card Replacement, Remove the Screws: 手順 2、 2の画像 1 Dell Alienware 14 Wireless Mini-Card Replacement, Remove the Screws: 手順 2、 2の画像 2
    • Remove the screws that secure the base cover to the computer base.

  3. Dell Alienware 14 Wireless Mini-Card Replacement, Slide and Lift the Base Cover: 手順 3、 1の画像 1
    • Slide and lift the base cover off the computer base.

  4. Dell Alienware 14 Wireless Mini-Card Replacement, Align the Tabs: 手順 4、 1の画像 1
    • Align the tabs on the NEW base cover with the slots on the computer base and slide the base cover into place.

  5. Dell Alienware 14 Wireless Mini-Card Replacement, Replace the Screws: 手順 5、 1の画像 1
    • Replace the screws that secure the base cover to the computer base.

  6. Dell Alienware 14 Wireless Mini-Card Replacement, Turn the Computer Over: 手順 6、 1の画像 1
    • Turn the computer over and open the display.

  7. Dell Alienware 14 Wireless Mini-Card Replacement, Disconnecting the Battery Cable: 手順 7、 1の画像 1
  8. Dell Alienware 14 Wireless Mini-Card Replacement, Remove the Screws: 手順 8、 1の画像 1
    • Remove the screws that secure the battery to the computer base.

  9. Dell Alienware 14 Wireless Mini-Card Replacement, Using the Battery Cable: 手順 9、 1の画像 1
    • Using the battery cable, lift the battery and release it from the tabs on the computer base.

  10. Dell Alienware 14 Wireless Mini-Card Replacement, Turn the Computer Over: 手順 10、 1の画像 1
    • Turn the computer over and open the display as far as possible.

  11. Dell Alienware 14 Wireless Mini-Card Replacement, The Power Button: 手順 11、 1の画像 1
    • Press and hold the power button for five seconds to ground the system board.

    • Close the display and turn the computer over.

  12. Dell Alienware 14 Wireless Mini-Card Replacement, Align the Tabs: 手順 13、 1の画像 1
    • Align the tabs on the NEW battery with the slots on the computer base.

  13. Dell Alienware 14 Wireless Mini-Card Replacement, Align the Screw Holes: 手順 14、 1の画像 1
    • Align the screw holes on the battery with the screw holes on the computer base.

  14. Dell Alienware 14 Wireless Mini-Card Replacement, Replace the Screws: 手順 15、 1の画像 1
    • Replace the screws that secure the battery to the computer base.

  15. Dell Alienware 14 Wireless Mini-Card Replacement, Connect the Battery Cable: 手順 16、 1の画像 1
    • Connect the battery cable to the system-board connector.

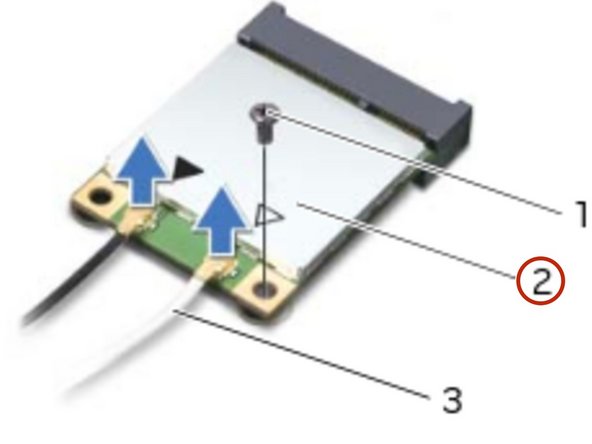
  16. Dell Alienware 14 Wireless Mini-Card Replacement, Disconnect the Antenna Cables: 手順 17、 2の画像 1 Dell Alienware 14 Wireless Mini-Card Replacement, Disconnect the Antenna Cables: 手順 17、 2の画像 2
  17. Dell Alienware 14 Wireless Mini-Card Replacement, Remove the Screw: 手順 18、 1の画像 1
    • Remove the screw that secures the wireless mini-card to the system board.

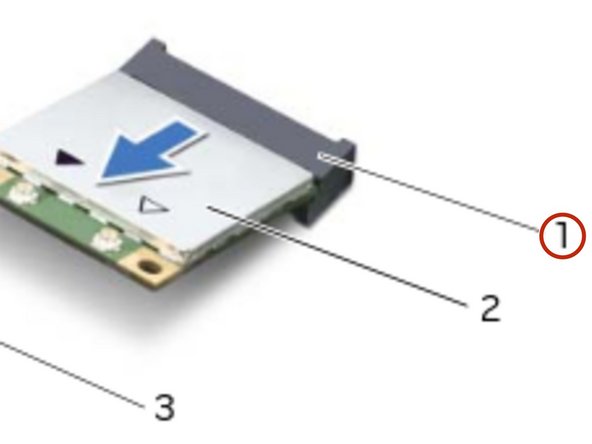
  18. Dell Alienware 14 Wireless Mini-Card Replacement, Remove the Wireless-Mini Card: 手順 19、 2の画像 1 Dell Alienware 14 Wireless Mini-Card Replacement, Remove the Wireless-Mini Card: 手順 19、 2の画像 2
    • Slide and remove the wireless-mini card from the system-board connector.

  19. Dell Alienware 14 Wireless Mini-Card Replacement, Align the Notch: 手順 20、 1の画像 1
    • Align the notch on the NEW wireless mini-card with the tab on the system-board connector.

    • CAUTION: Use firm and even pressure to slide the wireless mini-card into place. If you use excessive force, you may damage the connector.

    • CAUTION: The connectors are keyed to ensure correct insertion. If you feel resistance, check the connectors on the wireless mini-card and on the system-board connector, and realign the wireless mini-card.

    • CAUTION: To avoid damage to the wireless mini-card, never place cables under the wireless mini-card.

  20. Dell Alienware 14 Wireless Mini-Card Replacement, Inserting the Wireless Mini-Card: 手順 21、 1の画像 1
    • Insert the wireless mini-card at a 45-degree angle into the system-board connector.

  21. Dell Alienware 14 Wireless Mini-Card Replacement, Securing the Wireless Mini-Card: 手順 22、 1の画像 1
    • Press the other end of the wireless mini-card down into the slot on the system board and replace the screw that secures the wireless mini-card to the system board.

  22. Dell Alienware 14 Wireless Mini-Card Replacement, Connect the Antenna Cables: 手順 23、 1の画像 1
    • Connect the antenna cables to the connectors on the wireless mini-card.

終わりに

To reassemble your device, follow these instructions in reverse order.

作成者

2人の作成者と共同で作成されました。

Terrence15

メンバー登録日: 12/18/17

79,121 ポイント

441のガイドは作成済み

チーム

RampUP America, Inc. RampUP America, Inc.人のメンバー

Community

42 メンバー

1,985のガイドは作成済み

0 件のコメント

コメントを追加

統計データ:

過去 24時間: 0

過去 7 日: 0

過去 30 日: 1

今までの合計 185