メインコンテンツにスキップ

DeLonghi ECAM Series upper brew piston replacement

必要な工具と部品

  1. DeLonghi ECAM Series upper brew piston replacement, DeLonghi ECAM back panel removal: 手順 1、 1の画像 1
    • Unplug the power cord!

    • Remove all attachments such as water tank, pulp drawer, brew group.

    • Turn the machine with the back facing you.

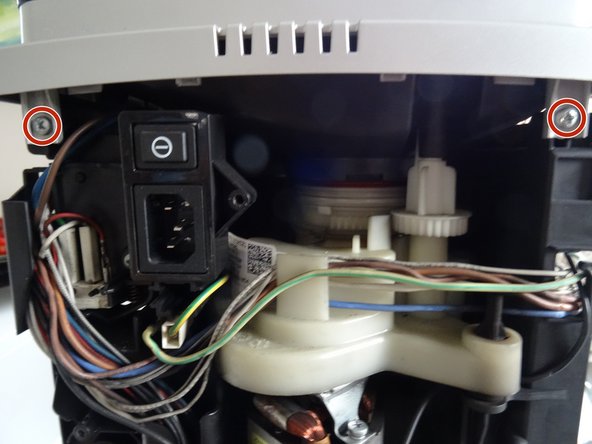
    • Remove five Torx T20 security screws.

    • A small hurdle: These screws have a pin in the middle, so the screwdriver must have a hole.

  2. DeLonghi ECAM Series upper brew piston replacement: 手順 2、 2の画像 1 DeLonghi ECAM Series upper brew piston replacement: 手順 2、 2の画像 2
    • Lift out the back.

    • The following components are immediately visible:

    • grinder

    • pump

    • flowmeter

  3. DeLonghi ECAM Series upper brew piston replacement, DeLonghi ECAM Series left side panel: 手順 3、 3の画像 1 DeLonghi ECAM Series upper brew piston replacement, DeLonghi ECAM Series left side panel: 手順 3、 3の画像 2 DeLonghi ECAM Series upper brew piston replacement, DeLonghi ECAM Series left side panel: 手順 3、 3の画像 3
    • Push the side panel back about 1.5 cm.

    • Lift off the panel.

    • The following compononents are exposed:

    • Heater

    • Expansion chamber

    • Gear drive

    • Steam valve

  4. DeLonghi ECAM Series upper brew piston replacement, Remove DeLonghi ECAM series top cover: 手順 4、 3の画像 1 DeLonghi ECAM Series upper brew piston replacement, Remove DeLonghi ECAM series top cover: 手順 4、 3の画像 2 DeLonghi ECAM Series upper brew piston replacement, Remove DeLonghi ECAM series top cover: 手順 4、 3の画像 3
    • Depending on the model, the steam tap/water spout must be removed, there are slight differences here.

    • Pull out the plastic clip on the steam nozzle.

    • Pull the steam nozzle out towards you.

  5. DeLonghi ECAM Series upper brew piston replacement: 手順 5、 2の画像 1 DeLonghi ECAM Series upper brew piston replacement: 手順 5、 2の画像 2
    • Carefully pull off the steam faucet toggle. Only use a plastic tool to pry to avoid damaging the bezel.

  6. DeLonghi ECAM Series upper brew piston replacement: 手順 6、 3の画像 1 DeLonghi ECAM Series upper brew piston replacement: 手順 6、 3の画像 2 DeLonghi ECAM Series upper brew piston replacement: 手順 6、 3の画像 3
    • If you haven't already done so, also detach the right-hand cover on the water tank.

    • Remove the four Phillips screws securing the top cover.

    • Lift the top cover up a bit. That might be a bit sticky.

    • Don't remove the top cover completely, some models still have cables attached to the cup warmer.

    • If there is a cup warmer, then unscrew the nut SW7 with which the two green-yellow cables are connected and loosen it. The two brown cables on the other side can stay if you just put the cover on top.

    • Place the top cover on top, or remove it entirely.

  7. DeLonghi ECAM Series upper brew piston replacement, Replace the upper brewing piston: 手順 7、 3の画像 1 DeLonghi ECAM Series upper brew piston replacement, Replace the upper brewing piston: 手順 7、 3の画像 2 DeLonghi ECAM Series upper brew piston replacement, Replace the upper brewing piston: 手順 7、 3の画像 3
    • The remaining front cover must also be removed.

    • Unscrew two screws on the left side.

    • Unscrew a screw on the right side.

    • Gently pull the front cover down. She might be a bit stuck.

  8. DeLonghi ECAM Series upper brew piston replacement: 手順 8、 1の画像 1
    • Remove the two screws on the control box.

    • Carefully lift the control box to one side.

    • Do not remove the box entirely, it is still connected with a ribbon cable. You can pull out the cable and put the box aside, possibly screwing it on loosely on one side.

  9. DeLonghi ECAM Series upper brew piston replacement: 手順 9、 2の画像 1 DeLonghi ECAM Series upper brew piston replacement: 手順 9、 2の画像 2
    • Remove the two screws on the coffee spout.

    • Lift off the coffee spout.

    • Pull off the silicone hose on the back of the coffee spout and remove the spout.

  10. DeLonghi ECAM Series upper brew piston replacement: 手順 10、 3の画像 1 DeLonghi ECAM Series upper brew piston replacement: 手順 10、 3の画像 2 DeLonghi ECAM Series upper brew piston replacement: 手順 10、 3の画像 3
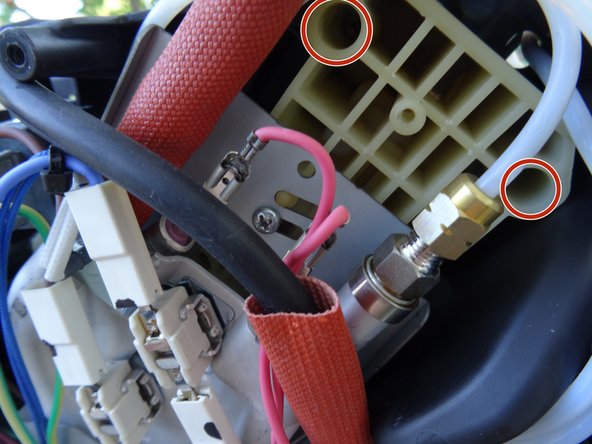
    • The support of the upper piston is fixed with two screws on the left side. Depending on the model, these screws must be uncovered.

    • The first picture shows a model with an additional steam heater. Here the steam heater has to be unscrewed (one short screw on top, one further down), then it can be pulled out a few centimetres.

    • The second picture shows a model with a manual steam tap. Here the two screws on the tap must be loosened, then the steam tap can be pushed a little to the side.

    • Once the two screws are exposed, unscrew them.

  11. DeLonghi ECAM Series upper brew piston replacement: 手順 11、 3の画像 1 DeLonghi ECAM Series upper brew piston replacement: 手順 11、 3の画像 2 DeLonghi ECAM Series upper brew piston replacement: 手順 11、 3の画像 3
    • There are six connections on the upper brewing piston: three hot water pressure lines, one non-pressurized waste water line, a hose line to the coffee spout and two cables to the microswitch. All must be resolved first.

    • Pull out the clip at the top left and loosen the pressure line. Pay attention to the O-ring seal. It either hangs on the line or afterwards. When reassembling, replace it with a new one if possible.

    • Pull out the clamp in the middle and loosen the pressure line. Pay attention to the O-ring seal. It either hangs on the line or afterwards. When reassembling, replace it with a new one if possible.

    • Pull out the clamp on the bottom left and loosen the pressure line. Pay attention to the O-ring seal. It either hangs on the line or afterwards. When reassembling, replace it with a new one if possible.

  12. DeLonghi ECAM Series upper brew piston replacement: 手順 12、 1の画像 1
    • Disconnect the two flat connectors from the microswitch connection

  13. DeLonghi ECAM Series upper brew piston replacement: 手順 13、 1の画像 1
    • Take off the black bend protection on the middle pressure line.

  14. DeLonghi ECAM Series upper brew piston replacement: 手順 14、 1の画像 1
    • Unscrew the two Allen screws (4 mm).

    • Lift off the stainless steel bracket.

  15. DeLonghi ECAM Series upper brew piston replacement: 手順 15、 1の画像 1
    • Pull out the pressure hoses that are in the way through the openings on the left.

    • Detach any silicone hose that may be present.

    • The upper piston support plate is now free. However, it is very tight and it is tricky to get it out. Be patient and work carefully. Make sure that the ribbon cable to the control panel is not damaged.

終わりに

Work the steps in reverse order to reassemble your device.

ある他の人がこのガイドを完成しました。

以下の翻訳者の皆さんにお礼を申し上げます:

de en

100%

oldturkey03さんは世界中で修理する私たちを助けてくれています! あなたも貢献してみませんか?
翻訳を始める ›

作成者

1人の作成者と共同作成されました。

VauWeh

メンバー登録日: 10/19/15

212,879 ポイント

265のガイドは作成済み

チーム

Repair is War on Entropy Repair is War on Entropy人のメンバー

Community

27 メンバー

1,209のガイドは作成済み

2 件のコメント

Thanks for writing this up! The needed tools should be a security torx T20 (back cover), T15 (upper piston), Philips #2, and allen wrenches I think.

So I followed the guide but still no coffee or water from the coffee spouts. Water from the steam pipe still works. Any tips? New upper piston or something else?

Gerhard Burger - 返信

Perhaps a broken or clogged solenoid valve?

VauWeh -

コメントを追加

統計データ:

過去 24時間: 2

過去 7 日: 19

過去 30 日: 79

今までの合計 2,437