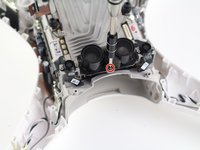
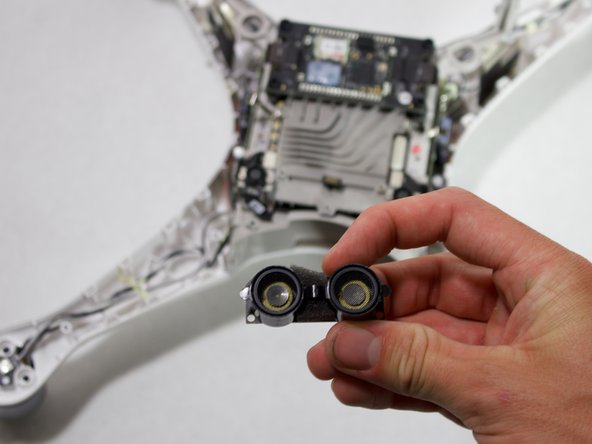
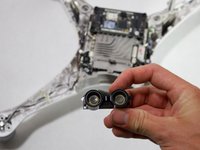
メインコンテンツにスキップ

DJI Phantom 4 Advanced Ultrasonic Sensor Replacement

必要な工具と部品

  1. DJI Phantom 4 Advanced Ultrasonic Sensor Replacement, Propeller: 手順 1、 2の画像 1 DJI Phantom 4 Advanced Ultrasonic Sensor Replacement, Propeller: 手順 1、 2の画像 2
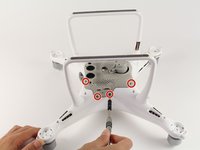
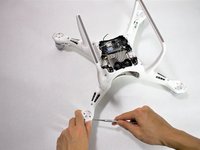
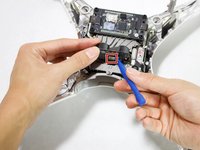
    • Use your finger tips to pinch the damaged propeller.

    • Twist the propeller counterclockwise and pull up to remove.

  2. DJI Phantom 4 Advanced Ultrasonic Sensor Replacement, Shell: 手順 2、 2の画像 1 DJI Phantom 4 Advanced Ultrasonic Sensor Replacement, Shell: 手順 2、 2の画像 2
    • Remove the eight 7 mm hex screws by turning counterclockwise with a 2 mm hex bit.

  3. DJI Phantom 4 Advanced Ultrasonic Sensor Replacement: 手順 3、 1の画像 1
    • Pry the LED motor covers off with a metal spudger.

    • The prying location is marked by an indent that points outward from the arm.

  4. DJI Phantom 4 Advanced Ultrasonic Sensor Replacement: 手順 4、 1の画像 1
    • Pry the paper covering off the four corners with a metal spudger.

  5. DJI Phantom 4 Advanced Ultrasonic Sensor Replacement: 手順 5、 1の画像 1
    • Remove the twelve 8.7 mm hex screws with a 2 mm hex bit from the motor bases.

  6. DJI Phantom 4 Advanced Ultrasonic Sensor Replacement: 手順 6、 2の画像 1 DJI Phantom 4 Advanced Ultrasonic Sensor Replacement: 手順 6、 2の画像 2
    • Flip the drone on its back

    • Remove the eight 4.5 mm hex screws by turning them counterclockwise with a 1.5 mm hex bit.

    • Separate the mesh from the drone by pulling up gently and rocking left to right.

    • The cable connects from the camera to the drone. Pulling up could rip the connection. Tilt the mesh 90 degrees towards the cable.

  7. DJI Phantom 4 Advanced Ultrasonic Sensor Replacement: 手順 7、 1の画像 1
    • Remove two 1.2mm screws using the JIS #000 bit from the camera cable retaining bracket.

  8. DJI Phantom 4 Advanced Ultrasonic Sensor Replacement: 手順 8、 1の画像 1
    • Lift the camera connector at one end with your hand and remove the mesh.

  9. DJI Phantom 4 Advanced Ultrasonic Sensor Replacement: 手順 9、 3の画像 1 DJI Phantom 4 Advanced Ultrasonic Sensor Replacement: 手順 9、 3の画像 2 DJI Phantom 4 Advanced Ultrasonic Sensor Replacement: 手順 9、 3の画像 3
    • Remove the two 1.2 mm screws using a JIS #000 bit from the antenna retaining bracket.

    • Pull the four U.FL antennae up.

    • The U.FL antenna connectors are fragile.

    • Remove the two 4 mm screws using a JIS #000 bit.

  10. DJI Phantom 4 Advanced Ultrasonic Sensor Replacement: 手順 10、 2の画像 1 DJI Phantom 4 Advanced Ultrasonic Sensor Replacement: 手順 10、 2の画像 2
    • Pry apart the clamshell at the motor end.

    • Separate the clamshell.

    • Two wires connect from the lower frame to the upper frame at the front of the drone. Pulling the clamshell apart hard may damage the connectors and wires.

  11. DJI Phantom 4 Advanced Ultrasonic Sensor Replacement: 手順 11、 1の画像 1
    • Press the connector tabs with a spudger and pull on the wire simultaneously.

    • Remove the shell from the rest of the drone.

  12. DJI Phantom 4 Advanced Ultrasonic Sensor Replacement, Ultrasonic Sensor: 手順 12、 2の画像 1 DJI Phantom 4 Advanced Ultrasonic Sensor Replacement, Ultrasonic Sensor: 手順 12、 2の画像 2
    • Remove the three 2.8 mm screws with a JIS #000 screwdriver.

    • The screw on the back of the ultrasonic sensor is covered by foam.

  13. DJI Phantom 4 Advanced Ultrasonic Sensor Replacement: 手順 13、 2の画像 1 DJI Phantom 4 Advanced Ultrasonic Sensor Replacement: 手順 13、 2の画像 2
    • Pry the ribbon cable off the ultrasonic sensor using a plastic opening tool.

終わりに

To reassemble your device, follow these instructions in reverse order.

ある他の人がこのガイドを完成しました。

作成者

3人の作成者と共同で作成されました。

David Hudson

メンバー登録日: 10/08/18

301 ポイント

2のガイドは作成済み

チーム

Cal Poly, Team S15-G6, White Fall 2018 Cal Poly, Team S15-G6, White Fall 2018人のメンバー

CPSU-WHITE-F18S15G6

4 メンバー

6のガイドは作成済み

0 件のコメント

コメントを追加

統計データ:

過去 24時間: 0

過去 7 日: 2

過去 30 日: 10

今までの合計 1,160