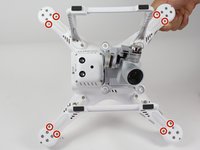
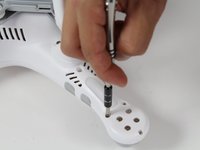
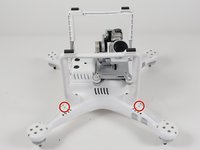
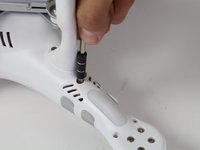
メインコンテンツにスキップ

DJI Phantom 3 Advanced Cover Replacement

必要な工具と部品

  1. DJI Phantom 3 Advanced Cover Replacement, Battery: 手順 1、 2の画像 1 DJI Phantom 3 Advanced Cover Replacement, Battery: 手順 1、 2の画像 2
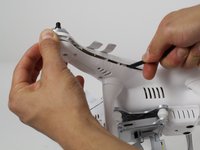
    • With the battery facing you, locate the two tabs on the top and bottom of the battery as shown.

    • Remember to disarm and power down your quadcopter before beginning any disassembly.

  2. DJI Phantom 3 Advanced Cover Replacement: 手順 2、 2の画像 1 DJI Phantom 3 Advanced Cover Replacement: 手順 2、 2の画像 2
    • Press the two tabs with your finger and thumb, and gently slide the battery towards you, out of the quadcopter frame.

    • With your other hand, be sure to hold the quadcopter steady to ensure that it stays still.

  3. DJI Phantom 3 Advanced Cover Replacement, Cover: 手順 3、 1の画像 1
    • Turn the Phantom 3 Advanced upside down.

  4. DJI Phantom 3 Advanced Cover Replacement: 手順 4、 1の画像 1
    • Remove the four 7mm long 2mm screws with a T-6 screwdriver.

    • There is one screw per arm, located at the tip of the arm.

  5. DJI Phantom 3 Advanced Cover Replacement: 手順 5、 2の画像 1 DJI Phantom 3 Advanced Cover Replacement: 手順 5、 2の画像 2
    • Remove the eight 5mm long 2.5mm screws using the T-8 screwdriver.

    • There are two 5mm screws on each arm.

  6. DJI Phantom 3 Advanced Cover Replacement: 手順 6、 2の画像 1 DJI Phantom 3 Advanced Cover Replacement: 手順 6、 2の画像 2
    • Remove the four 10mm long deep 3mm screws using the T-8 screwdriver.

    • There is one screw on each arm located near the landing gear.

  7. DJI Phantom 3 Advanced Cover Replacement: 手順 7、 3の画像 1 DJI Phantom 3 Advanced Cover Replacement: 手順 7、 3の画像 2 DJI Phantom 3 Advanced Cover Replacement: 手順 7、 3の画像 3
    • Carefully flip the phantom back over with the motors facing up.

    • Peel back the silver stickers from the seam in the cover.

    • Using a plastic spudger, slowly separate the two halves of the plastic shell.

    • This step requires some force, and the plastic will click loudly as the shell separates.

    • Do not fully remove the cover. There is a wire that needs to be detached from the control board before the cover is completely free.

  8. DJI Phantom 3 Advanced Cover Replacement: 手順 8、 3の画像 1 DJI Phantom 3 Advanced Cover Replacement: 手順 8、 3の画像 2 DJI Phantom 3 Advanced Cover Replacement: 手順 8、 3の画像 3
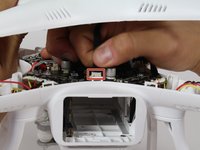
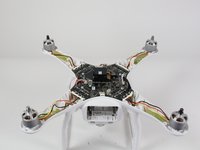
    • Slowly remove the upper half of the plastic case about halfway. There is a ribbon cable that's connects the cover and the control board.

    • Follow the ribbon cable to the control board and locate the connector that connects the cable to the control board.

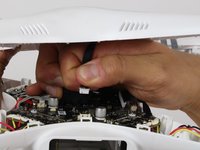
    • Press the tab on the side of the connector and pull up on the cable.

    • Continue to remove the shell the rest of the way.

終わりに

To reassemble your device, follow these instructions in reverse order.

10 の人々がこのガイドを完成させました。

作成者

3人の作成者と共同で作成されました。

Robert Comstock

メンバー登録日: 10/06/16

421 ポイント

2のガイドは作成済み

チーム

Cal Poly, Team 10-2, Livingston Fall 2016 Cal Poly, Team 10-2, Livingston Fall 2016人のメンバー

CPSU-LIVINGSTON-F16S10G2

3 メンバー

12のガイドは作成済み

3 件のコメント

Great Job Robert! Even the “Phantom Pilots Forum” had no recent recommendations for a disassembly manual, as DJI likes to “Fixit” themselves!

Michael Steinbrecher - 返信

Excellent detailed instructions. Having pictures on procedure makes it idiot proof.

Bolo - 返信

Does this also include the phantom 3 professional too? My understanding is that the only differences between them is the battery charger and the pro is 4k recording vs 1080p.

John D - 返信

コメントを追加

統計データ:

過去 24時間: 2

過去 7 日: 4

過去 30 日: 27

今までの合計 4,625