メインコンテンツにスキップ

Cuisinart Griddler GR- 4N LED Light Replacement

必要な工具と部品

  1. Cuisinart Griddler GR- 4N LED Light  Replacement, Cooking Surfaces: 手順 1、 2の画像 1 Cuisinart Griddler GR- 4N LED Light  Replacement, Cooking Surfaces: 手順 1、 2の画像 2
    • Ensure device is turned unplugged, cooled down and clean before attempting any replacements.

    • Remove cooking plates by pushing in the tabs on each side of the plate at the same time.

  2. Cuisinart Griddler GR- 4N LED Light  Replacement: 手順 2、 1の画像 1
    • Remove the six 5.5mm Phillips #2 screws that secure the bottom heating coil to the device.

  3. Cuisinart Griddler GR- 4N LED Light  Replacement: 手順 3、 1の画像 1
    • Remove the four 30 mm Phillips #2 screws that secure the bottom heating apparatus.

  4. Cuisinart Griddler GR- 4N LED Light  Replacement: 手順 4、 1の画像 1
    • Remove the single 5.5 mm Phillips #2 screw next to center black button.

    • After removing the center screw the metal plate should be free to remove.

  5. Cuisinart Griddler GR- 4N LED Light  Replacement: 手順 5、 2の画像 1 Cuisinart Griddler GR- 4N LED Light  Replacement: 手順 5、 2の画像 2
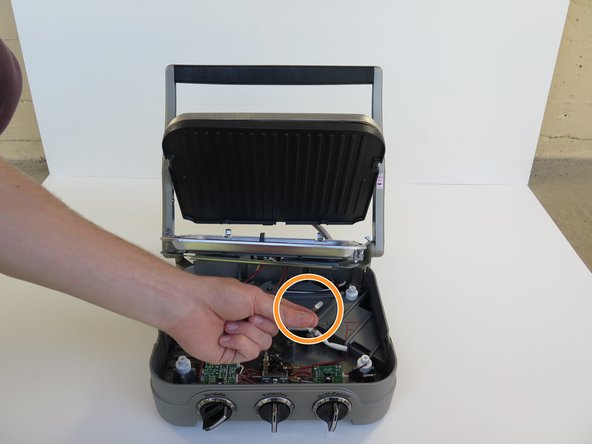
    • Lift the bottom heating apparatus up and remove large black center piece by pushing down on black button while sliding out.

    • Realign all surface and put device back together making sure all parts are lined up and heating surfaces are making contact.

    • The aligned parts will allow the cooking surfaces to work properly.

    Can you pls give your inputs as to how to fix the blinking light problem of the same Cuisinart model? In my sandwich maker and panini press both the left as well as the right knob light start flickering at the same time and the device wouldn't heatup

    Charu Bhardwaj - 返信

  6. Cuisinart Griddler GR- 4N LED Light  Replacement, Cuisinart Griddler GR- 4N Disassembly: 手順 6、 1の画像 1
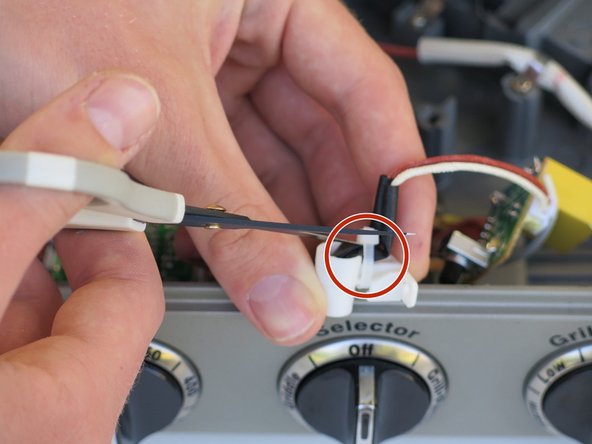
    • Remove the two 6 mm Phillips #2 screws that secure the knob circuit board.

    • Move the circuit board to the side so it is out of the way.

  7. Cuisinart Griddler GR- 4N LED Light  Replacement: 手順 7、 1の画像 1
    • Remove the two 6 mm Phillips #2 screws that secure the white plastic LED holder.

    This would be helpful except that I need the knobs !

    soaplady - 返信

  8. Cuisinart Griddler GR- 4N LED Light  Replacement, LED Light: 手順 8、 2の画像 1 Cuisinart Griddler GR- 4N LED Light  Replacement, LED Light: 手順 8、 2の画像 2
    • Cut the zip ties which hold the LED lights in place with scissors/knife.

  9. Cuisinart Griddler GR- 4N LED Light  Replacement: 手順 9、 2の画像 1 Cuisinart Griddler GR- 4N LED Light  Replacement: 手順 9、 2の画像 2
    • Slide back black plastic covers and cut the two wires connected to the LED with a pair of scissors.

    • The LED bulb should now be free to remove. In order to replace bulb you must solder the new LED into the existing wires.

    • Upon soldering the LED will need to be zip tied back in place.

終わりに

To reassemble your device, follow these instructions in reverse order.

2 の人々がこのガイドを完成させました。

作成者

2人の作成者と共同で作成されました。

Kayla Londono

メンバー登録日: 04/15/16

632 ポイント

4のガイドは作成済み

チーム

Cal Poly, Team 1-12, Maness Spring 2016 Cal Poly, Team 1-12, Maness Spring 2016人のメンバー

CPSU-MANESS-S16S1G12

4 メンバー

6のガイドは作成済み

4 件のコメント

Hai

is there any body can come home and help me

or any place I can send my machine and repair

regds

Leela Manilal

Raghavan Manilal - 返信

any tips on how to fix a broken thermostat?

Jean-Michel Léon - 返信

Will any green LED work? Or does it have to be a particular voltage?

Bob Mounger - 返信

How do I get the heating element off? It seems pretty securely connected via the red and white wires connected to the machine. Is there an easy way to disassemble this part? I honestly just want to clean the baked on grease on the pans but I’ve got to remove the heating element in order to do that. Any advice would be most appreciated. Thanks!

Katie Hoppmann - 返信

コメントを追加

統計データ:

過去 24時間: 0

過去 7 日: 4

過去 30 日: 12

今までの合計 1,245