メインコンテンツにスキップ

Creative Zen MicroPhoto Motherboard Replacement

必要な工具と部品

  1. Creative Zen MicroPhoto Motherboard Replacement, Sliding Off the Back Cover: 手順 1、 1の画像 1
    • Slide off the back cover to reveal the battery.

  2. Creative Zen MicroPhoto Motherboard Replacement, Removing the Battery: 手順 2、 1の画像 1
    • Removal of the battery may require some force.

    • Beginning with the notch directly beneath the battery, use the plastic opening tool to loosen the battery.

    • Once the battery is free, remove it from the device.

  3. Creative Zen MicroPhoto Motherboard Replacement, Separating the Front Cover: 手順 3、 1の画像 1
    • Turn over the device.

    • Use the plastic opening tool to separate the front and back covers.

    • Move the opening tool around the perimeter of the device until the front cover detaches.

  4. Creative Zen MicroPhoto Motherboard Replacement, Removing the Front Cover/Keypad: 手順 4、 1の画像 1
    • Slowly detach the front cover from the rest of the device to reveal the interior.

  5. Creative Zen MicroPhoto Motherboard Replacement, Disassembling the Internal Device: 手順 5、 1の画像 1
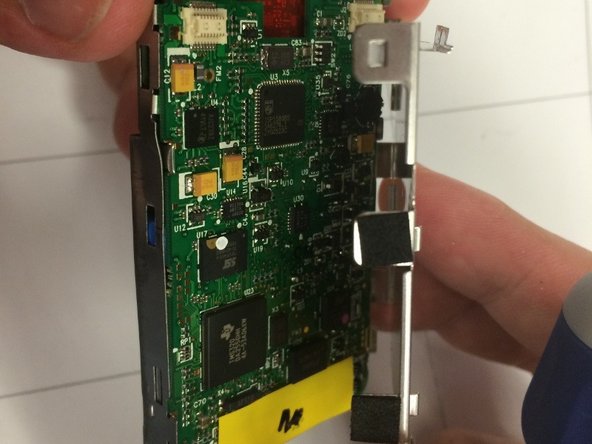
    • Insert the flat-head screwdriver into the notch on the bottom of the device. Pry the main board and screen from the outer shell of the device.

  6. Creative Zen MicroPhoto Motherboard Replacement, Removing the Main Board and Screen from the Device: 手順 6、 1の画像 1
    • The power button will come loose upon removal of outer shell. When reassembling, align power button properly.

    • Remove the main board and screen from the outer shell.

  7. Creative Zen MicroPhoto Motherboard Replacement, Taking off the Back Cover of the Main Board: 手順 7、 2の画像 1 Creative Zen MicroPhoto Motherboard Replacement, Taking off the Back Cover of the Main Board: 手順 7、 2の画像 2
    • No tools are needed. The prongs (pictured) will release easily to remove the back cover.

    • Carefully remove the back cover.

  8. Creative Zen MicroPhoto Motherboard Replacement, Removing the Main Board from the Screen: 手順 8、 1の画像 1
    • Be gentle when removing the main board. The main board is attached to the front panel of the device by wires.

    • Using the flat-head screwdriver, carefully pry open the prongs on the sides of the device, and remove the main board from the screen.

  9. Creative Zen MicroPhoto Motherboard Replacement, Removing the Main Board from the Device: 手順 9、 3の画像 1 Creative Zen MicroPhoto Motherboard Replacement, Removing the Main Board from the Device: 手順 9、 3の画像 2 Creative Zen MicroPhoto Motherboard Replacement, Removing the Main Board from the Device: 手順 9、 3の画像 3
    • Do not damage the ribbon tab (pictured). It is vital to the device.

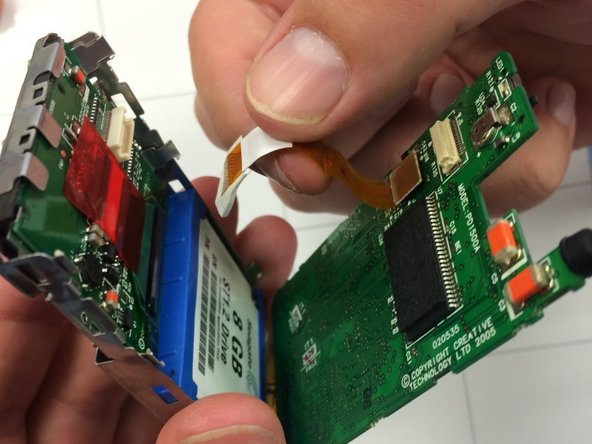
    • Push the ribbon tab (sticking out below the main screen) backward through the square hole to remove the main board of the device.

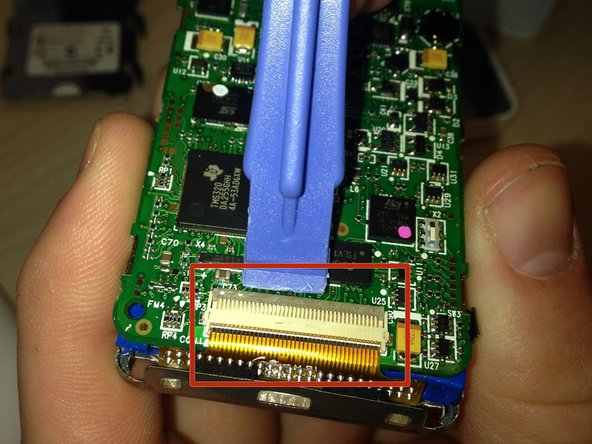
    • Once the wiring is removed from the front panel, release the hinge at the bottom of the device. To do so, gently pry underneath the clip (pictured) with a plastic opening tool. The clip will pop up, and the motherboard can be completely removed.

終わりに

To reassemble your device, follow these instructions in reverse order.

作成者

10人の作成者と共同で作成されました。

Elly

メンバー登録日: 09/30/14

174 ポイント

1ガイドが承認済み

チーム

Ohio State, Team 1-3, Buehl Fall 2014 Ohio State, Team 1-3, Buehl Fall 2014人のメンバー

OSU-BUEHL-F14S1G3

4 メンバー

2のガイドは作成済み

0 件のコメント

コメントを追加

統計データ:

過去 24時間: 0

過去 7 日: 3

過去 30 日: 14

今までの合計 1,226