メインコンテンツにスキップ

Creality Ender 3 Bracket Plate of Y-Axis Motor Replacement

必要な工具と部品

  1. Creality Ender 3  Bracket Plate of Y-Axis Motor Replacement, Bracket Plate of Y-Axis Motor: 手順 1、 1の画像 1
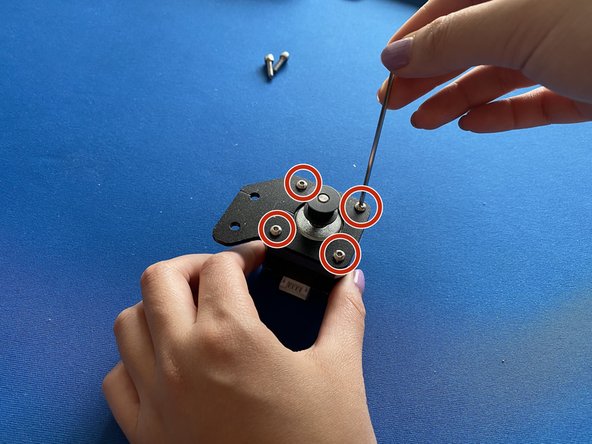
    • Place the bed plate in the middle of your Ender 3. Do this manually by gently pushing it to the middle.

  2. Creality Ender 3  Bracket Plate of Y-Axis Motor Replacement: 手順 2、 2の画像 1 Creality Ender 3  Bracket Plate of Y-Axis Motor Replacement: 手順 2、 2の画像 2
    • Or alternatively, place the bed in the center by turning your Ender 3 on.

  3. Creality Ender 3  Bracket Plate of Y-Axis Motor Replacement: 手順 3、 3の画像 1 Creality Ender 3  Bracket Plate of Y-Axis Motor Replacement: 手順 3、 3の画像 2 Creality Ender 3  Bracket Plate of Y-Axis Motor Replacement: 手順 3、 3の画像 3
    • Turn on the printer, and click the button to the screen shown in the photo.

    • Rotate the button clockwise to "Prepare".

    • Rotate the button clockwise to AutoHome. This should set your bedplate to 0 on both X & Y axes.

  4. Creality Ender 3  Bracket Plate of Y-Axis Motor Replacement: 手順 4、 1の画像 1
    • Unplug the wire that is connected to the Y motor.

  5. Creality Ender 3  Bracket Plate of Y-Axis Motor Replacement: 手順 5、 1の画像 1
    • Remove the two M4*20 screws from the back end of the Y-axis bar using an 8 mm Allen Wrench. The side of the display should be facing you.

  6. Creality Ender 3  Bracket Plate of Y-Axis Motor Replacement: 手順 6、 1の画像 1
    • Remove the four M3*6 screws that are attaching the motor to the Y-axis motor using an 8 mm Allen Wrench.

  7. Creality Ender 3  Bracket Plate of Y-Axis Motor Replacement: 手順 7、 1の画像 1
    • Buy a new bracket with the same brand (depending on the severity of the bend of the bracket) or straighten the metal on your own.

  8. Creality Ender 3  Bracket Plate of Y-Axis Motor Replacement: 手順 8、 2の画像 1 Creality Ender 3  Bracket Plate of Y-Axis Motor Replacement: 手順 8、 2の画像 2
    • If you choose to fix it on your own, slip the bracket in between a workshop bench clamp. Apply enough pressure between two thick blocks of metal to straighten it.

    • Use vise-grips to aid in stabilizing the metal as you force the metal to straighten.

  9. Creality Ender 3  Bracket Plate of Y-Axis Motor Replacement: 手順 9、 2の画像 1 Creality Ender 3  Bracket Plate of Y-Axis Motor Replacement: 手順 9、 2の画像 2
    • Repeat, Steps 6-11 in reverse to put the bracet back on the Y motor and back on the Ender 3.

    • Turn on Ender 3 to see if you did it correctly. Try to also print something too!

終わりに

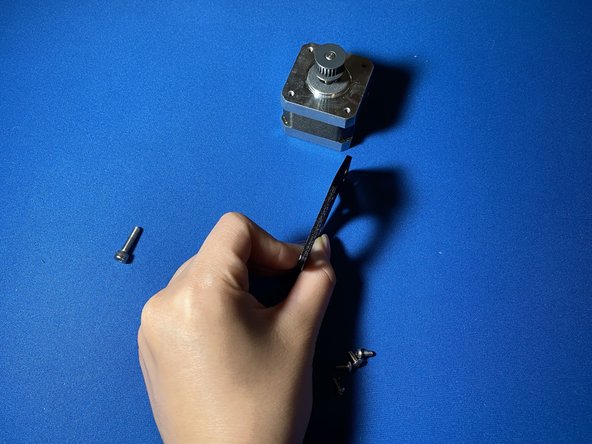
To reassemble your device, follow these instructions in reverse order.

作成者

1人の作成者と共同作成されました。

Isabella Bianca Reano

メンバー登録日: 04/18/21

169 ポイント

1ガイドが承認済み

チーム

University of Memphis, Team S48-G21, Kim Spring 2021 University of Memphis, Team S48-G21, Kim Spring 2021人のメンバー

UM-KIM-S21S48G21

1 メンバー

2のガイドは作成済み

0 件のコメント

コメントを追加

統計データ:

過去 24時間: 1

過去 7 日: 15

過去 30 日: 63

今までの合計 1,755