メインコンテンツにスキップ

Cosori Pro II Power Cord Replacement

必要な工具と部品

  1. Cosori Pro II Power Cord Replacement, Shell: 手順 1、 1の画像 1
    • Flip the device upside down and remove all of the Phillips #1 screws.

  2. Cosori Pro II Power Cord Replacement: 手順 2、 2の画像 1 Cosori Pro II Power Cord Replacement: 手順 2、 2の画像 2
    • Use an opening tool to push on the retaining hooks to disengage them while prying slightly.

    • Remove the panel.

  3. Cosori Pro II Power Cord Replacement: 手順 3、 1の画像 1
    • Use a Phillips #1 screwdriver to remove all four screws.

    • Lift off the bracket.

    • When lifting this off be careful to not unplug the screen.

  4. Cosori Pro II Power Cord Replacement: 手順 4、 2の画像 1 Cosori Pro II Power Cord Replacement: 手順 4、 2の画像 2
    • Use a Phillips #0 screwdriver to remove all the screws connecting to the shell.

    • Dissemble the shell going up to separate the basket holder.

  5. Cosori Pro II Power Cord Replacement: 手順 5、 2の画像 1 Cosori Pro II Power Cord Replacement: 手順 5、 2の画像 2
    • Use a Phillips #0 screwdriver and the 150 mm Flex Extension to unscrew the bottom plastic connecting to the basket holder.

    • Be careful to not apply too much force to the metal as it can cause it to warp it, and so it is easy rescrew the plastic piece in place.

  6. Cosori Pro II Power Cord Replacement: 手順 6、 2の画像 1 Cosori Pro II Power Cord Replacement: 手順 6、 2の画像 2
    • Pull the bottom shell down pulling at the sides to get them over screw holes.

  7. Cosori Pro II Power Cord Replacement, Heating Coil: 手順 7、 1の画像 1
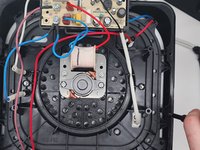
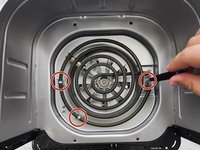
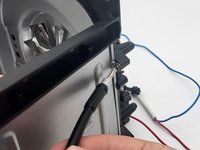
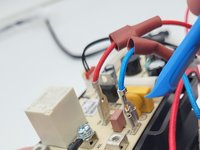
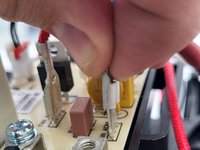
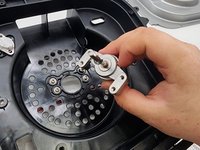
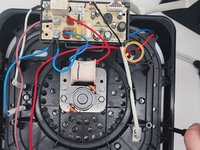
    • Remove the screws holding the cables into the distribution board with a Phillips #2 screwdriver.

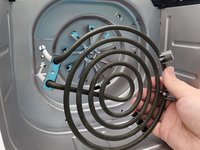
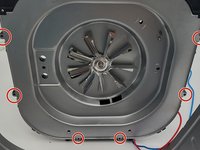
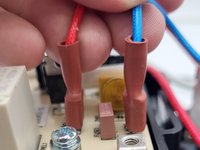
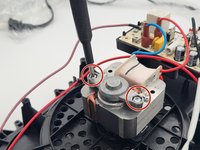
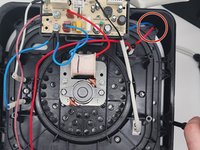
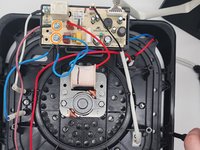
    • Remove the 2 cables that connect the heating coil to the distribution board on the top of the cooking chamber, there should be one blue and one white cable, both with a white shroud leading into the cooking chamber.

  8. Cosori Pro II Power Cord Replacement: 手順 8、 2の画像 1 Cosori Pro II Power Cord Replacement: 手順 8、 2の画像 2
    • Flip the device backward so the metal walls appear in a U-shape.

    • Remove the 3 screws inside the cooking chamber that hold the heating coil in place using a 2 Philips screwdriver.

    • Remove the heating coil.

  9. Cosori Pro II Power Cord Replacement, Motor/fan: 手順 9、 2の画像 1 Cosori Pro II Power Cord Replacement, Motor/fan: 手順 9、 2の画像 2
    • Remove the walls of the cooking chamber to get easier access to the fan.

  10. Cosori Pro II Power Cord Replacement: 手順 10、 3の画像 1 Cosori Pro II Power Cord Replacement: 手順 10、 3の画像 2 Cosori Pro II Power Cord Replacement: 手順 10、 3の画像 3
    • Squeeze and disconnect the connectors.

    • Press the tab on the disconnector down then carefully pull it off to remove the wires from the board.

  11. Cosori Pro II Power Cord Replacement: 手順 11、 2の画像 1 Cosori Pro II Power Cord Replacement: 手順 11、 2の画像 2
    • Use a Phillips screwdriver to remove the two screws from the motor.

  12. Cosori Pro II Power Cord Replacement: 手順 12、 1の画像 1
    • Remove the screws securing the heat detector using a Phillips #1 screwdrivers.

  13. Cosori Pro II Power Cord Replacement: 手順 13、 1の画像 1
    • Using a 3/8" socket, unscrew the hex nut holding the fan in place, making sure to not apply to much pressure on the fan to avoid warping.

  14. Cosori Pro II Power Cord Replacement: 手順 14、 2の画像 1 Cosori Pro II Power Cord Replacement: 手順 14、 2の画像 2
    • Remove each piece to the roof of the cooking chamber.

  15. Cosori Pro II Power Cord Replacement: 手順 15、 2の画像 1 Cosori Pro II Power Cord Replacement: 手順 15、 2の画像 2
    • Use a Phillips #2 screwdriver to remove the screws securing the motor.

    • Remove the motor.

  16. Cosori Pro II Power Cord Replacement, Cord: 手順 16、 3の画像 1 Cosori Pro II Power Cord Replacement, Cord: 手順 16、 3の画像 2 Cosori Pro II Power Cord Replacement, Cord: 手順 16、 3の画像 3
    • Unhook the wires from the plastic hook.

    • Remove the two Phillips #2 screws that secure the blue and pink cables.

    • Use a Phillips #1 screwdriver to remove the single screw.

  17. Cosori Pro II Power Cord Replacement: 手順 17、 1の画像 1
    • Use a Phillips #0 screwdriver to remove the two screws that secure the cylinder.

  18. Cosori Pro II Power Cord Replacement: 手順 18、 2の画像 1 Cosori Pro II Power Cord Replacement: 手順 18、 2の画像 2
    • Push the cylinder out.

    • Apply force to the hook on the connectors to take off the wires.

終わりに

To reassemble your device, follow these instructions in reverse order.

作成者

2人の作成者と共同で作成されました。

Matthewmm

メンバー登録日: 08/28/24

335 ポイント

2のガイドは作成済み

チーム

University of North Texas, Team 7-1, Kilpatrick Fall 2024 University of North Texas, Team 7-1, Kilpatrick Fall 2024人のメンバー

UNT-KILPATRICK-F24S7G1

3 メンバー

5のガイドは作成済み

0件のガイドコメント

コメントを追加

統計データ:

過去 24時間: 0

過去 7 日: 11

過去 30 日: 60

今までの合計 600