メインコンテンツにスキップ

Core Assembly Removal

必要な工具と部品

  1. Core Assembly Removal, Unfasten the back cover screws: 手順 1、 1の画像 1
    • Before starting repairs, take your watch off the charger and power it down.

    • Use a Tri-point Y00 driver to unfasten the four screws on the back of the watch.

    • Don’t worry about removing the screws, they will stay in place in the back cover.

  2. Core Assembly Removal, Wedge open the back cover: 手順 2、 2の画像 1 Core Assembly Removal, Wedge open the back cover: 手順 2、 2の画像 2
    • Insert an opening tool between the back cover and the metal housing.

    • Twist the opening tool to create a wider gap.

    • Don't fully remove the back cover just yet. The sensor flex cable is still connected to the motherboard.

  3. Core Assembly Removal, Disconnect the sensor flex cable: 手順 3、 3の画像 1 Core Assembly Removal, Disconnect the sensor flex cable: 手順 3、 3の画像 2 Core Assembly Removal, Disconnect the sensor flex cable: 手順 3、 3の画像 3
    • Lay the watch face down.

    • Carefully lift the back cover up from the edge with the buttons to access the sensor connector.

    • Use the flat end of a spudger to pry up and disconnect the sensor flex cable from the motherboard.

  4. Core Assembly Removal, Remove the back cover: 手順 4、 2の画像 1 Core Assembly Removal, Remove the back cover: 手順 4、 2の画像 2
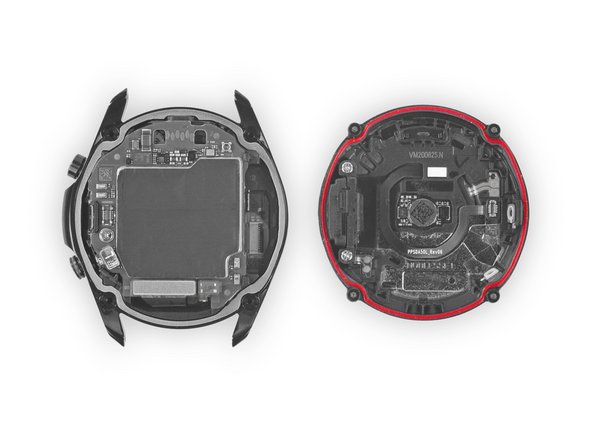
    • Remove the back cover.

    • Make sure the rubber gasket (marked red) is undamaged. If damaged replace it with a new one during reassembly to maintain proper water resistance.

  5. Core Assembly Removal, Unplug the display connector: 手順 5、 2の画像 1 Core Assembly Removal, Unplug the display connector: 手順 5、 2の画像 2
    • Use the flat end of a spudger to pry up and disconnect the display flex cable from the motherboard.

  6. Core Assembly Removal, Loosen the core assembly: 手順 6、 2の画像 1 Core Assembly Removal, Loosen the core assembly: 手順 6、 2の画像 2
    • The core's plastic frame fits tightly within the watch's metal housing.

    • Place the corner of the flat end of a spudger in the small opening of the barometric sensor, on the opposite side of the display connector.

    • Twist and tilt the spudger to lever the core assembly out of the metal housing.

  7. Core Assembly Removal, Remove the core assembly: 手順 7、 3の画像 1 Core Assembly Removal, Remove the core assembly: 手順 7、 3の画像 2 Core Assembly Removal, Remove the core assembly: 手順 7、 3の画像 3
    • Carefully thread the display flex cable through the gap on the core's plastic frame.

    • Remove the core assembly.

終わりに

To reassemble your device, follow these instructions in reverse order.

Tobias Isakeit

メンバー登録日: 03/31/14

117,763 ポイント

188のガイドは作成済み

チーム

Master Techs Master Techs人のメンバー

Community

322 メンバー

2,545のガイドは作成済み

0 件のコメント

コメントを追加

統計データ:

過去 24時間: 0

過去 7 日: 7

過去 30 日: 17

今までの合計 956