メインコンテンツにスキップ

このバージョンは誤った内容を含んでいる可能性があります。最新の承認済みスナップショットに切り替えてください。

必要な工具と部品

  1. この手順は未翻訳です。 翻訳を手伝う。

    : 手順 1、 2の画像 1 : 手順 1、 2の画像 2
    • Turn the phone with the back cover facing towards you.

    • Carefully remove the back cover by holding one corner of the case and carefully pulling it away from the phone.

    • The plastic case and inner components can break if not pulled carefully, so pull cautiously.

  2. この手順は未翻訳です。 翻訳を手伝う。

    : 手順 2、 1の画像 1
    • Remove the back cover from your device.

  3. この手順は未翻訳です。 翻訳を手伝う。

    : 手順 3、 1の画像 1
    • Find the gap on the bottom of the battery.

    • With a tool or with your hands, pull the battery upward and set it aside safely.

    • Remember to return the battery once you are done, safely placing it in the correct position or as how you first saw it.

    • Be careful with old or damaged batteries and dispose of it appropriately

  4. この手順は未翻訳です。 翻訳を手伝う。

    : 手順 4、 2の画像 1 : 手順 4、 2の画像 2
    • Remove all fifteen screws using the Phillips #000 screwdriver.

    • Remove the back panel after all screws are removed.

  5. この手順は未翻訳です。 翻訳を手伝う。

    : 手順 5、 3の画像 1 : 手順 5、 3の画像 2 : 手順 5、 3の画像 3
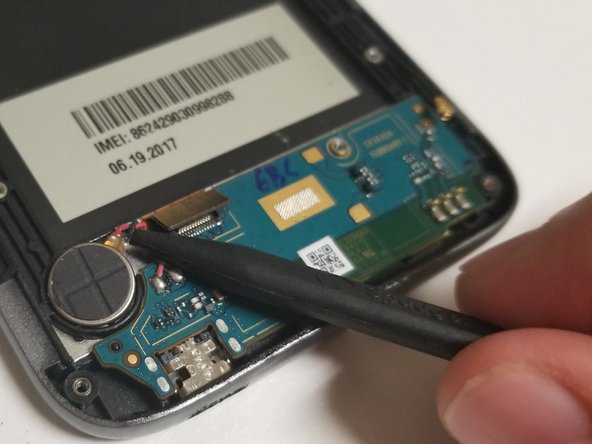
    • Disconnect the metal cable using the plastic spudger.

    • The remove the glued down speaker from the backing.

    • Disconnect the little black wire from lower logic board.

  6. この手順は未翻訳です。 翻訳を手伝う。

    : 手順 6、 1の画像 1
    • Using the plastic spudger remove the lower logic board because the only thing that is holding it down is glue.

ゴール

作成者

1人の作成者と共同作成されました。

Elijah Gastin

メンバー登録日: 09/21/18

100 ポイント

1ガイドが承認済み

チーム

University of North Texas, Team S5-G6, Thompson Fall 2018 University of North Texas, Team S5-G6, Thompson Fall 2018人のメンバー

UNT-THOMPSON-F18S5G6

3 メンバー

10のガイドは作成済み

0 件のコメント

コメントを追加

統計データ:

過去 24時間: 0

過去 7 日: 4

過去 30 日: 4

今までの合計 454