メインコンテンツにスキップ

Connect Four Electronic Handheld Back Casing Replacement

必要な工具と部品

  1. Connect Four Electronic Handheld Back Casing Replacement, Ensure the device is off.: 手順 1、 1の画像 1
    • Make sure the Connect Four Electronic Handheld is off by allowing it to shut off automatically.

  2. Connect Four Electronic Handheld Back Casing Replacement, Removing the battery casing.: 手順 2、 2の画像 1 Connect Four Electronic Handheld Back Casing Replacement, Removing the battery casing.: 手順 2、 2の画像 2
    • Using a Phillips head screwdriver, remove the (9.1mm length) #2 screw in the middle of the battery casing.

    • Slide the cover off and remove the battery.

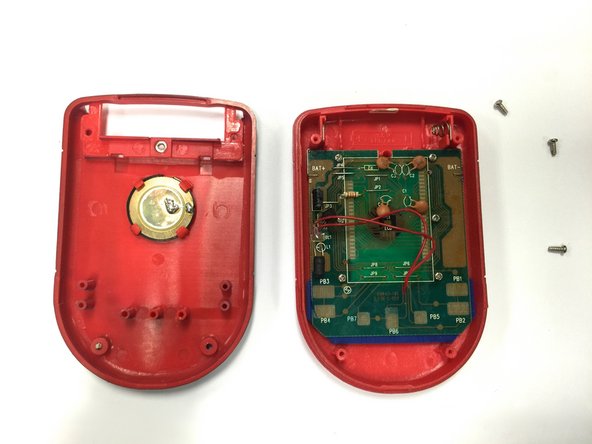
  3. Connect Four Electronic Handheld Back Casing Replacement, Removing/Replacing the Back Casing: 手順 3、 2の画像 1 Connect Four Electronic Handheld Back Casing Replacement, Removing/Replacing the Back Casing: 手順 3、 2の画像 2
    • Using a Phillips head screwdriver, remove the four (7.1mm- length) #3 screws that hold the back casing in place.

    • Carefully remove the back casing.

    • When removing the back casing, make sure not to rupture the wires that connect the speaker to the circuit board.

終わりに

To reassemble your device, follow these instructions in reverse order.

作成者

3人の作成者と共同で作成されました。

Wil

メンバー登録日: 10/22/14

313 ポイント

3のガイドは作成済み

チーム

Baylor, Team 8-11, Williams Fall 2014 Baylor, Team 8-11, Williams Fall 2014人のメンバー

BU-WILLIAMS-F14S8G11

3 メンバー

12のガイドは作成済み

0 件のコメント

コメントを追加

統計データ:

過去 24時間: 0

過去 7 日: 1

過去 30 日: 1

今までの合計 112