メインコンテンツにスキップ

Coby DVD-R11000 Fuse Replacement

必要な工具と部品

  1. Coby DVD-R11000 Fuse Replacement, Outer Casing: 手順 1、 3の画像 1 Coby DVD-R11000 Fuse Replacement, Outer Casing: 手順 1、 3の画像 2 Coby DVD-R11000 Fuse Replacement, Outer Casing: 手順 1、 3の画像 3
    • Remove the four 1cm screws, two on each side, of the DVD player with the Phillips #1 screwdriver.

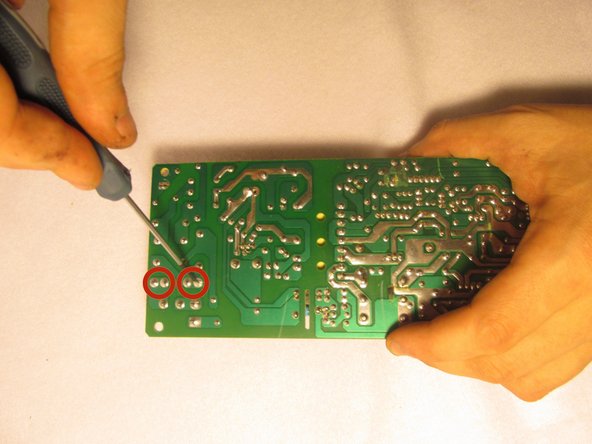
    • Remove the five 1cm screws on the back of the DVD player with the Phillips #1 screwdriver.

    • It is not required to remove the other seven screws in the middle between the I/O ports.

  2. Coby DVD-R11000 Fuse Replacement: 手順 2、 3の画像 1 Coby DVD-R11000 Fuse Replacement: 手順 2、 3の画像 2 Coby DVD-R11000 Fuse Replacement: 手順 2、 3の画像 3
    • Position the DVD player so that the back is facing you

    • Grab underneath the sides of the DVD player and lift the front of it upwards.

    • Carefully pull the top of the casing off

  3. Coby DVD-R11000 Fuse Replacement, 3-Pin Power Cable: 手順 3、 2の画像 1 Coby DVD-R11000 Fuse Replacement, 3-Pin Power Cable: 手順 3、 2の画像 2
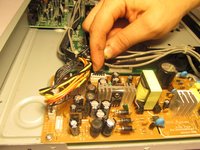
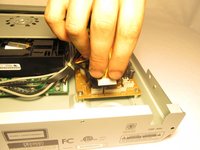
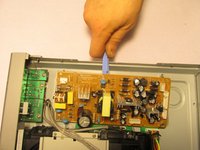
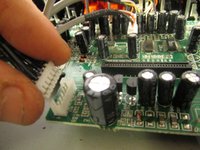
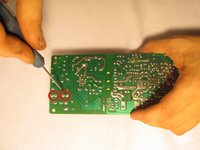
    • Gently pinch the 3-pin white adapter of the wire connecting the power cord to the circuit board.

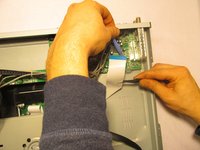
    • Remove the wire from the circuit board.

  4. Coby DVD-R11000 Fuse Replacement, Circuit Boards: 手順 4、 2の画像 1 Coby DVD-R11000 Fuse Replacement, Circuit Boards: 手順 4、 2の画像 2
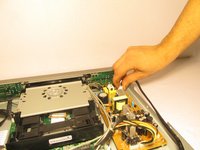
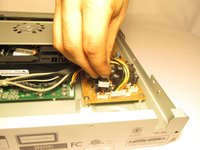
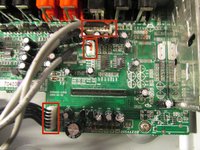
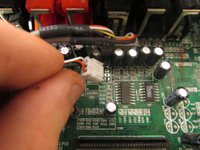
    • Position the DVD player so that the side with golden circuit board, where the power cord was plugged into, is closest to you.

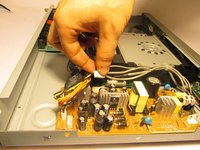
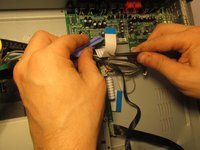
    • Remove the black wire with the 6-pin white adapter, which is adjacent to the other three pin adapter wires on the golden circuit board.

  5. Coby DVD-R11000 Fuse Replacement: 手順 5、 3の画像 1 Coby DVD-R11000 Fuse Replacement: 手順 5、 3の画像 2 Coby DVD-R11000 Fuse Replacement: 手順 5、 3の画像 3
    • Position the DVD player so that the back panel is facing you.

    • Remove the three wires with the white pin adapters from the golden circuit board.

  6. Coby DVD-R11000 Fuse Replacement: 手順 6、 3の画像 1 Coby DVD-R11000 Fuse Replacement: 手順 6、 3の画像 2 Coby DVD-R11000 Fuse Replacement: 手順 6、 3の画像 3
    • Remove the four half inch screws, located at each corner of the golden circuit board, using the Phillips #1 screwdriver.

    • Place the blue plastic tool opener underneath the side of the circuit board and carefully remove it from the DVD player.

  7. Coby DVD-R11000 Fuse Replacement: 手順 7、 3の画像 1 Coby DVD-R11000 Fuse Replacement: 手順 7、 3の画像 2 Coby DVD-R11000 Fuse Replacement: 手順 7、 3の画像 3
    • Position the DVD player so that the front is facing you.

    • Using the tweezers and the blue plastic opening tool, disconnect the ribbon cables from the green circuit board where the I/O ports are attach to.

  8. Coby DVD-R11000 Fuse Replacement: 手順 8、 3の画像 1 Coby DVD-R11000 Fuse Replacement: 手順 8、 3の画像 2 Coby DVD-R11000 Fuse Replacement: 手順 8、 3の画像 3
    • Remove the three wires with the white pin adapters from the green circuit board that you just disconnected the ribbon wires from.

  9. Coby DVD-R11000 Fuse Replacement: 手順 9、 3の画像 1 Coby DVD-R11000 Fuse Replacement: 手順 9、 3の画像 2 Coby DVD-R11000 Fuse Replacement: 手順 9、 3の画像 3
    • Remove the seven 1cm screws located on the back panel of the outer casing, in between the I/O ports, with the Phillips #1 screwdriver

    • Grab the sides of the back panel and remove it from the DVD player.

  10. Coby DVD-R11000 Fuse Replacement: 手順 10、 2の画像 1 Coby DVD-R11000 Fuse Replacement: 手順 10、 2の画像 2
    • Remove the two 1cm screws that are circled in red.

    • Place the blue plastic tool opener underneath the side of the circuit board and carefully remove it from the DVD player.

  11. Coby DVD-R11000 Fuse Replacement, Fuse: 手順 11、 2の画像 1 Coby DVD-R11000 Fuse Replacement, Fuse: 手順 11、 2の画像 2
    • De-solder the electronic components that are circled in red from the golden circuit board, which is the first one you removed.

終わりに

To reassemble your device, follow these instructions in reverse order.

作成者

1人の作成者と共同作成されました。

Andrew

メンバー登録日: 10/22/14

501 ポイント

5のガイドは作成済み

チーム

UMass Dartmouth, Team 1-6, Shastany Fall 2014 UMass Dartmouth, Team 1-6, Shastany Fall 2014人のメンバー

UMASSD-SHASTANY-F14S1G6

4 メンバー

5のガイドは作成済み

0 件のコメント

コメントを追加

統計データ:

過去 24時間: 0

過去 7 日: 0

過去 30 日: 0

今までの合計 472