メインコンテンツにスキップ

Chromebook 15 CB3-531-C4A5 Motherboard Replacement

必要な工具と部品

  1. Chromebook 15 CB3-531-C4A5 Motherboard Replacement, Case: 手順 1、 2の画像 1 Chromebook 15 CB3-531-C4A5 Motherboard Replacement, Case: 手順 1、 2の画像 2
    • Remove the 18 Phillips screws using a screwdriver with a PH0 bit.

  2. Chromebook 15 CB3-531-C4A5 Motherboard Replacement: 手順 2、 2の画像 1 Chromebook 15 CB3-531-C4A5 Motherboard Replacement: 手順 2、 2の画像 2
    • Using a spudger, gently pry open the back from the top.

  3. Chromebook 15 CB3-531-C4A5 Motherboard Replacement, Battery: 手順 3、 1の画像 1
    • Once it is opened up, locate the battery and the cable that is attached to it.

  4. Chromebook 15 CB3-531-C4A5 Motherboard Replacement: 手順 4、 2の画像 1 Chromebook 15 CB3-531-C4A5 Motherboard Replacement: 手順 4、 2の画像 2
    • Next, unscrew the battery pack. The one screw should be located on the far right of it. This will ensure that the battery comes out easily and affectively.

  5. Chromebook 15 CB3-531-C4A5 Motherboard Replacement: 手順 5、 1の画像 1
    • Take the battery out easily for replacement.

  6. Chromebook 15 CB3-531-C4A5 Motherboard Replacement, Wireless Card: 手順 6、 1の画像 1
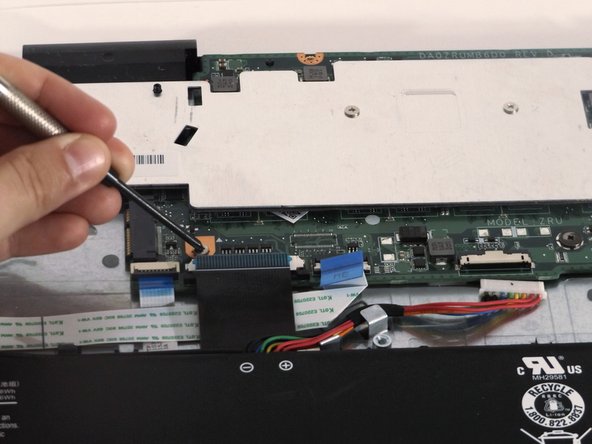
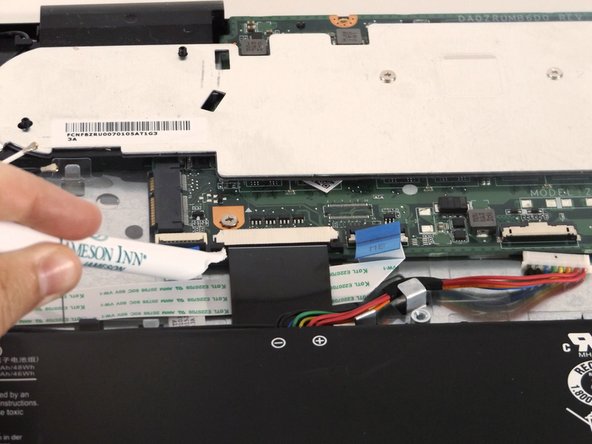
    • Remove the two antenna cables that attach the wireless card to the motherboard. One will be black and the other will be white.

  7. Chromebook 15 CB3-531-C4A5 Motherboard Replacement: 手順 7、 2の画像 1 Chromebook 15 CB3-531-C4A5 Motherboard Replacement: 手順 7、 2の画像 2
    • Locate the screw that holds the wireless card in place and then remove it using a screwdriver with a PH0 bit.

  8. Chromebook 15 CB3-531-C4A5 Motherboard Replacement: 手順 8、 1の画像 1
    • Slide the Wireless card out gently with two fingers while being careful not to damage any surrounding parts.

  9. Chromebook 15 CB3-531-C4A5 Motherboard Replacement, Motherboard: 手順 9、 2の画像 1 Chromebook 15 CB3-531-C4A5 Motherboard Replacement, Motherboard: 手順 9、 2の画像 2
    • Remove the four Phillips screws.

  10. Chromebook 15 CB3-531-C4A5 Motherboard Replacement: 手順 10、 3の画像 1 Chromebook 15 CB3-531-C4A5 Motherboard Replacement: 手順 10、 3の画像 2 Chromebook 15 CB3-531-C4A5 Motherboard Replacement: 手順 10、 3の画像 3
    • Remove tape that secures the ribbon cables.

    • Using the spudger, lift the latches to unlock each ribbon cable.

    • Remove the cables.

  11. Chromebook 15 CB3-531-C4A5 Motherboard Replacement: 手順 11、 1の画像 1
    • Remove the large black cable between the two ribbon cables.

  12. Chromebook 15 CB3-531-C4A5 Motherboard Replacement: 手順 12、 1の画像 1
    • Remove the remaining cable.

    • Remove the motherboard.

終わりに

To reassemble your device, follow these instructions in reverse order.

5 の人々がこのガイドを完成させました。

作成者

4人の作成者と共同で作成されました。

Savannah Vining

メンバー登録日: 01/17/17

922 ポイント

6のガイドは作成済み

チーム

Western Carolina University, Team 1-6, Virtue Spring 2017 Western Carolina University, Team 1-6, Virtue Spring 2017人のメンバー

WCU-VIRTUE-S17S1G6

4 メンバー

12のガイドは作成済み

コメント 1 件

RAM?

SSD?

Upgradable?

Removable?

www - 返信

コメントを追加

統計データ:

過去 24時間: 2

過去 7 日: 6

過去 30 日: 12

今までの合計 1,925