はじめに
If your Caterpillar phone dies suddenly it may be a battery failure. In order to protect the phone from power surges, it is designed to completely shut down from a battery failure. The red LED may come on when connected to a charger but it cannot power on until the battery is replaced. This guide will walk you through the process of replacing the battery to ensure that it is done safely and properly.
必要な工具と部品
-
-
There are two screws each on the top and the bottom
-
There are three screws each on the left and right.
-
Using your 1.3mm hex bit, remove all 10 screws.
-
-
-
The Caterpillar CAT S41 has 3 built-in water resistant seals, over the aux port, charging port, and combination Sim and TF/SD Card ports.
-
Loosen all 3 of these port covers.
-
-
-
The Sim Card Tray should be removed at this time. Although it is not necessary to remove, it is much more fragile than the frame and is liable to be damaged during the next steps.
-
Using a fingernail from the back side of the phone, pull the sim card tray straight out and away from the phone.
-
-
-
Make sure the phone is face down and flat on a surface to ensure no damage befalls the screen during the next steps.
-
The frame can be separated in any direction, but it is easiest to start in the more-accessible speaker hole, so this guide will assume you start there.
-
Insert an opening pick into the crack between the front half and the back half of the frame.
-
Starting on the bottom left corner, work your way around the corner. You should hear a few snaps as the locking clips are disengaged by your opening pick.
-
As the locking clips disengage, they should free up enough space to insert the opening pick in the next section. This holds true throughout the rest of the separation procedure.
-
-
-
-
Continuing clockwise, separate the top right corner of the frame.
-
Skip past the hole where the combination Sim and SD/TF Cards go, and insert your pick on the other side of the hole.
-
Skip past the orange button and insert your pick further down the frame, to finish separating the right side of the frame.
-
-
-
Continuing clockwise, separate the bottom right corner.
-
Continue all the way to the charger port, making sure to release all of the locking clips along the way.
-
Make sure all locking clips around the phone are released. Due to the force required to separate the frame, some clips may have reengaged while separating other clips.
-
-
-
Once all locking clips are disengaged, the back is very easy to remove as it is not held in with any extra adhesive or wires connecting it.
-
Lift the back of the frame straight up. If it does not lift easily, double check around the edges to ensure all locking clips are indeed disengaged.
-
The vibration motor is housed in the back of the frame, and if the back is not removed straight this motor could be damaged.
-
-
-
The battery connector is secured with a plate, and the plate is secured with a screw.
-
Using your Torx T4 bit, remove this screw.
-
-
-
After the screw is removed, the plate is held in by nothing but friction.
-
Use the tip of your opening pick to lift and remove the plate securing the battery connector in place.
-
-
-
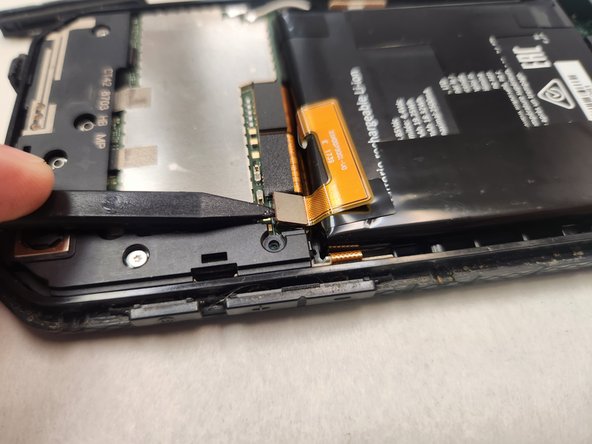
Using the tip of your spudger, lift and separate the battery connector from the connection on the motherboard.
-
Lightly bend the connector out of the way to ensure it does not inadvertently cause a connection to be reestablished.
-
-
-
Using your syringe, inject some 90%+ isopropyl alcohol near the corners of the battery to loosen the adhesive.
-
Give the alcohol a few minutes to soak into and loosen the adhesive securing the battery in place.
-
-
-
Using the flat edge of your spudger, begin prying the battery up.
-
There are two points on the right side of the battery that the flat edge of your spudger fits into nicely. Alternate between these two points to avoid too much pressure on any individual point in the battery.
-
Once the battery is lifted high enough, you can switch to the middle of the battery.
-
-
-
With the battery removed, check for any punctures or damage to the battery and take appropriate precautions as necessary.
-
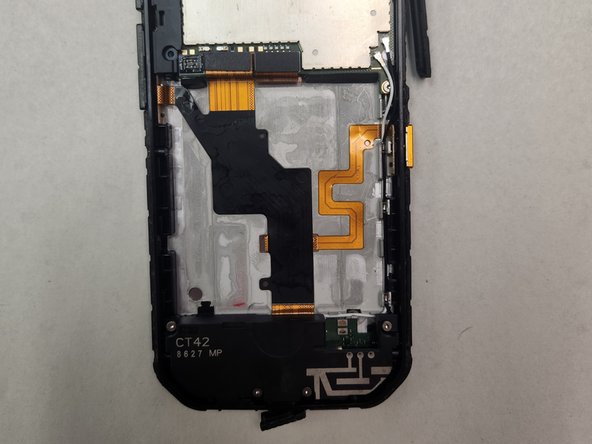
Clean up the adhesive residue from the battery compartment, and straighten the previously highlighted cable, to prepare for installing the new battery.
-


To reassemble your device, follow these instructions in reverse order.
To reassemble your device, follow these instructions in reverse order.
3 の人々がこのガイドを完成させました。

2 件のコメント
Have a nice day. I own a cat s41 phone. How can I get the original front and back case?
Unfortunately I do not know where to buy this part you need. After a search there does not seem to be any reputable vendors selling such.
The best thing I can suggest is buying a broken phone listed as "for parts" or "as/is" or "not working" or etc. If you can inspect the photos to see if the parts you need are in good condition that would work to disassemble and harvest the parts you need. I can see some listed on ebay between $25-$50 USD + shipping, but you may have better luck elsewhere or at marketplaces more local to you.